Back To Page 3 Techniques For Using the Rudder To begin with, we must stress that you do not need to use rudder if the sim does not need it…or if the sim is not programmed to respond to rudder input in the manner that you expect! This is critical. If your sim does not duplicate engine effects on takeoff, then stay off the rudder and relax! If your sim does not recognize adverse yaw when banking, then keep your feet “on the floor” when rolling into or out of turns. Since the rudder is often used to correct problems, simply put…”if it ain’t broke, don’t fix it” is the word on rudder use. Next…and this is of utmost importance. For the purposes of this article, the rudder is a secondary flight control for maintaining directional control and coordinated flight…it is not a primary flight control. Too often, I have seen folks talk about using the rudder to fly the landing approach with as the primary directional control device. This is not good! Turn the airplane with bank, then back pressure…not rudder! Countering Engine Effects on Takeoff With the advent of some recent prop sims, including Aces High and IL-2, we pilots have found a whole new challenge to air combat flying. And what might that be? Why…just getting off the ground successfully…to heck with the Red Baron! If I can just get this thing into the air, I feel like half the battle is won! The first time I tried to take off in Aces High was a humbling experience. In fact, so were the second and third times as well! After that, I sat myself down and had a little heart to heart…I mean, anyone should be able to takeoff! Right?!! Wrongo, moosebreath. Not in these sims…unless the pilot is willing to apply a little forehead to his throttle and rudder technique.  What was happening was that I was shooting the power to the plane and expecting that it would accelerate nicely down the runway, leap into the air, and be gone. If only it were that easy. Instead I got a wild ride off to the side that usually ended up in a wreck. Well, I didn’t fall off the turnip truck yesterday, so I reloaded the sim and tried a less brute force technique. This time I fed the power in slowly as I used rudder to keep the ball centered in its trace. I also kept the bird on the ground a little longer and let the speed build a bit before I tried to rotate. Then, when I did rotate to lift off, I did so smoothly and gently with continued emphasis on the centered ball. Once in the air, I kept the climb angle shallow and sucked up the gear. Some aircraft use flaps for takeoff, and I would raise them once I had gained a good head of steam.
 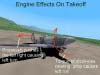 You may have had the same experience. If so, you may still be wondering what’s going on here. Well, what’s going on is that the sim flight model is attempting to give us a feel for real world engine effects, principally helical propwash and torque. These fancy terms refer to bad things that happen when a prop aircraft accelerates down the runway and tries to rotate. Without going into the gory details, let’s just say the engine propwash and the torque effect of the rotating prop combine to produce a strong force that will take us off into the boonies if we let it. Well…we’re not going to let it. Here’s how. First, we’ll prep ourselves for what’s going to happen by noting the direction of prop rotation…most fighters seem to have clockwise rotating props. The negative engine effects will always be opposite the direction of prop rotation, and the required corrective action will be in the direction of prop rotation. In the above figure, the clockwise rotating prop produces a propwash that strikes the left side of the vertical stabilizer/rudder and pushes it to the right, causing the nose to yaw left. We will counter that yaw with opposite rudder…rudder in the direction of prop rotation…in this case, right rudder.
 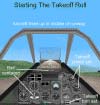 Line up carefully on the runway. Make sure you have flaps out if needed. How do you know this? Check your sim manual for the takeoff flap setting for your gross weight. If your sim has a rudder trim feature, check to see if the manual recommends a rudder trim setting for takeoff. Note your recommended takeoff power setting, either in RPM or manifold pressure. Now, begin the takeoff by smoothly advancing the throttle. No need to shove it forward…most sims have plenty of runway to use. In a taildragger (conventional gear aircraft), you should see a little of the runway to each side of the glare shield. As you roll and increase your speed, try to keep the two canopy side views of the runway equal. If one side starts to show more runway (may well be the right side due to engine effect), then you are turning away from that direction. Correct this by smoothly adding rudder pressure to return your nose to straight ahead. Crosscheck this visual reference with your ball. Keep it centered. Crosscheck your heading indicator when you begin your roll. Maintain this heading with rudder during the roll. Do not use aileron to control heading while still on the ground!
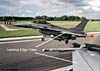
  As you gain speed in the takeoff roll, many aircraft will raise their tails by themselves…do not be in a hurry to push the stick forward to raise the nose. If the sim is programmed correctly, this will result in more nose swing. Once the tail is up, let the aircraft continue to accelerate. Under no circumstances should you attempt to force the aircraft into the air…the usual result is a quick roll into the dirt. Get some speed going (while each aircraft is different, try to have at least 100mph/160kph minimum) and then gently increase your backstick pressure. Be prepared for a tendency to roll as you lift off. This is where engine torque will rear its ugly head. A clockwise rotating prop will result in a left roll, so be ready to counter this with right aileron to hold your wings level. These adverse engine effects are most pronounced when you are slow, so maintain a shallow climb and accelerate to a minimum of 150mph/240kph as you raise your gear and flaps. Avoid sharp turns or rapid roll rates while you are slow. Here again are the main points:
- Add power slowly and smoothly, particularly if flying a prop plane.
- As you add power, concentrate on your visual and instrument references. Use rudder to keep the “ball” centered to keep going straight.
- Do not be in a hurry to lift off. In a tail dragger, let the tail come up on its own. Rudder effectiveness and yaw control are directly related to airspeed. Get sufficient speed before you attempt to break ground.
- When lifting off, rotate slowly and smoothly. Be ready to add extra rudder as needed to keep your nose going straight. If you need aileron to help hold the wings level, use it carefully…add aileron smoothly to avoid adverse yaw.
- Maintain a shallow climb angle until you have gained speed. Raise your gear but leave the flaps out a little longer before you retract them. If you have more than one level of flaps down, raise them in stages…”milk” the flaps up to further help offset any tendency to stall or “mush”.
Related Posts:
Related posts:
 Secondary Flight Controls – Flaps Page 5
 Secondary Flight Controls – Part Three: Trim
 Secondary Flight Controls – Rudder, Flaps, and Trim
 Page 2
Secondary Flight Controls – Rudder, Flaps, and Trim Page 3
Secondary Flight Controls – Rudder, Flaps, and Trim Page 5
Secondary Flight Controls – Rudder, Flaps, and Trim Page 6
Secondary Flight Controls – Rudder, Flaps, and Trim Page 7
Secondary Flight Controls – Rudder, Flaps, and Trim
Secondary Flight Controls – Rudder, Flaps, and Trim Page 2
Secondary Flight Controls – Rudder, Flaps, and Trim Page 3
Secondary Flight Controls – Rudder, Flaps, and Trim Page 5
Secondary Flight Controls – Rudder, Flaps, and Trim Page 6
Secondary Flight Controls – Rudder, Flaps, and Trim Page 7