Let’s remember what we’ve seen so far. Our flaps are tools. Tools to do certain things. Things like improve takeoff and landing performance. Or improve turn performance.
Takeoff Flap Tips
- Unless specifically directed not to use them in your sim, I suggest the use of the takeoff flaps. Some sims designate a particular position as the “takeoff” setting. Others have a range of flap positions from a three-position range to a five-position range. Use the first “notch” for a three-position system and the first or second notch for the five-position system.
- Use takeoff flaps anytime you are carrying external stores such as bombs or fuel tanks. Missiles may be excluded from this generalization.
- Use takeoff flaps anytime your runway length is shorter than normal or you want to get airborne as quick as possible. Consider using flaps for carrier takeoffs for this reason.
- As a rule, do not use WEP (War Emergency Power) for normal takeoffs when flying WW2 prop aircraft,. Remember the adverse effect of engine effects (torque, propwash, gyroscopic precession). These are more of a danger when you are slow, so do not “jerk” your aircraft into the air. Instead, fly it off as you sense that the tail is getting “light”. Maintain a shallow climb angle and accelerate to about 150mph/240kph before raising the flaps. If you have to turn immediately after takeoff, leave the flaps out during the turn. If possible, accelerate to climb speed (160-190mph/220-300kph) before increasing your pitch or turning.
- For Korean War-Vietnam War era jets, engine effects are not a factor, however, slow initial acceleration is. Be prepared for a longer takeoff roll. If available, use afterburner (AB). Non-afterburner fighters will accelerate slower and climb out at a shallower angle. This will often require you to keep the flaps out longer than is the case for jets with ABs. Fly these non-AB aircraft much the same as you would a WW2 prop plane.
- AB equipped fighters generally accelerate quickly. You can expect to raise the flaps very soon after gear retraction. Do not horse the nose up. Instead, keep a shallow angle until you have built up some speed…300KIAS minimum is a general rule of thumb. As you accelerate through 300KIAS, secure the AB and establish your climb speed. 400KIAS is a good number.
- Overall, the takeoff is not the time for aggressive maneuvers, particularly if you are heavy. Use flaps and fly the plane smoothly and cautiously until you have the flaps retracted and are at climb speed.
Landing Flap Tips
- Remember the reason for landing flaps…slower speeds, steeper approaches, power on throttle settings, reduced rollout distances, and improved visibility over the nose.
- Lower your landing gear and maneuver to the final approach glide path using the takeoff flap or “maneuver” position (one or two notches). Fly at a speed that is approximately 20% above your landing speed. For WW2 prop planes, do not extend landing flaps until the landing is certain. That means no more than about 500 feet AGL…then slow to your final approach speed. For jets, you may establish a longer final approach and put landing flaps down sooner.
- Practice flying at landing pattern speeds to familiarize yourself with the “feel” of the two flap settings (maneuver and landing flap). Practice flying a shallow descent and memorizing the “glide path picture”. Remember, your flight path will be low in the gunsight area.
- Do not “chop” power until you are in the flare. Smoothly retard the throttle to idle. Be aware of torque effects in prop planes if you cut the throttle quickly. This means for the typical prop plane that the aircraft will tend to roll to the right as the engine slows down.
- If you have to abort the landing for any reason, do not jam the throttle forward. Your final approach speed should give you a comfortable stall margin. Instead smoothly add power as you raise the nose. Once your descent is stopped, raise the gear. Then begin raising your flaps. Go first to the takeoff position and keep the flaps there until you reach normal flap retraction speed. This raising of the flaps in stages is called “milking the flaps up”.
Turn Performance Tips
- Well, takeoffs and landings are important, but what we all want to know is how to use flaps to knock the bandit’s socks off! Answers won’t be easy on this question…the sim flight models are hard to figure out in specific detail, and few model flaps the same anyway. How about some more generalizations to begin with?
- We’ll start with the practicality of using flaps. By now, you should understand that flaps are used at fairly low speeds. Here is the main question. Should you be planning on getting slow in the first place? There are no simple answers. If all you want to do is “turn and burn” in a 1v1 knife fight, then that’s one thing. But if you are engaged in a multi-bogey furball, then that may be entirely something else…you may decide that slowing down is the last thing you want to do.
- Rather than outline a bunch of options, I’ll give you my take on what might be a “best” one-size fits all plan. I like turning, but not to the point that I lose situational awareness. I like to BnZ, but not exclusively. I tend to favor a BnZ strategy until I can get a straggler cut out of the herd. Then I might consider turning a bit…but I never want to get too slow.
- OK. What does that mean? It means I stay “fast” until I see an opportunity to “slow down”. I fight a “slash and extend” fight unless the tactical situation favors a 1v1 TnB contest. Being “fast” means keeping my speed above corner velocity (CV). Getting “slow” means below CV. So, I begin by establishing some speed values. I want to know what my CV is. Now, corner velocity varies with weight and altitude, so there is no such thing as an exact CV that applies in all situations…so I’m going to make up a set of speeds that I’ll use as a basis for planning my maneuvering. These speeds will be a rough average of typical CVs for a variety of classes of fighters.
- These “classes” are the following: WW2 Light Wing Loading, WW2 Medium Wing Loading, and WW2 High Wing Loading. I’ll do the same for a range of jets. Then I’ll assume some average CVs for each class at sea level, no external stores. They look like this (and these are just “ball park” estimates):

- Next, let’s look at a typical EM diagram so that you understand the significance of where CV fits into the flight envelope. By definition, CV is the slowest speed where the plane can reach maximum G with the flaps up. Usually, the highest turn rate occurs at CV, however, the minimum turn radius may be reached below CV, particularly in WW2 aircraft.

- Previously, we have explained that it does no good to lower flaps above CV since the aircraft can already reach max G. Therefore, from a practical point of view, CV is the max speed for flap deployment, even though many fighters have flap limiting speeds (for the first one or two notches of flap) that are greater than CV.
- So, once I’ve decided to engage in a TnB fight, I use my CV “guesstimate” as the point where I drop flaps (assuming this speed is less than the documented flap limiting speed). How much flaps? One notch in a 2 or 3 position flap system…one (or two max) if I’m flying a four or five notch system.
- Once the flaps are out, how slow do I want to get? Not very slow at all! I want to stay as close as I can to CV or the max flap speed. Why? Because if you look at the EM diagram again, you see that turn rate increases fairly well between stall speed and CV while turn radius improves only marginally. The turn rate doubles from point #1 to #2 while the turn radius only changes slightly. Bottom line? You gain little by getting too far below CV.

- Now that I have the flaps out, how do I manage them? Here’s a short and sweet answer. Put the flaps out to turn, raise them when you are not turning. If you are not pulling G, then there is no reason to have the flaps out…all they do is add drag. So in a “knife fight”, think “pull G – put the flaps down”…”unload G – raise the flaps”.
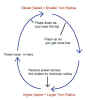
- Lastly, a word about vertical maneuvering. In a BnZ vertical move, you can use flaps to help you get “over the top”. Here are some points to keep in mind. Watch your use of power in turning at high speed. In these situations, power tends to widen your turn radius. As a rule, power is best used at the top of a vertical maneuver…not the bottom. Here’s how I do it. As I pull up into the climb, I reduce the throttle while I’m pulling G (assuming of course that I am at high speed to begin with). Once I have my nose up to the desired climb angle, I put full throttle back in and unload G if my goal is to gain altitude. I hold this until I approach my pull down point. Then I make sure I have full power in and drop one or two notches of flap as I increase back stick pressure to reverse the climb. I keep full power in and flaps out until I have my nose pointed back down again. Then, I’ll raise the flaps and go for speed. What results is something like the well-known “egg” and looks like this:
OK…so much for flap generalities. Here’s the bottom line. Use my advice as basic guidance only. Then, go out and fly your specific plane. Get a feel for how the various stages of flap affect your ability to turn and accelerate. Determine your own “flaps up and down” parameters. I’ve given you the basic “how to’s”…now you finish up by getting your own fine points.
Now, let’s move on to another one of those great unknowns…trim! Stand by for Part Three of this series for that discussion!
I’d like to thank my good buddy, Leon Smith, for the excellent work he did on preparing the EM diagrams for this article. More thanks to many of you for your comments and remarks in the several forum threads that preceeded this article. Your interest and enthusiasm is why I write these things! Finally, a big attaboy to TK Kawahito and Matt Wagner for making the upcoming sims that you have gotten a peek at here.
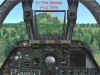
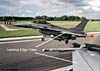
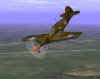
Before we go, some more great screenshots!
 |
|
Related Posts:
Related posts:
 Secondary Flight Controls – Flaps
 Page 2
Secondary Flight Controls – Flaps Page 3
Secondary Flight Controls – Flaps Page 4
Secondary Flight Controls – Flaps
Secondary Flight Controls – Flaps Page 2
Secondary Flight Controls – Flaps Page 3
Secondary Flight Controls – Flaps Page 4
 Secondary Flight Controls – Rudder, Flaps, and Trim
 Page 2
Secondary Flight Controls – Rudder, Flaps, and Trim Page 4
Secondary Flight Controls – Rudder, Flaps, and Trim Page 5
Secondary Flight Controls – Rudder, Flaps, and Trim
Secondary Flight Controls – Rudder, Flaps, and Trim Page 2
Secondary Flight Controls – Rudder, Flaps, and Trim Page 4
Secondary Flight Controls – Rudder, Flaps, and Trim Page 5