Section Three – Trim In the Simulation
Now we’re getting down to the nitty-gritty! What we’ll find in this last section is that trim comes in two types in our sims. I’ll call them, for lack of better words, auto-trim and manual trim. In the former, depending on the sim, you will basically turn the trimming problem over to the AI. In the latter, you’ll have to use the sim’s trim controls to keep your aircraft in balance. Let’s start then with a look at the types of trim that you’ll encounter in a selection of current sims.
Types of Simulation Trim
Auto-Trim. When I say “auto-trim”, I mean any of four things. One, the sim has no trim controls at all, and therefore the aircraft in the sim is always “in trim”. Two, the aircraft in the sim have computer controlled trim in real life and as a result the sim lacks any trim controls (this is the case with many modern jet fighters). Three, the sim has a feature that allows the AI to trim the aircraft for certain conditions without requiring you to operate the trim controls. The fourth situation occurs when the sim has an autopilot feature.
Most older sims fit into the first category. Some of these are still popular. European Air War and Jane’s WW2 Fighters are two examples. In these sims, the AI keeps the aircraft in trim under all conditions regardless of airspeed, attitude, or configuration considerations.
The second category includes sims such as Falcon 4 and Jane’s F-15/18. Most modern fighters have computer controlled flight control systems that keep the jet in trim in all conditions and configurations.
The third category is unique. This category is for sims that feature both manual and automatic trim. The best example is Aces High. AH has a “Combat Trim” feature that frees the pilot from having to trim for airspeed changes in general. For example, during the acceleration after takeoff, the AI retrims the elevator “nose down”. This Combat Trim feature has limitations and does not relieve the pilot from all trimming needs. Changes in aircraft pitch attitude or configuration will produce stick forces that the pilot will have to manually account for.
The fourth category deals with trimming while the AI is flying the plane on autopilot. Even though you may normally be using manual trim in the sim, once you engage the autopilot, the AI retrims the plane for whatever speed and attitude the autopilot is programmed for. Aces High has an autopilot that trims the plane in level flight, in a climb, or in a dive for the speed you select,
Manual Trim. Most sims today use a manual trim feature that tries to replicate real life, and most do a pretty good job at providing a “feel” that comes close to what a RL pilot would experience. However, with today’s flight stick technology, no sim is going to “work” like a RL aircraft trim system works. Here’s why.
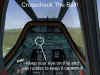
In the typical RL flight control set-up, the stick is physically connected to the flight controls (the exception being “fly by wire” systems). If the elevator is “up”, then the stick is aft of the neutral position. If the pilot is flying at slow speed, he is holding the stick back to hold the nose up. If he trims this back stick pressure off, the stick will remain in the aft of neutral position. The trim is now providing the force to hold the stick in its aft position. In these next pictures, you can see how the stick is behind the neutral position in order to hold the elevator “up”.


When we encounter this situation in our sim, we can feel the same “heavy” stick as we hold the nose up. But if we trim the nose so that these stick forces disappear, then something very different happens. The flight stick returns to the neutral position. It has to because it is spring-loaded to this position. The point is that in our sims, we are not trimming the stick. Instead, we are, in effect, trimming the picture we see on the monitor screen. If we add nose up trim as we hold the flight stick back, we will have to reduce the pressure we are holding against the stick spring. If we do not, the nose will pitch up on the screen. So, as we trim the “up” trim key or HOTAS control, we slowly relax back stick pressure until we reach a point where the pitch attitude remains steady and the stick is in the neutral position. You have now trimmed the nose for this slow speed. Check the external view and you can see the elevator is raised. Check the cockpit internal view and you will see the stick is still aft as it should be. But your flight stick is centered.
The point to keep in mind is that, unlike real life, when you trim in the sim, you return the stick to the centered position. Be sure when you change your speeds later on that you retrim to regain your original stick authority.
These screenshots came from IL-2 because that sim (along with AH ) may well have one of the more sophisticated trim functions seen today. Other sims offer manual trim however. Two, MiG Alley and Jane’s USAF, offer only pitch trim. Others, including, MS CFS2, Battle of Britain, Flanker 2, and Jane’s Attack Squadron, have trim functions for pitch, roll, and yaw.
Well…that pretty well covers the types of trim that we will see in our sims. Let’s move on now to the ways we have of making the trim input in the sim.
Making the Trim Input In the Simulation
Picture yourself motoring along. You have the power pushed up, your speed is increasing, and your nose wants to rise as a result. But you want to maintain level flight, so you turn to trim the nose “down”. Sounds good to me…but just how do you do this in a sim? And are there any limitations or shortcomings to this?
Keyboard Trim. The most common way to make a trim input is to use the keyboard. Every sim that has a trim function has a key (or keys) that are set aside for that purpose. Quite often, the “arrow keys” are used for trim…the vertical arrows for pitch trim, and the horizontal arrows for aileron trim. Rudder trim is the ” red-haired step-child” and could be assigned anywhere on the keyboard. For most sims, the keyboard trim input is a single key press per increment of trim step. Each press of the key gets a small increase in trim. The key cannot be pressed and held to make a large trim input. For example, when IL-2 first came out, it took 20 presses of the keyboard key to move the trim through its range of travel. Although time consuming, this key pressing process mimics the real life trim process fairly well. Because of this, I prefer to keep the trim function on the keyboard.
Stick/HOTAS Trim. Your other option is to use the sim’s key mapping function to “map” the trim to a flight stick button or throttle switch. While such a technique can make gameplay a little easier, it does not resemble what we experience in RL. If someone wants to remap trim to his stick, I suggest the reassignment be made to the hat switch. In RL, the hat switch is the trim button. I have replaced one of the multi-function “castle” switches on my TM F-22 Pro with a spare “coolie” hat switch and use it for pitch and aileron trim…just like I did in RL.
What I do not do is map trim to any type of slider or rotary switch on my HOTAS. In most cases, trim was not meant to be a quick or easy-to-use control. Modifying a HOTAS to permit rapid trim inputs is a poor replication of the real world as far as I’m concerned.
In any case, the idea is to use trim in our sims to make our flying easier and more enjoyable. Let’s finish off this article with some tips on how to use trim in our flying.
How and When To Trim
First, the “how”. Regardless of the situation you find yourself in, this is how to use your trim controls. In this next figure, please note that we fly with the stick and rudder and trim with the trim controls.
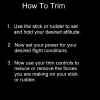
The question of “when” to trim takes us full circle in this article. We end up back with Archie and Mom on the teeter-totter. Trim is going to be a tool that we use to make our work easier. Archie used the lever to move the world…we are going to use trim to help fly the plane. Mom used her additional force to balance the teeter-totter…we are going to use the additional force of trim to balance our plane. I’ll discuss trim with regards to the following phases of flight: the takeoff, the climb and cruise, combat, and the landing.
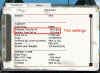
The Takeoff. Most aircraft in RL have a takeoff trim setting. Sometimes it’s a number on a dial or gauge. Sometimes it’s just a light bulb on a panel. In any case, the pilot has something to tell him that the plane is “in trim” for takeoff. This will require that he check the trim in all three axes (elevator, aileron, and rudder). Often, he has a checklist that gives the trim setting for whatever weight and configuration he has for takeoff.
In Aces High, the Combat Trim function is the default for takeoff. The pilot can check his trim gauge for proper settings.

Some sims include a takeoff checklist that replicates the RL trim procedure:
However, the fact of the matter is that takeoff trim settings are the exception and not the rule in our sims. Not a problem. Perhaps there will come a day when setting trim will be a routine matter. Until then, as long as you understand the how’s and when’s, we’ll consider it “nice to know” only.
Prop sims are far more likely a candidate for takeoff trim. The reason, of course, is that big prop spinning around and the airflow that it produces. The first of these articles…the rudder discussion…explained engine effects in some detail. Rudder is used to correct for some of these effects, and rudder trim is used to help the pilot put in and maintain the required amount of rudder. Re-read that article, if needed to refresh your memory of engine effects.
You may also find that pitch trim is needed for the takeoff. The amount of trim will vary with aircraft weight and is intended to help the pilot rotate the nose up at liftoff speed. At present, pitch trim is not an issue in our sims.
So trim in the takeoff is all a matter of modeling and documentation. As sims become more complex, you may find that you have to refer to the sim’s documentation to find the preset trim values to use. Until then, file this away for future use.
The Climb and Cruise. Earlier in this article, I mentioned that we really trimmed for an angle of attack. This was in reference to pitch trim only. In the climb and in cruise, generally speaking, we plan to fly at an optimum speed…best climb or best endurance, etc. At this speed, you will hold a pitch attitude that requires a certain elevator deflection. This elevator deflection will probably not be the neutral position of the fight stick…you will have to hold the stick out of the neutral position to maintain the desired attitude. Unless you want to develop big muscles, I suggest you use pitch trim to relieve those stick forces. Here’s how you do that.
Once your pitch attitude is set, then set your climb or cruise power…remember that throttle settings affect the balance of the plane, often in all three axes…so smoothly add power until you reach the desired RPM or manifold setting. As a rule, do not use afterburner or WEP for climbs unless you have an urgent need to get to altitude. You’ll use too much fuel and subject your engine to overheating if you do. Every plane has an optimum climb speed. For WW2 planes, this was about 150-190mph. A typical jet fighter will climb at 350-400KIAS.
Your weight will affect your climb attitude and climb rate. Start off at around 10 degrees of pitch (use the attitude indicator to determine this). Hold this attitude using outside references…note the position of the horizon line and try to keep it steady on your forward view.

Then note your stick position…it’s probably slightly aft of neutral. Relax a little back pressure. Does the nose want to drop? Probably so. If this is the case, tap in two or three clicks of nose up trim. Then repeat the process…relax back pressure and check the nose position. If it still drops slightly, add a couple more clicks of nose up trim.
Eventually, you will reach a point where the nose stays on the horizon where you want it. You are now trimmed in pitch. Now, keep this in mind. As you climb higher and higher, you will have to lower your pitch attitude to maintain the same speed. If you find your speed beginning to bleed off, lower your nose a few degrees and retrim.
Aileron trim in the climb or in cruising flight is usually not a big deal. If you notice one wing seems heavier than the other, then hold the wings level and trim the aileron into the direction of the light wing…in other words, if the left wing wants to drop, press the right aileron trim key. You may have to add a number of trim clicks until the trim setting holds the wings level and you have returned the flight stick to the neutral aileron position.
Rudder trim can be a little more difficult to see the need for. There are two ways of seeing this. One is that your heading is changing even though you are in wings level flight. The other is to check the ball in the turn and slip indicator. If the ball is out of the center position, then you need rudder trim. The proper technique is to “step on the ball” and then trim… but with rudder in our sims, you need not center the ball with your rudder control (pedals or stick twist grip). It is OK just to tap in the proper trim inputs…if the ball is off to the right, use the right rudder trim key. Tap in your rudder clicks until the ball is centered (or the plane stops turning). One note. You may have to retrim the aileron after trimming the rudder. This is because of the aerodynamic connection between yaw and roll (dihedral effect). This is in fact how I trim the rudder in the airliner that I fly today.
Remember also that balance around the vertical axis (yaw) is affected by power setting for prop aircraft. You may see more of a need for rudder trim when operating at high power settings, depending on your sim’s flight model.
Related Posts:

Related posts:
 Secondary Flight Controls – Part Three: Trim Page 2
Secondary Flight Controls – Part Three: Trim Page 3
Secondary Flight Controls – Part Three: Trim Page 4
Secondary Flight Controls – Part Three: Trim Page 6
Secondary Flight Controls – Part Three: Trim Page 2
Secondary Flight Controls – Part Three: Trim Page 3
Secondary Flight Controls – Part Three: Trim Page 4
Secondary Flight Controls – Part Three: Trim Page 6
 Secondary Flight Controls – Rudder, Flaps, and Trim
 Page 4
Secondary Flight Controls – Rudder, Flaps, and Trim Page 5
Secondary Flight Controls – Rudder, Flaps, and Trim Page 6
Secondary Flight Controls – Rudder, Flaps, and Trim
Secondary Flight Controls – Rudder, Flaps, and Trim Page 4
Secondary Flight Controls – Rudder, Flaps, and Trim Page 5
Secondary Flight Controls – Rudder, Flaps, and Trim Page 6