|
Feature Article
A Practical Guide to Missile Evasion Training
in Falcon 4.0
by Mark
"Boxer" Doran
Practice,
practice and more practice. That's an appropriate mantra for
learning to be an effective pilot in the Falcon 4 universe.
In some ways, the black art of missile evasion is perhaps
the epitome of the requirement. Arguably, the evasion of missiles
is one of the most challenging aspects of the entire Falcon
4 experience. If you, like me, have been experiencing a little
frustration at the hands of the SAMs, take heart…they
can be beaten, with a little structured practice.
The purpose
of this article is to share some specific advice on how to
beat a couple of the SAM types in the Falcon 4 universe. In
the process, we will discuss some specific tools and techniques
that will help you keep your virtual jet in one piece. Finally,
there are some suggestions on how to practice and get better
at evading those pesky SAMs. With luck, you may be able to
apply the ideas to your own practice and then tell me how
best to beat some of the other missile types.
Of course there's the sound tactical
argument: stay out of threat areas and you won't have to evade
missiles. You should, of course, do this as a matter of course.
Don't overfly known SAM sites. Never fly between 500 feet
and 10,000 feet over enemy territory. Never fly in straight
lines for more than a few seconds. Sound tactics one and all,
which work nicely in the mission-planning phase, but often
SAM threat location intelligence is imperfect or fighters
pop up and wreck your nice safe medium altitude ingress flight
plan. Suffice it to say that at some point, even with the
best planning to avoid it, you will eventually end up in the
heart of a SAM battery's engagement envelope. When that happens,
it is best to be prepared.
By now you have probably read a lot
of other material about missile evasion, so you will know
about the need to beam radar guided missiles and that showing
a "zone five" afterburner-can to a heat seeker is
a recipe for a bad day. You may even have read the diatribe
about missile evasion in Shaw's "Fighter Combat"
and thus be familiar with the notion of barrel rolling about
a missile's approach axis in the terminal homing phase to
shake off said missile. If you are looking for more help in
the theory department, Shaw's book is excellent. And, of course,
don't forget the Falcon 4 manual: there's a good explanation
of missile function in Pete Bonanni's training mission description
starting on page 7-2.
Well, the theory is all very well,
but what does beaming look like from the pilot's-eye view
in Falcon 4? And how do you use the view and other situational
awareness tools in the game to affect a good beaming maneuver?
And what if beaming isn't enough to shake the threat?
Make the Padlock View Work for You
Assuming a missile within visual range,
absolutely the most important thing is to get your "Mark
I" eyeball on the incoming weapon. Only then can you
evaluate the threat and react effectively to defeat it. The
first and most valuable tool in the battle is the padlock
view.
If you are using Realistic padlock,
you should probably give serious consideration to switching
to Enhanced mode. Enhanced padlock is about the only reasonable
way you will be able to lock quickly onto a freshly-launched
SAM that has your name on it. Most of the people I know flying
Falcon 4 who count themselves in the "hard core"
crowd normally shun game settings that are less than maximum
possible on the realism scale. Even so, it seems that everyone
has decided that Enhanced padlock is the only way to go if
you are to survive.
That said, there are a couple of tricks
to using the Enhanced padlock effectively that can improve
your chances dramatically. First, it is important to understand
what the manual means when it says the padlock view will lock
onto successive targets, highest priority threat first, followed
by the next highest and so on with each press of the padlock
key ("4" in this case).
What this means in practice is that
the game calculates the priority list each time you enter
the padlock view and subsequent "4" key presses
move on down the threat list.
What it also means is that if you
are already in padlock, say lining up a juicy T-62, and a
SAM is then launched at you, the next press of the padlock
key will NOT switch you to the incoming missile. While in
may be tempting to think that each padlock key press should
take your eye to the highest threat at that given moment,
that isn't how it works.
If you want to be sure that you latch
onto the highest priority target at any given moment, you
need to be in some other view and then enter padlock view
to be sure if getting the most urgent threat in view. Thus,
if you are in fact already in padlock view when you get a
launch warning, you must leave padlock view and reenter it
to be sure of latching onto the newly launched threat. At
least by observation that seems to be the way it works.
The keypad plus and minus keys don't
help you either, even though you might think they should.
Now, pressing minus does in fact take you to higher priority
threats. The trouble is that when you reach the number one
threat, a subsequent press of the minus key will wrap you
around to the other end of the list, a lower priority threat.
This, of course, makes the plus and minus keys useless in
terms of understanding where the threat you are looking at
right now resides in the priority list.
Unless you are prepared for these
little details in the game's implementation, latching onto
an incoming missile can be very difficult and frustrating.
I can't take credit for this insight: Falcon 4 Instructor
Pilot Stephen "HotdogOne" French taught it to me.
He also has a simple but ingenious strategy for programmable
HOTAS buttons that bears repeating here, albeit with some
extra amplification that Stephen provided for me in a follow-up
email to make things clear.
The suggestion is to program a button
to issue the sequence to bring up the 2D cockpit and then
padlock again immediately. The Thrustmaster F22 button definition
I use looks like this:
BTN T1 /O /N Cockpit DLY(30) /N
Padlock /I Padlock REM unpadlock-padlock
where the corresponding macro file
statements look like this:
Cockpit = 2
Padlock = 4
The small delay ensures that the time
needed to switch into 2D cockpit doesn't cause the padlock
key press to get lost (depending on the speed of your system
you may or may not need this). You'll notice that I have the
padlock key alone programmed for the S3 chorded / I key press
so that I can still walk my eye down the padlock target priority
list when needed. If you don't use TM gear, this may be a
bit cryptic - just think of this as two buttons, one programmed
to issue the sequence "2" (2D cockpit) then "4"
(padlock) each time you press it once, and the other to issue
"4" only each time. In any event and regardless
of the view you are in now, any time I press T1 button, it
drops me into Enhanced padlock with the highest priority threat
in view.
Evaluating the Threat
So now you have the missile padlocked.
How should you maneuver? Should you maneuver at all? In most
cases the answer will be yes, you need to maneuver to evade.
But sometimes, that isn't the case and there's an easy way
to tell if you are already safe.
The rule of thumb is that if the missile
is obviously moving at a steady rate across your canopy then
it probably isn't tracking you at all. In other words, if
the padlock view is moving as though your head is swiveling
to follow the missile, it's not tracking you. Relax and enjoy
the view. By the way, it's much harder to judge whether the
missile's relative bearing from you is changing (i.e. moving
across your canopy) if you are also turning. I usually try
and stop any turn I have going and then watch the missile
for a second or two to assess its course.
There's another more foolproof way
to know whether a missile is tracking you or not: the "7"
key will take you to an outside view of any missile that is
guiding on you. No view of a missile when you hit "7?"
No immediate threat! You may consider use of outside views
a "cheat" but regardless of that, I do not recommend
this view since I find using this radical a view switch too
disorienting in the heat of battle.
The rule of thumb arises from the
fact that the missiles in Falcon 4 fly lead pursuit courses.
As you will recall from Intercept Geometry 101, the shortest
path to an intercept is a collision course, which is most
easily arranged by keeping your target at a constant bearing
from you as you close with it. This is exactly what the missile
is doing to you as it tracks, so if it's standing still on
the canopy as you watch it, it has a collision course plugged
in. What this tells you is that you need to activate your
defensive plan. This means powering up ECM to counter radar
guided threats if you haven't already done so, dispensing
countermeasures and maneuvering to defeat the missile's collision
course plans.
While there are lots of threat systems
modeled in Falcon 4, for the purposes of this discussion we
will consider just two: the SA-6 and the SA-8. Both are radar
guided. Thus, ECM on and your finger on the chaff dispenser
are the first order of the day in both cases.
Beating the SA-6
The SA-6 is an older system. In the
Falcon 4 universe, it seems to be vulnerable to countermeasures,
especially if you can catch sight of the missile shortly after
liftoff. Pumping out three chaff bundles in quick succession
is often enough to confuse it right off the bat. When this
happens, missiles tend to either go ballistic (meaning straight
up) or drive behind and below you, presumably chasing the
chaff. In either of these cases, it's quite obvious that the
missile is moving rapidly across the canopy as you look at
it. Don't waste any energy maneuvering since it's not necessary
and you may need to preserve energy for the likely second
volley.
If, on the other hand, the missile
turns hard towards you and then appears to be standing still,
moving very slowly on the canopy, or worse yet, apparently
slowing to a standstill, more drastic measures are required.
This is where a combination of beaming and chaff come into
play. Put the missile on the beam and show it two or three
chaff bundles. Then reevaluate the missile's course.
If this all sounds to you pretty matter-of-fact,
it should. Perhaps the worst thing you can do is panic and
pull manically on the pole at the first sign of a launch in
the hope that some maneuver, any maneuver, will save your
bacon. "Lose sight, lose the fight" applies just
as well to missile evasion as it does to dogfighting. Stay
calm and act deliberately. The more you practice missile evasion,
the more you will discover that in fact you often have plenty
of time to study the threat and make a judgment call on what
to do before you react.
For BVR incoming missiles, putting
the threat on the beam is best accomplished by using the threat
warning TWS display to place the circled SAM site at the 3
o'clock or 9 o'clock of the display. If the threat is in your
forward hemisphere, turn away from it to do this, and turn
towards the threat if it is to your rear. You can monitor
the TWS from the 2D cockpit view quite well to accomplish
this.
If the missile is in visual range
though, short missile flight times and lack of angular resolution
in the display make using the TWS display much less effective
for this purpose. Here padlock really comes into its own,
especially if you are willing to use the lift line and SA
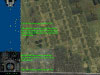
bar cues (shift "3" key).
The lift line alone can help you put
a missile at a beam aspect to you if you can point the line
at the missile and maneuver until the missile is at the double
chevron point along the lift line. You can then unload the
G from your turn and roll the jet upright and you should find
the missile at your three or nine o'clock (a.k.a. the 3-9
line).
For the ultra purists, it is of course
possible to use only the canopy reflections to accomplish
the same thing you can with the lift line. In that case you
watch for your shoulders and visored face in place of the
double chevron.
This works pretty well if the missile
starts in your rear hemisphere and thus ends up "above"
you when you roll and pull the double chevron towards it.
You are less well off if the missile starts ahead of you since
it would require a negative G push over, often of a magnitude
beyond the capability of your virtual self and/or the jet,
to keep the missile in view and center the lift line double
chevron over the missile; not practical, but don't despair
just yet.
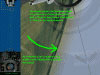
The SA bar adds another useful set
of cues that can help even if you don't want to bank (or often
over bank for missiles well below you) to find a missile along
the lift line. In the SA bar view, you can use the elongated
canopy and the yellow view field rectangle to position a missile
at the beam regardless of bank angle, attitude, and initial
bearing to the threat.
To do this, simply maneuver to put
the yellow cross in the view field rectangle in the middle
of the elongated canopy. Again the double chevron on the lift
line indicates the beam position, in this case supplemented
by some green and red vertical tick marks. Turning to put
the yellow cross anywhere along the line formed by the double
chevron and the tick marks will locate the missile along your
3-9 line at a perfect beam aspect.
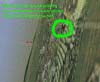
As with the BVR missile case, the
direction of turn required to move the view field cross appropriately
is determined by which hemisphere the missile is in. In the
forward hemisphere, the missile will be below the tick mark
/ double chevron line and you should roll away from it and
then pull to bring it to the line. In the rear hemisphere,
you need to roll into the missile and pull to bring it to
the beam.
The degree and attitude of the turn
will depend on your situation. If the missile is closing quickly,
you don't have much time so turn hard and fast. If you are
low on "smash," consider turning nose low and selecting
afterburner to generate best possible turn rate. If you are
energy-rich, consider a climbing spiral since this puts you
higher and thus further away from a SAM threat. Although in
this case, beware the slowing effect the climb against gravity
will have on your turn rate and your airspeed! Obviously if
the threat is closer to your nose or tail, a more radical
turn is also required to get it to the beam in time.
Also, you need to consider your loadout.
With a full load of bombs, your ability to generate turn rate
is much degraded, so consider whether you need to use the
emergency jettison to lighten the load. It's better to survive,
abort the mission for lack of ordnance, and bring the airframe
home than it is to end up in a smoking hole in the ground
with bombs still on the racks. On the other hand, in a BVR
situation you may be able to maneuver fast enough to beam
a missile even with your wings laden.
As usual, you are likely to have more
useful options available to you if you start out at or near
corner speed, since most maneuver defenses rely on having
your best turning capabilities available. Whatever you do,
though, don't get slower than 350kts with SAMs around, if
you can help it.
As you approach getting an SA-6 missile
to the beam position, pump out three more chaff bundles and
slow your turn rate so you don't overshoot the beam position,
then assess the missile's path relative to your view. Again,
the SA bar can help you make this assessment, even if it's
not obvious from the main padlock view: look and see if the
rectangle is moving even after you've eased the bat turn you
used to get the missile at the 3-9 line. If the rectangle
is moving quickly, you have probably beaten it already.
For SA-6s, most of the time, the above
will keep you out of harm's way. But sometimes one will get
through anyway, at which point you probably need to think
about a terminal phase defense. This situation is a lot more
common with the SA-8, which seems far less susceptible to
countermeasures and beaming techniques during the boost and
fly-out phases.
Beating the SA-8
So if you face an SA-8 and both beaming
and chaff have failed you, you are down to the last ditch
terminal phase defense. As mentioned above, the principle
here is taken straight from the textbook: a barrel roll about
the missile's approach access generates a rapidly changing
set of target (that's you!) headings for the missile to think
about.
Since Falcon 4 missiles fly lead pursuit
in all cases, a good radical change of direction on your part
as the missile gets close will cause the missile to have to
make its own even more radical change of direction. A continuous
set of these turns by you makes the missile make ever more
drastic corrections until finally the missile can no longer
keep up the rate of change of turn required to keep the lead
pursuit going and it falls off its collision course. At least,
that's the theory.
The best form of continuous turn you
can make works out to be a barrel roll inscribing a circle
about the axis of approach of the missile. The way to accomplish
this roll is fairly straightforward, although the timing of
when to start the maneuver is something you will have to try
out and get the feel for yourself. First, get into position.

Assuming that you are already abeam
to the missile in a somewhat level attitude and that the missile
is approaching from below you, roll into the missile and pull
to put your nose below the missile so that it ends up at your
10-11 o'clock or 1-2 o'clock position just above the canopy
rail level. Obviously the required maneuver varies if you
are in a different starting setup, but generally this picture
is the result you want to end up with. You are ready to give
the missile turn rate problems to solve and you are pointed
down hill to keep your own energy losses to a minimum (missiles
mostly come in volleys, so burning all your energy on the
first missile unless you absolutely have to could be hazardous).
From this point, you need to initiate
a barrel roll around the missile's approach. A simultaneous
roll (towards the missile) and pull from this starting point
should accomplish this need. It may help you to think of this
as "dragging" the visible parts of the cockpit (those
that are on the display as you start) around the edge of your
computer screen while padlock view keeps the missile in the
center of the screen.
Often with the SA-8, less than one
complete roll is enough to get the missile to fall off its
collision course. I usually complete the whole roll, though,
since it brings you roughly wings level again, making recovery
easier to accomplish, even though it burns a little more energy
than is strictly necessary.
Incidentally, SA-8s are also prone
to the old trick learned in EF2000 by DiD. Since they pull
considerable lead, under some circumstances you can easily
run them into the ground! If you are only a few hundred feet
AGL when you detect the launch and the missile is low to the
ground still, a quick roll onto your back and a kick turn
to point your nose at the ground can cause the missile to
calculate a required intercept point well below ground level.
The missile then obligingly dives for the ground and, provided
it impacts terra firma before you do, and that you can then
recover in time, the missile ends up a loser.
This works much better when the missile
is in the forward hemisphere initially; I wouldn't recommend
trying it for a launch from behind you unless you are some
way away from the SA-8 launcher already and have time to turn
to put the missile in the forward hemisphere first. You may
end up at low altitude with a launch in the rear hemisphere
quite often against the SA-8s: imagine a first launch causes
you to give up a lot of altitude in beating the missile with
a diving barrel roll. You recover to wings level and start
to angle away from the SAM launchers. This is just about the
time those mischievous SAM guys love to lob a second missile
your way.
Putting Theory into Practice
With advice on technique under your
belt, all that remains is to practice until it comes naturally:
train like you fight, fight like you train. You may already
have a training game plan in mind, but if not, here's the
routine I use.
First, do like the pros do and run
a simulation exercise. That may sound like a tautology flying
a simulator game, but in this case we can do better than the
air force and train against the actual threat with no danger
of getting "morted" for real. Visit the setup screens
and turn on invulnerability. While you are at it, turn on
unlimited chaff and flares. This may seem sacrilegious, but
it will take you a long time to get proficient at dodging
SAMs if you practice in modes where your jet disintegrates
after one or, at most, two SAM hits.

Figure 9: A more robust smoke trail GIF file.
Save this as... <falcon directory>\terrdata\misctex\mistrail.gif
Another thing I'd recommend is using
an enhanced version of the missile trail art file. The one
I use was made by Jeff "Rhino" Babineau and does
a great job making the smoke trails much more obvious, especially
in the higher resolution modes. You may consider this a cheat,
but I actually use this all the time since compared to what
real-life video footage I've seen, the default Falcon 4 missile
smoke trails seem rather puny (install it in your <falcon
directory>\terrdata\misctex\ as "mistrail.gif").
Once you've done this, take advantage
of the Tactical Engagement Missile Threat training mission.
This provides a canned setup with several different threat
types all within a short flight time of each other. You can
use the fact that you are invulnerable and that you have full
tanks of JP8 and unlimited countermeasures to explore the
fine art of missile evasion in this mission. Of course, a
custom TE mission you make up to examine a particular threat
setup will also work well. Either of these will save time-consuming
efforts to hunt for trouble in mud moving instant action or
actual campaign missions.
The first thing is to fly straight
and level around the SAM sites. Forget maneuvering and watch
the SAMs bore in on you. You may be surprised at how many
miss even if you do nothing; as you fly past the sites, you
are often beaming them as they launch and sometimes that's
enough. Be that as it may, you are trying to get a feel for
what the missile paths looks like as they bore in on you for
"successful" intercepts, as opposed to times when
missiles pass you by. There is a boost phase where they seemingly
start out ballistic. Then there's a sharp turn to the lead
pursuit course on the fly-out. Then they seem to slow down
and stand still just getting a little larger each moment before
rudely interrupting your concentration with a boom!
Fly the approach to the different
SAM types at various altitudes to see the variation this causes
in reaction. At low altitudes, the sites may have trouble
picking you up at all. At high altitude, the SA-8 may choose
to leave you alone entirely, even when you over fly them,
since you're on the edge of their envelope. And of course,
try flying in the normally "no-fly" range between
500 feet and 10,000 feet. Even though for tactical reasons
you shouldn't plan to fly in this range on real mission flights,
chances are SAMs or fighters will force you down into this
range at some point leaving you in the heart of the medium-altitude
SAM's engagement envelope.
Try to watch the missile approaching
to see if it is moving on the canopy or whether the yellow
view field box in the SA bar is stationary or moving. If you
catch yourself wondering whether the missile is moving relative
to you or not because it looks almost stationary in mid air,
that's a sure sign that the missile is tracking you.
Also take note of missile flight times
and get a feel for how much time you have between a launch
warning and impact. Setting aside the "Archer inbou....BOOM!"
scenario for a second, you may be surprised at quite how much
time you really have, when dealing with SAMs, anyway.
You should also get your fingers used
to stabbing the unpadlock-padlock button right when you get
a launch warning to lock up the new threat. You may even want
to develop a "nervous tick" and punch the button
early and often when on the enemy side of the forward line
of troops (FLOT). I consider this the equivalent of how real
air force pilots are taught to scan the sky constantly. In
any event, I usually expect to have newly launched radar missiles
padlocked before my wingman calls them out and quite often
IR missiles as well (yes, even the Archers sometimes).
Also, experiment with dispensing countermeasures.
The first point is to make release of the right sort of decoys
for the threat as instinctive as possible. In the heat of
the moment, you want to make sure that you don't end up pumping
out flares in a vain attempt to confuse a radar seeker (hint:
this doesn't work!). Try and get a feel for timing of countermeasures
releases and also think about quantity of chaff or flares
to release. A rate of two to three per second seems to work
quite well, at least as a place to start. In any case, recognize
that sometimes less is more: too many chaff bundles in a row
may just make a nice trail for the missiles to follow. If
you intend to fly actual missions with the limited countermeasures
setting turned on, you will want to find the balance between
using enough decoys to be effective without spraying them
all over the sky only to run out deep in bandit country.
Making a Game Plan
With this picture of how the SAMs
work locked in your head, you can start to think about making
the SAMs miss you routinely. Like many things in flying, a
game plan in the form of a checklist may help you build good
habit patterns in your training that will keep you safe when
you fly in earnest.
- Honor
the threat - Mainly rely on the audio launch cue
and the cockpit missile launch light in the case of the
radar SAMs, but otherwise seeing the plume of smoke from
a fresh launch from padlock or virtual cockpit view. These
are your cues that it is time to react right now!
- Locate
the threat - If you haven't spotted the threat by
"Mark I" eyeball in Step One, find it now by locking
it up in padlock view. You also want to determine range
at this point, since appropriate action will vary if the
missile is BVR, visual but at range, or right in your lap
already. Either way, use padlock first on the assumption
that the threat is close to ensure that you lose no time
in the event it is in visual range already; you can always
revert to BVR defense if the initial assumption here is
wrong.
- Evaluate
the threat - Is the missile guiding on you? If so,
is it a heat seeker or radar guided? If you are using labels,
you'll know just from looking at the threat (you did your
homework in Tactical Reference). If not and TWS indications
don't make it obvious, consider the threat heat and radar
guided.
- Countermeasures
and maneuver (as required) - Flares and reduced throttle
as much as possible for IR heat seekers, chaff for radar
missiles. Beam radar guided missiles at range. Barrel roll,
break turn, or other nose rate maneuver to defeat missiles
that are closer in.
- Reevaluate
the threat - If the missile is still guiding, return
to Step Four.
- Recover the jet -
As soon as possible, you want to resume a normal flight
attitude and start picking up any expended energy, be it
airspeed or altitude. In Falcon 4, missiles tend to come
in volleys, so you need to be back in the ideal configuration
to start this list over again at Step One.
Conclusion
There is no perfect defense against
SAMs in real life or in our simulated one. Even with perfect
evasion technique, occasionally you will get tagged anyway.
And I wouldn't represent the techniques outlined above as
anything other than the result of my own experimentation;
there may well be better moves than these. Hopefully some
of the lessons I learned from flying against the SA-6 and
SA-8 systems as described above will give you some insight
that is useful for your own flying. Perhaps you may even be
inspired to try developing reliable methods to beat other
systems in the Falcon 4 threat arsenal. If so, I wish you
luck and don't forget to spread the wealth when you come across
that perfect move!
Click
here to go to top of this page.
|