Feature by Andy Bush
Introduction
In Part One, you examined a number of real life preliminary mission planning considerations that can be replicated in today’s air combat simulations. These considerations gave you an overview of the target and outlined avionics and weapon planning factors. Part Two is where “the rubber meets the road.” We now put our books and manuals away…we have just crossed into bad guy country. Our switches are “hot” and it’s time to get to work!!
The part of your mission from your base to the target is known as the “ingress” phase. In many respects, the ingress can be just as challenging and exciting as the actual attack. As someone once said, “Getting there is half the fun.” Do not be complacent about the ingress. There are many dangers and obstacles lurking along the route to the target. You are going to have to either overcome these challenges or maneuver to avoid them.
The bottom line is that you need to arrive at the target with enough fuel, weapons, and aircraft to guarantee target destruction. If you lack any or all of these because of enroute mistakes, then the mission is blown before it even gets started. You do not want this to happen, and attention to ingress considerations is an excellent way to ensure this.
Ingress Considerations
Formation Procedures
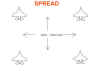
Choose a suitable formation for your flight. In general, the type of formation is determined by the nature of the threat and the difficulty of the route of flight. Line abreast formations are known as “spread” formations and are good for flights at medium to high altitude and where an air threat is likely. They provide the best six o’clock lookout for all flight members, but they are the most difficult formation to maneuver. Angled back formations such as wedge are much easier to maneuver since the wingmen are behind the leader instead of being on his 3/9 line. Wedge formations are well suited for low level flight where terrain avoidance is a significant consideration.Regardless of formation type, the two ship is the basic formation element. Larger formations are multiples of two ships.

Align your formation depending on threat detection and environmental considerations. As a rule, have your wingmen looking into the anticipated direction of the threat. If the sun is a factor, you may elect to have your wingman look into the sun on the assumption that is the direction that the attack will come from.
Spread your line abreast formation out 6,000-12,000 feet apart. Position your wingman in wedge formation back on a 30-45 degree line as much as 6,000’ foot range. Terrain or visibility conditions permitting, stack your formation at varying altitudes. A 3,000’-5,000’ foot split is optimal.
Navigation Considerations
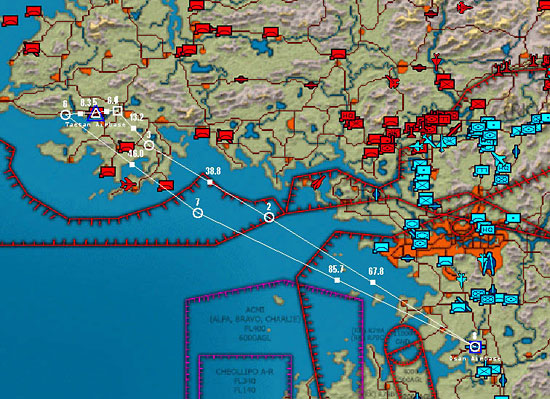
Most sims today include high quality maps of the entire region of the mission. Often the routes are shown as straight lines between way points that disregard any opportunity to take advantage of terrain. Do not accept this if you can use the map to plan a more effective route in and out of the target area. Replot your waypoints to take advantage of terrain.
Initial Point (IP) Selection
The initial point (IP) is the geographical reference that you use to begin the attack phase of your mission. It is the foundation for all attack navigation and timing. You should take the time in your target study to locate a suitable IP. Please observe these considerations when selecting your IP:

The IP should first and foremost be easy to find. The last thing you want to do in an attack is to mill around looking for your IP. Do not choose a feature as your IP if there are other similar features in the immediate vicinity. Try to find a feature that is unique and sticks out like a “sore thumb!” Be sure you take into consideration your ingress altitude when you look for a suitable IP. Something that is easily seen from 10,,000 feet may not be as easily seen from low altitude. IPs used for low altitude approaches should have definite vertical definition, such a unique hill or tower. IPs used for medium or high altitude approaches should have a horizontal definition, such as a lake or crossroad. Your IP should be far enough away from the target to allow you to remain undetected visually by target area defenses. Pick an IP that will allow you to remain below the line-of-sight of any threat radars in the vicinity of the target…for this reason, IPs in valleys are better than on mountain tops!

Plan to locate your IP no more than two to three minutes from the target…at typical attack speeds, this equates to about 15 to 25 miles. If you locate your IP much further away, you run the risk of getting off course during your run in from the IP to the target. Try not to plan an IP to target course that will require full attention to navigation. Your priority during the run in should be target location, target ID, threat activity, followed by navigation. This is why you took the time to plan that “big picture to specific target” concept during your target study. As much as possible, you want the run in to be a “no brainer.”
Controlling Your Airspeed
On your way to the target, you must decide what speed to fly. It is simply not just a matter of “pedal to the metal.” There are a number of considerations to look at…depending on the mission, you may have to observe all or only some of these. Here are the major factors to consider. When you decide to fly your simulation in a full realism mode, you will need to think about how these factors will impact your mission.
A real life fighter pilot thinks fuel flow when he considers his airspeed. You should do the same in your sim planning. Fortunately, some of the newer simulations include charts for computing fuel flow versus airspeed. These charts become particularly important for those of you who enjoy building your own missions with the simulation mission builder. You must compute a fuel “burn” based upon the distance to be flown and your chosen airspeed. Do you have the required fuel? If not, pick a more economical speed and altitude to fly at. This usually means flying higher and slower. You must be very careful when considering the tradeoffs in fuel flow considerations. Remember, you must also allow for target area fuel burn and for defensive reactions. Both often require the use of afterburner. Afterburner use is very expensive…use it sparingly when fuel is short.
Fuel versus Range
When you look at the distance to the target, you must think fuel flow. Fuel flow in fighters is measured in pounds per hour. Since you know how much fuel you have to begin the mission with, you can easily compute how much fuel you have to “play” with during the mission. Your “playtime” is the difference between your beginning fuel and your desired minimum at landing. Your playtime has to be sufficient to fly to and from the target at the planned speed. It must allow for maneuvering in the target area. It must also include a “pad” to allow for defensive reaction to threats encountered along the way. So the question becomes, how do you plan your fuel flow…which is to say, how do you plan your enroute speed?

Ingress/Egress Profiles
The discussion of fuel requirements leads directly to the choice of mission profile. Mission profiles define the altitude structure of the route of flight and are typically described in terms of “ingress altitude – attack altitude – egress altitude.” For example, typical profiles range from “high-high-high” to “low-low-low.” The high profile has the most economical fuel expenditure, and the low has the highest fuel expenditure. For missions flown at the maximum range of the aircraft, a common profile choice is “high-low-high.” This profile saves fuel to and from the target but allows a low altitude attack. When you choose your profile, keep in mind the threat along the way. A high ingress may be advantageous from a fuel burn perspective, but may be ill conceived when taking into consideration enroute air or SAM threats.
Timing Considerations
Another consideration when planning your ingress is the question of timing. In past simulations, no emphasis was placed on when you got to the target. However, this is changing as simulations strive to become ever more realistic. When you plan your mission, you may have timing requirements to meet. Examples include meeting the tanker at a specific time, rendezvousing with AWACS or other support forces, and hitting the target at a given time. Target time is particularly important. Fighter pilots refer to this as TOT…”time on target.” Your TOT may be one of the highest priority goals of the entire mission. In the real world, hitting your TOT is a “pass/fail” item. As simulations continue to develop in complexity, simulation pilots will be required to pay increasing attention to timing factors as a measure of mission success.
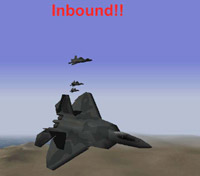
“Fight or Flight”
Let’s consider whether or not your ingress to the target is unopposed. What are the implications of an attack on your flight as you make your way to the target? Should you engage, or should you attempt to avoid contact? Your decision may hinge on factors beyond your control. You may not have the fuel to engage in defensive maneuvering. You may not be carrying weapons suitable for a prolonged defensive engagement. The “fight or flight” decision must be made beforehand. Know your mission fuel and time limitations. Decide ahead of time what you will do in a given defensive situation.
Fence Check
The “fence check” is a short checklist each pilot completes just prior to starting the attack phase of the mission. The word “fence” refers to the imaginary line separating the good guys from the bad. Once you cross the “fence,” you are in hostile country and you need to be prepared. The fence check includes fuel state, EMCON, weapons selection and arming, TEWS operation, and attack formation. The flight leader makes the call and the wingmen ensure their items are completed.

Attack Planning Considerations
Now we are getting down to the “nitty-gritty.” The best attack plan is one that assures target destruction and maximizes the enemy’s surprise and confusion. The attack phase starts at the IP. Plan your run in to do two things…approach the target unobserved or undetected and, if you have additional flight members, from opposite attack directions. Use terrain masking to best advantage. You can split your four ship into two elements to attack from opposing directions at the same time. If you are in a two ship, you can still do this and remain in visual support for each other.
Your choice of attack plan will hinge directly on the threat level of enemy defenses in the target area. We divide our tactics into two types…either “high threat” or “low threat”. A high threat situation typically includes SAMs and radar controlled, large caliber (37mm and above) AAA, while a low threat area is generally thought of as one having only small arms, light AAA, or man-portable SAMs.
It used to be that a high threat environment always dictated a low altitude ingress, while a low threat situation allowed a more leisurely medium altitude approach to the target area. At the same time, it was presumed a high threat defense resulted in pop-up type maneuvers…conversely, a low threat situation permitted the use of medium altitude tactics such as the “wheel”. Recent advances in ECM and stand-off weapon capability have mitigated this rule of thumb to some extent. For our purposes, however, in the typical sim, you can go with the traditional assumptions regarding low altitude ingress/terrain masking techniques in a high threat area, and leave the medium altitude techniques for a more benign environment. Let’s take a general look at these high and low threat tactics.
Tactics For A High Threat Environment
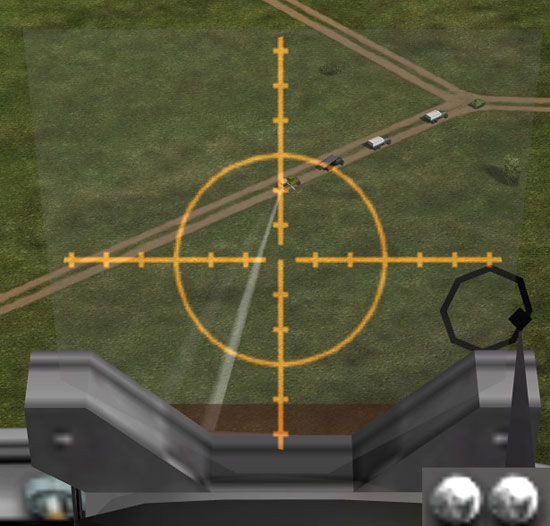
If the target is well defended by SAMs and AAA, then plan a low altitude attack using terrain masking. Two attacks that work well in a high threat environment are “shooter-cover” and “decoy.” “Shooter-cover” means one pilot attacks the target while the other looks for a threat and then attacks the threat if necessary. In a “decoy” attack, one pilot (or flight, if attacking in elements) exposes himself to the threat while the other pilot attacks from a different direction. “Decoy” works particularly well against the sim’s SAM AI. Use stand-off weapons or delivery methods whenever possible. Maverick missiles are excellent against threats in a “shooter-cover” attack. Use “toss” deliveries for freefall weapons. Avoid overflight of the target if at all possible. The pop-up attack is a favored maneuver for these tactics.
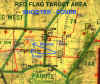
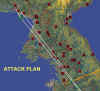
Figure 10 is copied from a map I used at Red Flag when I flew the A-10. The map shows the target area and various IPs around it. In the depicted shooter-cover attack profile, I left the IP and flew at minimum altitude directly at the target. We used the high terrain between us and the target to mask our approach. My wingman was on the left side of the spread formation. We hacked our clocks at the IP and after about a minute, I cleared the wingman to split off and take spacing to the south. He remained behind the hills also. He now was responsible for his own navigation…we used the INS to help us stay oriented to where the target was. At this time, he was still clearing my six for air threats. I planned a Maverick attack on the target and intended to pop up from behind the hills, acquire the target, and shoot. When I called “Up,” the wingman also climbed and switched his attention to the target area. Once I got a tally on the target area, I would be “heads down” as I located a target and then locked the Maverick on it. While I was “heads down”, the wingman concentrated hard on the target area looking for a threat reaction. He planned to use the gun at long range as a suppression weapon. If he saw a threat come up, he would engage it. If he saw a missile coming up, he would radio me to “break – missile” and I would dump chaff and flares and scoot back down behind the hills for cover. He would break away also. If no threats came up, he would follow me into my Maverick launch and then break away with me. He would continue to clear me during the egress away from the target.
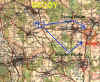
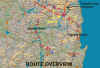
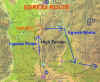
Figure 11 is a large scale map of Germany close to the former West German border. I used this map during the 80’s to train for combat against a Warsaw Pact tank attack on NATO forces. We knew the bad guys would come out of the east and would try to use the existing roads to speed up their advance. Us Hog drivers were there to put a kink in their plans. We wanted to catch the commie tanks at a choke point if possible. We expected the gomers to advance west along the road leading into the depicted target area. There, they had to get across a small bridge and through an intersection. We planned to nail them as they approached the bridge. Because of the relatively flat terrain, we needed to maximize our ability to stay masked…and we wanted to use the technique of deception to draw their attention away from the real attack direction. This situation is ready-made for the “decoy” tactic. This attack was best flown using two two-ships, but we could do it with a single two-ship, if necessary. I would take the flight to the IP and then split.
I was the attacking element (or single) and the supporting element (or my wingman, if we were by ourselves) was the decoy. I angled off to the south and the decoy went north-east. I used the forested area to mask my approach, while the decoy used the town to hide behind as he drove in. The attack was based on simple timing. The decoy planned to pop up from the north-west of the target area and engage the target with long range strafe. He made the radio call “Up” when he began his pop. He used his eyes and his RHAW to alert him to enemy threat reaction. His objective was to get a quick shot in, call “Off,” and then dive back to minimum altitude while dispensing flares and chaff. Hopefully, this would result in a bunch of gomers all looking in his direction. Meanwhile, I was moving south along the tree line. When I heard the decoy call “up,” I would be ready to turn hard to the north-east towards the target. At his “off” call, I would begin my pop to acquire the target. If I had a wingman, he would fly a cover position. I planned a Maverick attack or long range strafe on the lead vehicle. Our objective was to stop the commie advance and make them “button up”…meaning get inside their vehicles. This would force them into a radar acquisition mode and slowed their attack. We would then follow up this attack as the situation permitted using shooter-cover tactics.
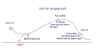
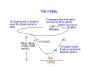
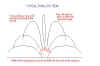
The pop-up attack is a often flown tactic in the low altitude, high threat environment. It works well with both shooter-cover and decoy attacks. The target is approached at minimum altitude and at weapons release airspeed or higher. At this time the target may not be in sight. At approximately three miles from the target, the attacking pilot begins a climb, acquires the target, and then rolls inverted and pulls down to the desired dive angle for the attack. The cover or decoy pilot flies a similar maneuver and offsets his flight path as necessary from the attacker. The cover pilot offsets only enough to establish visual contact with the target area, and begins his pop-up at the same time as the attacker. The decoy pilot takes a greater offset…he typically turns away 30 degrees from the attacker and times his turn back towards the target to achieve approximately a 90 degree difference in attack heading. The decoy pilot begins his pop-up before the attacker…the objective is to draw the defender’s attention well away from the direction the attacker will come from.
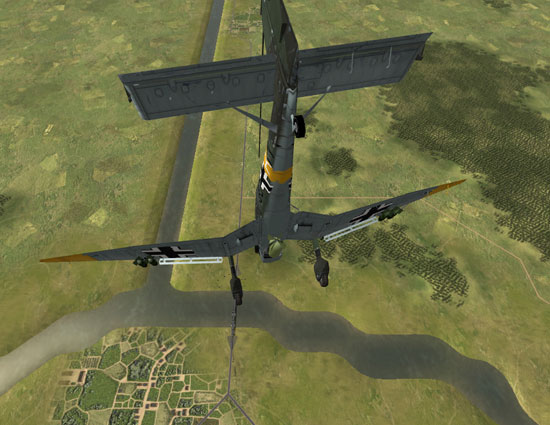
The pop-up attack is often thought of as a “fast mover” attack profile. In the traditional sense, the attack is planned in great detail using large scale maps. The attack profile is planned for a specific dive angle and release altitude…math formulas are used to compute the required distances from the target. The calculations are used to find the “pop” point and the “pull down” point. Once these are known, the map is used to plan an approach to the pop point. A ground feature close to the pop point will be used as a close-in IP. The pilot will fly over that point on a specific heading and hack his clock. The pilot will have computed a “fly off” time to fly from this IP. When that time expires, the pilot will be at the planned pop point. He then goes full power, pulls up to a pre-planned climb angle, and stays on his approach heading. Once at the desired climb angle, he unloads and watches his altimeter as he looks for the target. With the target in sight, the pilot then continues his climb to the planned “pull down” altitude. At this altitude, he then rolls inverted and begins his pull towards the target. The wait for the pull down altitude ensures the pilot is on or close to the pre-planned dive angle. Once pointed at the target, the pilot makes any necessary last second aiming corrections prior to releasing his weapon.
Tactics For A Low Threat Environment
In a low threat environment, use medium altitude tactics to stay out of the AAA threat. As a general rule, stay above 5,000’ above target elevation to remain clear of most small arms and light AAA. Trail formation is a good low threat choice. Orbit the target in a “wheel” and attack individually. Plan for thirty seconds separation between each flight member’s attack for frag avoidance. If your sim includes “smart” weapons, the low threat environment is optimum for their use.
Weapons Envelope
Regardless of which attack profile you fly, at some point you are going to have to deliver the weapon. Many weapons require the attacking aircraft to overfly the target area. This results in the need for the attacker to be aware of and avoid the destructive effects of his own weapon. Each weapon has a fragmentation (frag) envelope. This envelope has three parameters…height above ground, length or width, and duration in seconds. Plan your weapons release to avoid flying through the effects of your own weapon’s explosion or through another pilot’s weapon’s frag envelope.
The best way to avoid fragging yourself is to follow the minimum release altitude info in your sim manual. Do not continue your dive below release altitude…the target may be a “goner,” but you may be also. Avoid fragging your wingman by separating your attacks on a common target by at least thirty seconds or by simultaneously attacking targets that are at least one half mile apart.
Re-Attack Considerations
A re-attack of the target should be avoided if possible. If a re-attack cannot be avoided, then do not repeat the initial attack plan. Exit the target area, and use a new IP if you can. Just as in real life, you can expect your sim’s AI to be ready for you the second time around. Since you can expect target area defenses to be at the ready, your second attack should emphasize threat suppression along with target destruction. Use shooter-cover or decoy tactics.
Knock It Off Criteria
To “knock it off” (KIO) means to stop what you are doing and either regroup or exit the target area. Newer sims include this call or something similar in the radio communications options section. There is no better advice than to stress that you never press on blindly into the target area when your finely crafted plan has just turned into a bucket of worms. The smart tactician will call an immediate halt and order a reposition to figure things out. A KIO call is serious business and must always be honored. Brief your flight on your KIO criteria and your plan on what to do if the call is made. Remember – anyone can make the call and for any reason. You can sort out the wisdom of the call later!
Egress Considerations
The egress phase of your mission is your attempt to “get out of Dodge”. Watching your stick of bombs walk right through the enemy convoy may be a wonderful sight to behold, but if it’s the last thing you see, you can consider yourself a statistic! In our sims, we can continue this planning exercise by considering the following tips.
Egress Route
Use your area map to plan your egress. Do not take the same way out as your ingress route. Consider your fuel state, tanker location, nearest friendly border/area, and terrain when planning this route. Plan a climb to an optimum fuel conservation altitude as soon as possible, threat permitting.
Emergency Recovery Plan
Have an emergency recovery base in mind for each portion of the mission. Use your mission builder to develop a waypoint for your emergency base. Direct any battle damaged craft to land there. Do not try to fly a shot up bird all the way home if you can get it on the ground sooner.
Safe Recovery Procedures
Some simulation missions may include a safe recovery plan. This is a pre-briefed plan that allows you to approach your base and be seen as incoming friendlies. Follow the plan to avoid becoming a victim of “friendly fire.” The safe recovery profile is usually a straight-in approach flown from a ten mile final. Make sure your EMCON is configured properly…turn off your ECM…you don’t want to look like the enemy!!
Conclusion
Congratulations! You’ve made it back into the chocks, and now you are off to debrief those intel weenies on your successful mission. Your prior planning did prevent poor performance! Good job!!
This concludes our discussion of how to plan a typical air combat mission in a manner that takes full advantage of the advances in fighter simulation being incorporated into today’s ultra-realistic flight sims. As the games continue to improve, you can realize a similar increase in the enjoyment of your game play by maximizing your participation in the mission building process.
Related posts:
 Combat Mission Planning Considerations, Part One – Initial Planning
 IL-2 Series: Ground Attack
 IL-2 Series: Ground Attack and Ship Attack Part I,
 How to Dive Bomb Page 2
IL-2 Series: Ground Attack and Ship Attack Part I, How to Dive Bomb Page 3
IL-2 Series: Ground Attack and Ship Attack Part I, How to Dive Bomb Page 4
IL-2 Series: Ground Attack and Ship Attack Part I,
IL-2 Series: Ground Attack and Ship Attack Part I, How to Dive Bomb Page 2
IL-2 Series: Ground Attack and Ship Attack Part I, How to Dive Bomb Page 3
IL-2 Series: Ground Attack and Ship Attack Part I, How to Dive Bomb Page 4
 Lock On: Modern Air Combat Page 4
 OCA Strike: A Falcon 4 Air to Ground Mission Report Page 7