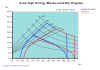
You will notice that the curves for both Spitfires have been overlaid to the make comparison almost instant. You can see from this overlay that the Spitfire Mk V is the more maneuverable of the two aircraft. You can see by inspecting the diagram, that the Mk V has both an instantaneous and sustained turn rate advantage at all speeds below about 220mph. For example, at 200mph the Mk V enjoys an instantaneous turn rate advantage of about 4dps, and at their best sustained turns, the Mk V has a 2dps higher turn rate, and a smaller turn radius than the Mk IX. This reveals the superior turning ability of the Mk V, but the question isn’t resolved yet because the Mk IX is faster, and that is a major factor in the arena. What we can say so far is that the Spitfire Mk V is better at close range, hard maneuvering dogfights. But because of its lower speed, it would be more vulnerable than the Mk IX in a hostile environment, which is why the Mk IX is a far more frequent choice.
Now we can make one more important distinction. Many flight sim pilots learn their BFM from Shaw, who describes the combat between dissimilar aircraft by classifying them as either energy or angles fighters. For most virtual fighter pilots that distinction is not easy to make in practice, but our EM diagram can help. In the overlay of the two Spitfires shown above, you will notice that one is faster and has better sustained turning ability at high speed, so we call it the energy fighter. The other has better instantaneous and sustained turning ability at low speed, so we call it the angles fighter. Look at the diagram again, and notice that below about 220mph, both of the red curves are above those of the blue curves. This means that in this engagement the Spitfire Mk V will have a clear advantage in turn rate and turn radius and so all those tactics normally ascribed to the angles fighter will be appropriate for it. Because the sustained turning curve of the Spitfire Mk IX is above that of the Mk V at high speed, and it has a higher top speed, it will make better use of energy tactics.
Let’s apply that logic to two new fighters, the Aces High F4U-1C and the F6F-5. Examination of Fig7 shows that the Hellcat is the angles fighter, while the Corsair is the energy fighter. It is also important to point out that those designations are relative, and can change depending on the opponent. For example, let’s consider what would happen if we compared the F6F with the Spitfire, or the F4U with the P-51.

In the case of the F4U versus the P-51, its role has changed. Examination of the overlay shown in Fig8 reveals that the F4U is now the angles fighter, but the advantage is only around 1dps, not enough to make this an easy fight by any means. However, the P-51 doesn’t have enough superiority at high speed to realize a significant energy advantage, so while the P-51 is the energy fighter in this case, the distinction is less clear. In this case, the P-51 can’t allow the fight to get slow, but will also have difficulty employing energy tactics against the F4U. It is possible in situations like this, that other factors relating to roll rate, climb rate, stall characteristics, initial energy advantage, weapons effectiveness, or perhaps some difference in pilot skill, are more likely to have a greater influence on the outcome than pure maneuverability. Many pilots would approach a fight like this as if it were a similar aircraft engagement. However, if I were flying the P-51 against the F4U, I would be nervous of the combination of higher turn rate, smaller radius, and the mighty cannons of the 1C model, and make good use of that modest extra speed.

In the case of the F6F versus the Spitfire shown in Fig9, it can be seen that the F6F is no longer the angles fighter, and also has no significant energy advantage. In this fight the Hellcat driver is going to have his work cut out, and would certainly need to hold a significant initial advantage before committing to an engagement. In this situation, I would describe both of these aircraft as angles fighters, the Spitfire being the superior of the two.
Putting It Into Practice
Part One: Angles versus Energy
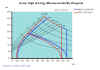
Another favorite of mine is the P-51, so let’s compare the Aces High P-51D and Spitfire Mk IX and see what predictions we can make about their relative performance. Study the diagram in Fig10 below and see if you can pick out the important features.
You will notice that the P-51 in this case is clearly the energy fighter, and the Spitfire is the angles fighter. Before talking about how this diagram predicts the engagement should be fought, we will pause for one final exercise. Just to ensure we are all reading from the same hymn sheet, let’s check the numbers. By examining this diagram we can extract the following information about each individual aircraft. If you check each value in the table against the diagram, you should be able to see where it comes from. If so, we can move forward. Remember though, this was a one-off exercise. You would not normally need to extract data from a diagram like this because everything you really need is visible on the chart at a glance. Also, don’t be concerned if you can’t quote the figures as accurately as I have, because I’ve been able to use the raw data. Pause for a moment to consider Fig11 and Fig12.
So, let’s get down to the real point of these diagrams… Suppose you are the P-51 driver and want to know where you have an advantage over the Spitfire. Take a look at the diagram in Fig10 again and notice that the sustained turn rate curves for both aircraft cross at 255mph. Above that speed the P-51 has a sustained turn rate advantage. Above that speed the P-51 also has equality in the instantaneous turns and better top speed and acceleration. So, the P-51 can fight the Spitfire above 255mph without ever losing the advantage…it is the energy fighter. However, if the P-51 driver pushes the fight too hard and slows below 255mph, the advantage will go to the Spitfire! Unfortunately it is not quite that clear cut. Having a sustained turn rate advantage above 255mph doesn’t mean that you can engage the Spitfire in a turning fight, even if you stay at or above that speed. If you do, the Spitfire will trade his airspeed for angles and be in a position for a shot fairly quickly. By attempting to maintain a sustained turn at high speed you will have a large turn radius and that will concede turning room to the Spitfire. What the P-51 drivers should do, is to stay in that part of the envelope where they have the advantage, and that basically means high-speed attacks followed by extensions beyond gun range. Let’s look at that idea more closely.

Firstly, let’s review our objectives. We want to kill the more maneuverable Spitfire, but we also want to survive. That is interesting because the relative importance of each of those objectives will influence our tactics. The reason is simply that in reality the desire to live is paramount, but in fact for the sim jock, nothing is farther from the truth. There is a concept that transcends the difference between the real world and simulations, and once grasped allows you to fly aircraft such as the P-51 intelligently. The important thing to remember here is that in contrast with the real world, you have very different priorities as a simulator pilot. For us, life is cheap, and so some of the performance attributes of the various aircraft become weighted very differently. In W.W.II, for example, speed was far more valuable to real pilots than it is to simulator pilots. A real pilot would no doubt have found a turning engagement both physically and mentally draining, due to the mix of extreme concentration, physical exertion, heart pounding amounts of adrenaline, all tinged with varying degrees of fear! No doubt that was a large factor in explaining why turning engagements were the exception rather than the rule. Around 80% of shoot downs involved the element of surprise, high speed, 1g attacks. In contrast, simulator pilots can enjoy the challenge of a high g dogfight with their flight stick in one hand and a beer in the other. The price of defeat? Nothing more than a mildly bruised ego and a few more practice sessions before the next match. If you really wanted to live, the P-51, Fw-190 and other fast aircraft are exactly the aircraft to choose!
Generally speaking, fast, high-wing-loaded aircraft have inferior low speed maneuverability when compared with the lower wing loaded fighters, but they made up for it at high speed, which in W.W.II was what really mattered. In the real world, and in the online arenas of Aces High, they can be flown as intended. That is, the high-speed bounce and energy tactics can be employed to maximum advantage. With fast aircraft, you can strike a lower or slower opponent and hold a tracking solution for a short time (often long enough for a kill) before extending safely for a repeat performance. Those are the tactics that allowed the Axis pilots to rack up such huge scores. During the time when you are tracking for a shot, don’t be tempted to turn above the sustained turn rate curve and against a Spitfire, forced to maneuver hard to defeat the shot…you will never lose energy. Things can become slightly complicated by what can only be called the unrealistic suicidal tendencies of the average flight sim pilot.
What I am referring to is the unnatural desire for the average P-51 pilot to start a dissimilar air combat with a neutral position and similar energy levels before engaging. No P-51 pilot worth his salt and certainly none who lived very long, would engage under those circumstances when they could simply refuse combat by virtue of their superior speed and fight under far more favorable circumstances, namely an initial energy advantage.
So how can you fight in the P-51 when forced into a Co-E situation against a better angles fighter like the Spitfire? If you only want to live, the answer is simple, blow through the merge fast (possibly taking a head on shot) and refuse combat. However, if as a simulator pilot you just want to have fun and don’t mind a few virtual deaths for a flying lesson, there are more options. What I often do is to force the fight to high speed where the instantaneous turning ability of the aircraft are equal, depending only upon the physiology limit of the blackout model. You can do that by diving into the merge in order to push the entry speed well above the corner velocity for both aircraft. If your opponent does the same, you know that your initial turns will be equal because you will both be riding the (tunnel vision) edge of the software imposed physical limits. By doing that you will at least get one, maybe two turns before your speed bleeds down to below corner speed, which is when you break off and disengage to set up for another pass. Sounds dull, right? Well the problem is that If you have an aircraft that you know can be out turned, it is just plain dumb to do anything else. Even then, there are complications because it is not always possible to break off the fight just when you need to, because the better turning opponent may also have the acceleration and speed to score hits before you can get outside gun range, thus preventing you from disengaging. In that sort of situation, the best course open to the faster aircraft is not to risk any maneuver that would slow it down beyond the point where their sustained turn rate curves cross. As was often the case in the real world, pilots fly fast in straight lines and make only high-speed attacks that involve dives, zoom climbs, and only gentle turns. If you intend to fly that way, it might be better to engage only those aircraft that appear to be unaware of your presence. Attack fighters that are preoccupied, or already damaged. That might sound unsporting, but it is highly realistic!
Even so, it is still possible to engage an enemy aircraft that can out turn you and still get the kill. However success depends on the enemy pilot overestimating the importance of his own aircraft’s maneuverability, and underestimating the importance of good high speed BFM. Here is a tactic I use that often works….
![]()
OK, two things can happen at the merge when you start to dive for speed. Either the bad guy will follow you down and you will merge at high speed, or he will stay high and refuse to give up his altitude. If he dives with you, you at least equalize your turning ability for the first several hundred degrees of the turn. That is true because any two aircraft both turning at 300kts and 6g, for example, will have exactly the same turn rate and radius. The catch is that you simply won’t be able to hold it for as long as your opponent, which is why you will attempt to disengage long before their superior low speed performance comes into play, which is exactly the situation I described previously.
However, suppose they don’t dive with you? If they choose to hold onto their altitude, it could be for two reasons. It might be that they are allowing you to create turning room, with the intention of using to execute a lead turn of their own. Or, as is more often the case, they aren’t that savvy, and simply want to hold onto their altitude, because they have learned that altitude is a good thing. You will be surprised at how many pilots will fail to spot that you are actually creating turning room in the vertical and setting them up for a lead turn. Check the diagram above. If they allow you to fly into their blind area under the nose without a belly check, many will fail to notice that you are converting all that speed into a zoom climb and a belly shot. Even better, many pilots will even execute a loop as you go out of sight, mistakenly believing that they can horde even more altitude for later. You will of course see as they begin to pull up and time your own pull up to catch them slow at the top of their Immelmann turn. I’m always amazed at the number of pilots who have fallen to my virtual guns in exactly that way! The beauty of this is that even if it fails to get an outright kill, you won’t have lost anything, and should be able to extend.
If you miss the shot, or even if you get hits but no kill, you are right back to the need for an extension. Once again, you need to know if your aircraft actually has the ability to break off safely. If so, what is the minimum speed you can allow your aircraft to drop to before the escape window closes? A good guide, once again, is the point where the sustained turn curves cross, 255mph in this case. If your aircraft has a climb rate advantage, you can then extend beyond guns range and climb out for a another attack. In this case, the P-51 doesn’t have a climb rate advantage, and may need to extend until the Spitfire gives up the chase. Either way, I will just say that from a virtual fighter pilots perspective, there is no kill quite as satisfying as when you kill a more maneuverable aircraft using sound energy tactics. The USAF learned this lesson in the Pacific during the very early stages of W.W.II and have since turned the techniques of energy fighting into a science. At the very least, I hope this explanation shows that the less maneuverable aircraft still has some very interesting options.
Part Two: Angles versus Angles
In this section, I will explain some techniques that are valuable when the aircraft performance is so evenly matched that the fight may be considered as a similar aircraft engagement. The previous sections have explained the theory of turning performance for various aircraft as modeled in Aces High. What has not yet been explained is exactly how you get the aircraft to achieve the performance indicated in the diagrams in practice. How can you achieve the greatest turn rate, for the longest time, without departing from controlled flight? In order to answer that question I need to explain three things. Firstly, you need to know exactly where in the envelope you need to be to optimize your turn rate and turn radius. Secondly, you need to know how to get there. Lastly, you need to know how to stay there for long enough to get the kill without stalling or spinning out of the fight.
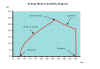
To answer the first question, you should refer to the diagram shown in Fig15, the F4U and a heavier F6F. The stall line is shown, and you can see that the higher up that line you can fly, the higher your turn rate will be. You won’t be able to fly above the 6g blackout-limit so that is the highest point on the stall line, and we have already described that as the corner speed. However, because that point is above the sustained turn rate curve (the Ps=0 curve) you will bleed off your airspeed and move down the stall line until you reach the best sustained turn speed. To do that, you will need to stay on the edge of the stall line the whole time. You will see by inspecting Fig16 that the best-sustained turn speed for the F6F is 152mph with a turn rate of 18.8dps. That’s the place you want to be during a hard turning engagement because it gives the highest turn rate, the smallest radius, and you can stay there indefinitely! It is because the optimum conditions occur on the stall line that this technique is known as stall fighting.

So to answer the second question, how do you get to that point? You will notice from the diagram above that if your speed is above the corner speed of 235mph, you should pull to the 6g limit. That means that you speed will reduce, but your turn rate will increase, and your turn radius will get smaller, until your speed bleeds to corner. If you notice that you are losing position rapidly, because you are watching the bandit’s nose pulling around on you, you should assist the slowing down process by pulling your nose above the horizon. That will help you slow to corner more quickly, and have the added benefit of storing energy (in the form of altitude) for later in the fight. If the Bandit is gaining angles because he was already slower than you, he will find it difficult to follow you high without losing too much speed. Now, because you are puling close to 6g and are above the sustained turn rate curve you will begin to lose speed quite rapidly. Don’t be tempted to use the throttle to slow down…you don’t want to throw energy away. During this phase of the fight, you must be pulling hard enough to have your vision partially restricted by blackout. Not so much that you can’t see the bandit, but enough to know that you are max performing. The secret here is to maintain a slight backwards motion on the stick; as you get slower, you need to command more AoA to maintain the same 6g load. As you get close to corner speed, you will begin to hear the stall warning, and that’s the time to hold the stick steady. Once you hear the stall warning, your aft stick movement must cease, now you need to ride the edge of the stall, and a steady hand is called for. The objective of course is to ride the stall, gradually bleeding speed down to the best sustained turn rate. That’s how you get there, but the closer you get to that speed, the more risk there is that you might exceed the stalling AoA and depart the aircraft. You can’t be impatient at this stage. Which brings us to the last question…once you get to the best sustained turn speed, how can you stay there and avoid departures? Here is the catch. You want to fly as close as possible to the stall line in order to optimize your turn, but if you hit it you will stall, lose lift, lose angles, or even spin! So this last question really comes down to finding a way of knowing when you are as close to the stall line as you can be, and there are some good indicators in the game.

When the angle of attack gets close to the stall, the air over the wings begins to separate from its surface and becomes turbulent resulting in buffeting. In some simulations this has been modeled with screen shake, or increased wind noise. In Aces High the main indication is the sound of the stall warning. As you get close to the stall and you can hear it, the level of sound and the note changes as the stall becomes deeper. So, if you are at the sustained turn speed and pulling hard enough that your speed is not increasing, and you have a persistent stall warning, you will be flying on the edge of the envelope. The way to avoid stalling is to ease small amounts of forward and aft stick in order to just maintain the sustained turn speed.
If your speed starts to drop, you must ease the stick forward or you will stall. As your speed increases, you can ease it back once again. Most importantly, you must unload slightly before applying later stick movements; if you want to roll, ease the stick forward slightly first! The snag is that this requires a fair degree of skill. If, in your effort to avoid departures, you use too much forward stick, your turn will open up and your opponent will turn inside you. If you use too much aft stick, you will hit the stall and possibly spin. The balance is delicate and it takes much practice to perfect. The real difficulty for pilots during a tough engagement, is forcing themselves to reduce the back pressure on the stick when all of their senses are crying out for them to pull harder! Having said that, there are some valuable techniques that can be used to ensure that you always employ intelligent stick control. The subject is considered in more depth in another article “Combat Control Techniques: Or how to be a good stick” and the lessons are relevant in all flight simulations.
Having considered the turning performance of these aircraft in some depth, it only remains to add a word of caution. The close-in dogfight can be a lot of fun….when multiple bandits are involved in what is known as a furball, it is so much fun that it can become addictive! The better you get at it, the more fun it becomes! However, the simple fact is that during your online flying where survival should have more importance than it does while off-line, flying slow enough to dogfight can be extremely hazardous! Remember the fighter pilots maxim, “Speed is Life!” and try to avoid taking unnecessary risks. It is not wise to get slow at the first opportunity, but it is good to know that if you have to get slow, you know how to handle yourself on the edge of the envelope!
Have fun trying these techniques; remember I’m always willing to answer questions!
Related Posts:
Related posts:
 Energy Management: Picking The Right Airplane For The Job
 Falcon Flight Model Evolution Page 2
Falcon Flight Model Evolution Page 3
Falcon Flight Model Evolution Page 4
Falcon Flight Model Evolution Page 5
Falcon Flight Model Evolution Page 2
Falcon Flight Model Evolution Page 3
Falcon Flight Model Evolution Page 4
Falcon Flight Model Evolution Page 5
 How to be a Good Stick in LOMAC Page 2
How to be a Good Stick in LOMAC Page 3
How to be a Good Stick in LOMAC Page 4
How to be a Good Stick in LOMAC Page 2
How to be a Good Stick in LOMAC Page 3
How to be a Good Stick in LOMAC Page 4