by Andy Bush
Be sure to read all of the parts of this series
[ Boom and Zoom, Part One ][ Part Two ][ Part Three ][ Part Four ]

In Part Two, we will take a closer look at the HnR attack from initiation to the re-attack (the HnC attack will be discussed in Part Three.). I’ll use screenshots to give you an idea what the attack looks like using the snap, padlock, and external views.
Just so we keep ourselves focused on what exactly we are talking about with regard to these two maneuvers…let’s keep in mind that the HnR and the HnC are reposition maneuvers for the purpose of re-attacking the bandit. In upcoming discussions of both maneuvers, your goal is to get enough distance between yourself and the bandit to be able to turn around, get your energy back, and attack from a position of advantage.
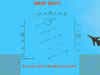
The HnR Attack
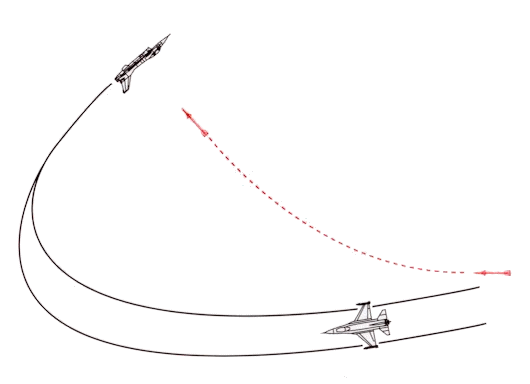
We begin by reminding everyone that this maneuver is one in which you gain turning room by extending below the plane of turn of the bandit. You are gaining lateral separation, not vertical…even though your extension may take you below the bandit’s altitude.
When Should I Use It?
Use the HnR attack when you have a significant top speed advantage over your opponent (+100mph for WW2 aircraft, +200 KIAS for modern fighters). In particular, you are concerned with maximum indicated speed, i.e., the top speed that you can get in a dive…be careful of speed values given in sim manuals. Often, these speeds are true airspeed values that pertain to max speed in level flight for a given altitude. While this is a good indicator of relative performance, you are much more interested in getting your aircraft to go as fast as it can.
Why is this important? Because the two can be dramatically different. For example, the P-40 could dive at a much higher speed than its listed 345 mph. This value is True Airspeed, not the Indicated Airspeed that you would see on the cockpit airspeed indicator.
What is the significance of this? For the AVG P-40 pilot, quite a bit. The fixed gear Ki-27 was not going to match the P-40 in a dive. But the difference does not end here. Other factors are also major considerations. Two merit mentioning for our sim flying. One is airframe structural strength, and the other is control effectiveness.
Some sims model aircraft structural strength very well…you may well be able to reach an airspeed that causes damage to your plane. If your opponent has a lower limitation, you can take advantage of it by diving away from him. Control effectiveness is another feature that can give you an advantage. Some sims model this factor very well…as you increase speed, the controls stiffen. Eventually, in some aircraft, they may well be useless and the aircraft will be uncontrollable until you slow down (or hit the ground as is often the case!!). In some WW2 aircraft, the ailerons were the first to lose their effectiveness. When this happened, the pilot could no longer roll with the same speed as he was used to…this was an advantage to the F4F Wildcat pilot who knew that the Zero chasing him would have its ailerons stiffen up to the point that the Zero pilot could not follow the Wildcat pilot in a turn at high speed.

Summing it up, this airspeed advantage will allow you to extend far enough to be able to turn back around to engage without allowing the opponent to catch up to you. You should also use the HnR when you plan a “one pass, haul ass” attack!
How Is the HnR Maneuver Flown?
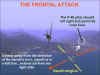
We begin with the attack entry. Since our objective is to extend for lateral separation, we are better served if our attack is initiated from above the opponent. If we attack from below him, then we waste energy in our reversal from nose high in the attack to nose low in the extension.
Our extension objective plays a critical role in our attack. Why? Because, when we extend away from the bandit, we want to do it behind his wingline (3/9 line). If we attempt to extend in front of his wingline, then we risk getting shot on the way out!

This desire to extend behind the bandit’s wingline has direct effect on our gun attack. We all know gun attacks come in two forms…tracking and snap shots. Let’s stop for a moment and clarify something about gun attacks.
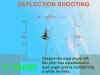
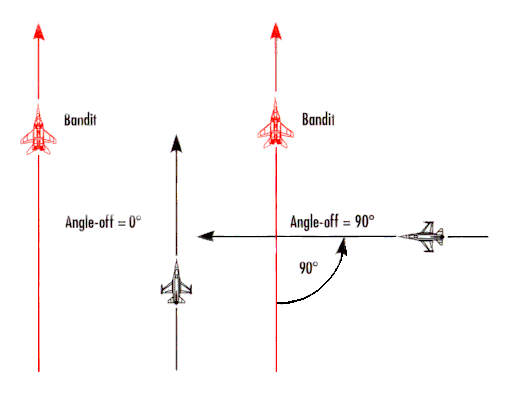
A tracking shot does not always require a low angle off, low aspect approach. It is entirely possible to track a target at any angle off and aspect. Tracking with approximately 90 degrees angle off is commonly referred to as “tracking on the beam”. As long as you as the shooter have the turn rate available to keep your nose in lead pursuit, you can track at any angle. By keeping your nose in lead, you are matching the target’s turn rate. Incidentally, another term…and one used in WW2…was the phrase “deflection shooting”. Many aces such as Hans Marseilles were well known for their deadly ability in deflection shooting.Deflection shooting is another way to describe a high angle off tracking shot.
A snap shot, however, is one in which the shooter does not try to match the target’s turn rate. Instead, the shooter estimates the needed lead angle, and then aims his aircraft in the plane of motion of the target. Often, the shooter is at or near one G when attempting this attack. When the target nears the lead point, the shooter fires with the expectation that the target will fly through the bullet stream. In this type of gun attack, the shooter accepts a lower probability of kill (Pk) but, in doing so, preserves his angle off/aspect angle.
Not so with the tracking shot. As the shooter adjusts his aim to track the target, he is at the same time reducing his angle off/aspect angle. The longer he tracks the target, the less the angular difference between himself and the target becomes.
Do you see where I am going with this?!! Good!! You are right…trying to track the target reduces your angle off/aspect angle. This makes it harder to extend away behind the target’s wingline because your tracking has aligned your nose with the target’s.
The point in all of this is to always be aware of the end game results of your attack profile. If it puts you at a disadvantage, then you may want to choose a different plan. When your game plan is to HnR, be careful not to spend excessive time trying to track the target…instead, take your snap shot and get out of Dodge!!
OK!! Enough of the “H” part of the HnR…let’s move on to the meat of the matter, the “R” part!
The significance of the HnR lies in what we do when we break off the attack. You have two objectives. First, you want to separate as rapidly as possible, and second, you want to retain your tally on your opponent.
Separation is a function of two things…airspeed and angles. Use all the power you have…WW2 guys, use WEP (War Emergency Power); jet jocks, use full burner when available. You are not looking to get Corner Velocity…you want max speed and you want it as fast as possible. Step one is to jam the throttle full forward. Step two is to plan your extension flight path wisely. This is where the angles part comes in. Your separation angle has two parts…one relative to the opponent, and one relative to the ground.

First, let’s take the angle relative to your opponent. This also has two parts. To begin with, you have the angle that exists when you cease fire. Ideally, you want this angle to be as large as possible to maximize your ability to extend well behind the bandit’s wingline. The second angle I’m talking about is the angle between your extension flight path and the position of the bandit. As a technique, I propose that you extend with the bandit at your 5 or 7 o’clock, in other words about 30 degrees off your tail.
Why have the bandit here and not at your dead six? Visibility! If you are using a snap view to keep the bandit in sight, your headrest may block your ability to see your six. The 30 degree angle lets you see the bandit and still maximize your extension.

Let’s start with our position at the open fire point. Since your attack can come from any direction, I’ll generalize again and say that your attack path can be from the front of the bandit’s 3/9 line…or behind it. Let’s take the frontal situation first.
Look at the target’s projected flight path. Now estimate a spot about 30 degrees off his tail. That is your extension direction. If you are within 45 degrees of the bandit’s nose, make a quick turn to your extension heading. If you are in the 45 to 90 degree arc of his nose, then a harder and larger turn will be necessary. In both cases, you can use your attack heading to help you estimate your extension heading.
If the bandit is turning, extend to the side opposite his turn direction. This gives the bandit the maximum number of degrees to turn in order to point at you in your extension. This takes time…time that you can use to get extra separation. It also forces the bandit to bleed more airspeed in the turn…another advantage to you.
Make these turns hard (5-7 G) to minimize the time spent in the turn…with your nose low attitude, this will not cost you any energy. As always, roll quickly to your desired bank attitude (lift vector aimed at your extension point). Next, pull your nose to that point. Then unload (relax back pressure to about one G), and roll back to a wings level attitude. Roll, pull, unload, roll. Try not to roll and pull at the same time…your fastest rate of roll is when you are unloaded. Now, check your rear view.
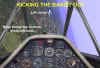
Is the bandit where you want him…about 30 degrees max off your tail? If he drifts into your six o’clock blind spot, then turn slightly to move him back out to where you can see him again. Use a quick, hard turn…known as a “check” or “kick” turn…to put him where you want him. Moving the bandit with reference to your tail is also called “kicking the bandit out” (although the term “kick” has nothing to do with rudder…it’s just a slang term for a quick, hard turn of short duration). Perform the check or kick turn by rolling unloaded into a bank angle that is 90 degrees opposite the opponent’s attitude. Then, make a short and hard pull to move the nose about 30-45 degrees…this should take 2-3 seconds or so. Then unload, roll back to wings level, and continue your extension. Remember the roll/pull/roll technique!


As an alternative, you could use rudder to yaw your aircraft to see the opponent, but do not fly with the rudder in this position. This would cause unnecessary drag, make your aircraft hard to control, and bleed energy. Instead, use the rudder to take peeks at the opponent.
Now let’s consider the rear aspect attack. If you are attacking from behind the bandit’s wingline, then your HnR extension flight path will require you to turn as much as 150 degrees to reach your extension heading.
Because of the magnitude of the turn needed to put you on your extension heading, you may want to make this a slicing turn, i.e. one in which you turn while descending. Such a turn will help you retain you energy and uses gravity to reduce your turn radius and increase your turn rate at the same time. If you are approaching for the bandit’s six, you do have another option if you have sufficient altitude…instead of turning, roll inverted and split S away.

As before, use the bandit’s projected flight path to estimate your turn. Once you have rolled out on your extension heading, then begin your extension. Kick the bandit out as necessary to keep him in sight.
Now, let’s talk about your extension angle relative to the ground. The main issue here is gravity…how it helps you accelerate. You want to unload to get less than one G…if available, use your cockpit G meter to hold about +.5 G. Do not overdo the unload…too much negative G and you may “red” out! This may not require a steep descent angle. Do not automatically shove the stick forward and put yourself in a steep dive. You want to deny your opponent any chance to arc you…in this case, in the vertical. The next figure shows this situation.
Your objective is maximum airspeed with minimum altitude loss. Remember, potential energy and kinetic energy are interrelated. What you gain in your descent, you will lose as you climb back up. This is particularly true of the difference between your altitude and the bandit’s when you decide to turn around. Assuming that you want to re-attack from at least level with the bandit, every foot of altitude that you must regain is lost energy…and lost energy is lost airspeed, lost maneuvering potential, lost advantage. Think of your starting altitude as money in the bank. If you have to spend it, spend it wisely and get your money’s worth. Consider your opponent’s ability to accelerate. If he is thrust limited compared to you, then keep your nose close to the horizon as you extend to minimize your altitude loss. This may result in slightly longer extensions in terms of distance from the fight and time, but will pay off at the end in reduced energy bleed in the turn back.
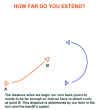
The next question to be answered in the HnR is “How far do I extend before I can turn back?” There is no “one size fits all” answer to this question. The required separation depends on the relative performances of you and your opponent. You must have an idea of the minimum distance between you and the pursuing bandit before you attempt a turn back. This distance will depend on two things…(1) how well your aircraft can effectively reverse its heading and, (2) the bandit’s airspeed when you begin the turn back.
First, let’s consider our own performance. In the previous sentence, I used the words “effectively reverse” for a reason. The turn back is more than just a turn of 180 degrees. Your energy level at the finish of the turn is an important consideration. Remember, you are not on the way home…you are returning to combat…and very quickly at that. An “effective reversal” is one that allows you to turn the required number of degrees at the least expenditure of energy. BFM is always a balance of kinetic energy (airspeed) and potential energy (altitude). How well your aircraft maintains its energy in a turn (level, climbing, or descending) will determine your turn around strategy.
How do you find this info? Trial and error. Take your aircraft out and fly it. As for your performance, you would like to turn around as quick as possible with minimum airspeed loss. The quickest way to turn is to perform a 135 degree inverted slice…but this puts you further below the bandit when you roll out…and for this reason may not be your best choice. Your other options are to turn level, pitchback (an inclined climbing turn – the opposite of a slice), or pull up into an Immelmann-type of maneuver.
The pitchback and Immelmann offer the advantage of increased altitude at your roll out, but also result in slower roll out speeds. As a matter of technique, I prefer these to a level turn on the assumption that I will be able to get my speed back in the re-attack. Remember to consider the use of flaps to help you turn…just be sure to raise them after you have completed the turn.


Compare turnaround times and airspeed losses. Vary your altitudes. Find the most effective turn (min time, max airspeed at roll out), and then practice that maneuver until you can do it in your sleep. In a fight, you do not want to put all of your attention on maintaining basic aircraft control…in the turn back, you will be watching the bandit as well as your own position…guess which one is most important?!!
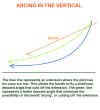
As a rule, the fighters in modern jet sims are much better in vertical maneuvers than prop fighters in WW2 sims. A typical jet has a much higher thrust to weight ratio than a prop fighter and, as a result is better at retaining energy in vertical maneuvers…and this is a blanket statement made without regard to any particular sim’s flight model. Some WW2 sim aircraft seem to have a difficult time “getting over the top”…Aces High comes to mind here. So, as with all BFM, never forget that all maneuvering is relative…in this case, relative to your particular aircraft’s capabilities. Do not pick a turn around technique just because “you like to do it that way”! If your aircraft turns into a wallowing pig at the top of an Immelmann, then this may not be the best maneuver to pick!!
OK! So much for the discussion of the effect of our performance on the turn back. The second part of that issue is the bandit’s performance. What aspect of his performance is significant to how and when we begin our turn back? The answer is his airspeed…we are going to focus on how fast he is going as he attempts to follow us in our extension.
Here’s the situation. In our extension, we have been accelerating away from the bandit. But, once we begin our turn back, our opening speed begins to slow and quickly stops as we turn 90 degrees to the bandit. Meanwhile, the bandit is closing on us.
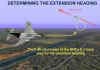
Let’s jump ahead to when we roll out of our turn, regardless of what type of turn that was. We end up basically nose on to the bandit. Now, we’ll freeze the two aircraft and examine the distance between them. The question you want the answer to is what should that distance be as a minimum. Just for example, let’s say that we would like 6000 feet (one nm) for WW2 aircraft and 12,000 feet (2 NM) for modern jets. These are just examples…you may find that more or less will work for you. No matter. Once we have determined the desired minimum distance at roll out, we can then work the problem backwards to find out the range that we should begin the turn back at. Here’s how we do that.
Let’s visualize an extension with the bandit attempting to catch us. I’ve made some rough rules of thumb for you to consider based on turning performance. I’ll assume that we can complete the 180 degree turn around in 10-15 seconds. During that time, the bandit will be closing on us. This figure shows the situation:
Next, I’ll choose two types of bandits…a WW2 type at 300mph and a modern jet at 600KIAS. These speeds allow me to compute how far the bandits travel in the time that it takes us to turn around (I’ll average the distance for the 10-15 second period). By rounding the numbers off, I come up with a distance of 1nm (6000’) for the WW2 fighter and about 2nm (12000’) for the jet fighter. I then add my desired distance at roll out and end up with approximate values of 2nm for a WW2 situation and 4nm for a jet situation. These are just rough values, but they do give you a feel for the time/distance relationship of the turn back maneuver.
How do you know when you are at these ranges? Many sims offer target labels that gives you bandit range. I do not look upon these as a cheat since the depth perception and ability to depict fine graphical detail is lacking in our sims. If the video picture allowed us to recognize and measure range as easily as can be done in real life, then I would not favor labels…but that is not the case.
The reason why I went through this math drill was to show you that the distances are not as close as some might imagine. In order to effectively return to the fight, you must get substantial separation prior to initiating the turn back. One cautionary note – these are real world approximates. They are based on specific turn rates. Your sim flight model may or may not use real world turn rates…we have all seen bandits do some amazing turns and reversals in our sims. In those cases where a sim’s flight model is suspect, only trial and error will produce an answer to the question of “how far is far enough”.
One last caution. If you are going to err in this estimation of when to turn back, err on the conservative side. Extending too far is much better than not far enough. What may happen if you do not go out far enough? Quite simply, the bandit has the opportunity to rejoin on you in your turn.
Views of a HnR Attack
Let’s finish off this discussion by looking at screenshots of two HnR attacks…a WW2 situation where a Fw-190 is dueling with a Hurricane, and a Vietnam scenario where an F-4E is wrapped up with a MiG-19.
These screenshots were taken using MS Combat Flight Simulator. I chose this sim simply because it has an extremely user-friendly editing system that allows me to position the aircraft to get their relative positions just the way I want them for instructional purposes. The views may not look exactly like they do in your sim, but they should be good enough to allow you to understand the points being made. Then it’s up to you to go kill the bandit!
The main things to look for are shooter and target fuselage alignment references, nose positions relative to the horizon and flight path corrections made to keep the tally.
Here we go…first the WW2 HnR engagement.
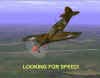
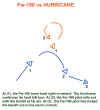
We begin with the Fw-190 pilot in a nose low attitude as he attempts a high angle deflection shot. The Hurricane’s high turn rate has forced the shooter’s nose into lag. At this point, the Fw-190 pilot must decide what his next move will be. He decides that he has some good smash (high airspeed) and that he can extend away nose low to get some separation. The question becomes one of which direction does he go in this extension. He uses the fuselage axis and wingline of the Hurricane to approximate a direction to turn to.
The shooter rolls rapidly to his right to place his lift vector in the direction noted. He then pulls his nose hard to that heading. This is done using the forward view. The short duration of the hard turn allows the shooter to keep the bandit’s position in mind even though he momentarily loses a tally. Reaching his desired heading, the shooter looks left using a snap view to see the bandit’s reaction.
The bandit is still in his left turn. The shooter then selects forward view, unloads, and rolls wings level. As he rolls wings level, the shooter positions his nose slightly below the horizon to maximize his acceleration.

With his nose now in the right attitude for his extension, the shooter checks his throttle at full power, adds some nose down trim for the airspeed increase, and then selects a snap view to monitor the bandit. The bandit was turning left and was initially slightly offset to the shooter’s seven o’clock. Because of this, he selects his “back left” view.
Much to his alarm, the bandit is not in this view! Not to worry. He remembers the geometry of the set up. The Hurricane was turning hard left…towards the shooter’s extended six. That’s where he probably is now. Here are two views of this situation.

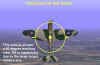
So the shooter selects his “rear” view and this is what he sees.

“Yep”, the shooter thinks…”Just like I thought.” The shooter does some quick geometry in his head…”the bandit is turning left…I want to kick him out so I can watch him…if I kick him out on the right side, I’ll be turning into him…not good…so I’ll kick him out on the left side”.
With that thought, the shooter returns to his forward view, rolls quickly into a left bank and pulls hard for a second or two. He keeps his nose slightly below the horizon.
Then he quickly unloads, rolls wings level again, and checks his nose position relative to the horizon. He is going to switch back to a rear view, and he does not want to do this with his nose out of position…too high and he loses energy…too low and he may hit the ground.
Then he selects his rear view…and sees this.
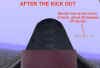
“Good,” he thinks. The shooter also has a readout of bandit range…a feature available in many sims. At about 1300 feet range, the shooter is relatively safe. The Hurricane had to expend a lot of energy in order to get his nose around to the shooter’s position. The bandit may be nose on to the shooter, but their relative airspeeds are very different. The bandit’s speed is probably no more than 200mph…possibly less due to his hard turn. Now check the shooter’s airspeed in Figure 27…500kph equates to more than 300mph. The shooter has his desired extension airspeed difference (+100 mph) and will be slowly adding to that figure as he continues to accelerate. He can now concentrate on extending as he switches back and forth between his rear and forward views.
All that is left for the shooter is to monitor bandit range until the turn back point is reached.
Now, let’s look at the F-4E Vs MiG-19 situation. The set up is somewhat similar with the exception that the F-4E is meeting the MiG in more of a head on position. As the F-4 pilot merges with the MiG, he notes that he can pretty much extend straight through. He is in a left bank, and the MiG is also. The F-4E pilot looks to the MiG’s five o’clock for his extension heading. He wants to extend to the MiG’s right side to increase the number of degrees the MiG has to turn to follow the F-4E.
As the two aircraft merge, the F-4E pilot maintains his left bank, selects his left snap view, and pauses to watch the MiG. What’s he going to do? The F-4E pilot’s extension plan is going to depend on the MiG’s follow-on move.

Another option for the F-4E pilot is to use a padlock view to observe the bandit at the merge. When he selects padlock, he sees this picture. He uses the horizontal and vertical stabilizers to orient himself to the bandit and the horizon. He uses the vertical stabilizer as his lift vector. He sees that a roll to the right will bring him wings level with the bandit still to his left rear. But the bandit is in a left turn that will take him to the F-4E’s six o’clock. To ensure that the MiG remains on his left side, the F-4E pilot rolls to the left slightly to orient the lift vector just below the horizon and then makes a hard, check turn into the bandit’s six. This kicks the MiG further out to the F-4E’s seven o’clock.

OK! Regardless of whether the F-4E pilot is using a snap view or padlock to watch the bandit, he maintains his tally and analyzes the MiG’s intentions. He sees that the MiG is staying to play and, by continuing its hard left turn, is intent on flying a two-dimensional level turning fight…a plan that will cost the MiG pilot time and knots, as the F-4E pilot knows. The F-4E pilot selects forward view, rolls right to a wings level and slightly nose low attitude, unloads and rams his throttles into full AB. The F-4E leaps forward, gaining over 50 knots almost instantaneously.

The F-4E extends away from the MiG in a nose low attitude. With the MiG not yet nose on, the F-4E pilot has gained an excellent extension on the MiG. Now, as with the previous WW2 example, it’s a race for the roses! The F-4E pilot uses his rear view to monitor MiG range and aspect. He will check turn as need to keep the MiG out of his dead six until he gets the needed separation for the turn back. In any case, he is out of both cannon and Atoll range. The call is now his…he can choose to engage or not…proper use of fuselage alignment, nose position relative to the horizon, and his available sim views have given him the room to make that decision on his terms, not the MiG’s.
Well, folks…that pretty much wraps up our discussion of the HnR attack. In the last part of this series, I’ll discuss the HnC attack and throw in some tips on how to fly the HnC in a 2v1 situation that you can practice using your favorite sim and comm programs such as Roger Wilco.
Related posts:
 Boom and Zoom Tactics, Part Four: 2v1 Techniques
 Boom and Zoom Tactics, Part One
 Boom and Zoom Tactics, Part Three
 Discussion Of Boom And Zoom Tactics
 Tactics 101 – Introduction and Lag Pursuit
 The Falcon 3.0 Manual Tactics Section – Introduction to Defensive BFM
 The Falcon 3.0 Manual Tactics Section – Introduction to Head-On BFM
 The Falcon 3.0 Manual Tactics Section – Introduction to the Geometry of Air Combat