by Andy Bush
Be sure to read all of the parts of this series
[ Boom and Zoom, Part One ][ Part Two ][ Part Three ][ Part Four ]

I’ll conclude this series with some basic tips on how to fly a Boom and Zoom using “Hit and Climb” (HnC) tactics. Following a discussion of the some academic considerations, we’ll look at two situations…a WW2 setting and something a little more current. We’ll focus in on the use of snap, padlock, and external views to understand how to visualize this maneuver in our sims. I had planned to finish up this part with a look at the typical maneuver flow and simple communication techniques that you and your flying partner may find helpful as you gang up on the bandit in a 2v1 engagement, but, because of the length of this last part, I’ve decided to put that into a separate article.
What Is the HnC?

The HnC is an exaggerated High Yo-Yo type of maneuver. In some A2A manuals, you may find a maneuver called a Quarter Plane maneuver. The HnC resembles this maneuver as well. The main difference between a HnC and these two maneuvers is the point at which the maneuver is begun. The Yo-Yo or Quarter Plane maneuvers are repositioning maneuvers intended to gain or preserve turning room and are usually begun before the pilot reaches gun range in order to avoid a flight path overshoot. On the other hand, the HnC maneuver is usually begun after the pilot has fired.
When Should I Use It?
Use the HnC to make slashing attacks on an opponent that you have an energy advantage over. This maneuver is well suited for an engagement where you cannot turn with your opponent and your top speed advantage is minimal…an example would be the F-4 against a MiG-21. The top speeds of these two fighters are close enough that you in your F-4 cannot count on a HnR tactic to get you the needed lateral turning room. In your attempt at a HnR, the MiG-21 probably will not be able to catch you, but it will be able to remain close enough to get inside the turn radius of your turn back maneuver…and this is to be avoided at all costs!
You may also use the HnC tactic when you want to avoid a prolonged turning fight…often the case when you find yourself outnumbered or at some other tactical disadvantage.
The HnC is best used against a bandit that has depleted its energy state…usually as the result of a hard turn. When I flew the F-4 and the F-104, we used this maneuver against the F-5 (a good MiG-21 surrogate). We knew that if we could get the F-5 into a hard turn, it would not have the excess energy to be able to follow us into the vertical. We used our superior thrust to weight to power ourselves up and out of the plane of the F-5’s turn.
How Is the HnC Maneuver Flown?
Let’s follow the same line of thought that we used in the HnR discussion…we’ll begin with the entry. Again, I caution you all about making big assumptions…but here are some ideas to consider. Unlike the HnR, I would prefer the HnC attack to be initiated from a level to climbing entry. Why? Because my objective is to climb above the plane of turn of the opponent. If I dive on the opponent, it is possible that when I initiate my climb that my turn radius actually takes me through that plane of turn. If the bandit is in a level turn, I would therefore be descending below him before I started back up. Any altitude that used to be below the bandit is of no good to me in my climb…it is wasted energy, fuel, time, and therefore turning room.

Because of this, if I dive on my opponent, I want to level off prior to reaching gun range. To do this, you must have the lateral turning room needed to descend down towards the bandit and then be able to raise your nose to level your aircraft with the plane of the bandit’s turn. More detail on this will come later. A diving entry is fine just as long as you do not allow it to turn around and bite you on the rear as you execute your vertical extension!
Now let’s consider the actual pull up. But first, let’s stop for a second for a reality check. Don’t forget why we are in this position in the first place…we are making a gun attack! So make a good one! Let’s not start thinking about our reposition and forget about killing the bandit…that’s getting the cart before the horse! Drive in and take your shot…then start your HnC reposition. It’s nice to plan ahead, but don’t take it too far.
OK! Back to the problem at hand…
In the HnC pull up, you want an answer to two questions…when do I begin the maneuver…and how do I do it?
Let’s take the ‘when’ first. In the HnC vertical pull up, there is a fine line between ‘too soon,’ ‘just right,’ and ‘too late.’ In your sim, you will not have much time to ponder this! The decision point comes very fast. As in most BFM situations, there is no simple answer. Here are some of your considerations…you do not want to pull so soon that you ‘telegraph’ your intentions to your opponent. On the other hand, if you delay your pull up, there is a good chance that the bandit may be able to extend away from your re-attack.
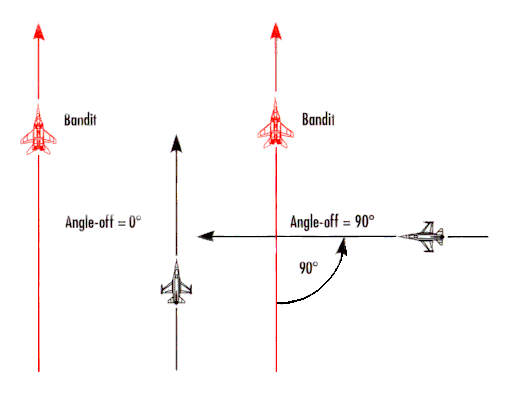
Here is a tip. Use the angle that you approach the bandit at as a reference. If you are in his front quarter…within 30 degrees of his nose…then consider pulling up before you pass his wingline. What is this called? A Lead Turn!! Remember, in BFM a well-performed lead turn is next to Godliness!! Your closure in this situation is a major point of emphasis…the greater the closure, the sooner you may initiate the lead turn pull up. You can expect the bandit’s speed to give you the required lateral spacing as you climb.

If you approach the bandit on the beam, be very careful about pulling up too soon. Do not ‘telegraph’ your intentions in this way…you are letting the bandit ‘off the hook.’ As soon as he sees you pull up, if he’s smart, he’ll unload and head for the deck (or if he has the energy, he may pull up into you to force a vertical scissors). Instead, delay your pull up until you approach his flight path. In this manner, you are pulling up into the bandit’s six area, not his wingline area.

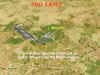
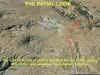
For me, one technique is that I begin my pull when I cease firing the gun, regardless of approach angle. I know that my firing distance is close enough that I’ll not pull up too soon in the front quarter, and it will also be close enough that I’ll not give my intentions away on a beam approach. The next diagram shows a red ellipse that represents typical pull up points depending on the angle of your approach to the bandit. The concept is derived from nominal max effective gun ranges. The idea is that your pull up point varies with aspect.

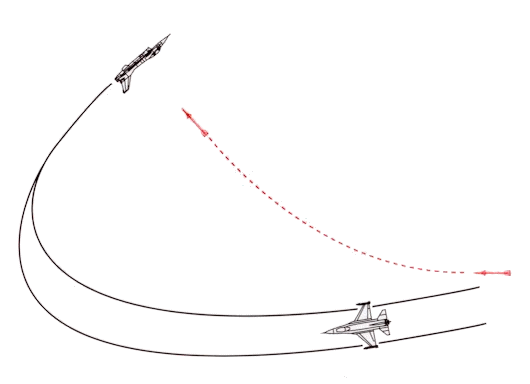
Now the second part of our question…the “how”. How to perform the HnC pull up is basically a matter of lift vector control. In the HnR, our first step was to turn to an extension heading. In the HnC, we follow the same thinking, but instead of turning, we are going to climb. Just as the HnR turn heading was important, so is the orientation of the HnC climb.
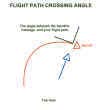
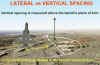
When we talked about the HnR attack in Part Two, we said the extension had both a lateral and a vertical component. The same is true of the HnC climb. The first is the flight path relative to the bandit. Here, once again, we bring the bandit’s wingline into the discussion. Visualize yourself looking down on to the bandit’s plane of turn just as the HnC fighter is beginning its pull up. The fuselage axis of the HnC fighter makes an angle with the bandit’s fuselage.
In the pull up, the HnC pilot wants to get vertical separation…and he also wants a little lateral separation. This lateral separation is usually gotten behind the bandit’s wingline. Why? Because the HnC pilot is setting himself up for a re-attack, and he does not want to be overhead the bandit so much as he wants to be high and slightly behind. He needs the spacing to the bandit’s six o’clock in order to be able to level out of his re-attack dive prior to taking another shot.
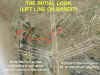
What this then means is that the HnC pilot needs to get his nose behind the bandit’s wingline prior to (or during) the pull up. He does not want to climb with his nose pointed ahead of the wingline. This will impede his ability to get lateral separation…and even worse, may offer the bandit a chance to pull up and force an overshoot. Your objective in the climb is to minimize your forward movement relative to the flight path of the bandit. In doing this, you will force the bandit to move out in front of you, creating as a result lateral separation in addition to the vertical separation you are getting in the climb. In the next diagram, picture yourself looking down upon the bandit’s plane of turn from above. The flight path vectors represent movement in the plane of the bandit only.

But you can overdo a good thing! There is no advantage to pointing too far into the bandit’s six. I suggest that a nose position of down the wingline to no more than 30 degrees aft is sufficient. The only exception to this is the situation where the HnC pilot meets the bandit more or less head on. In this case, the HnC pilot should disregard his excessive fuselage misalignment and not try to change his heading before beginning the climb…to do so would take too much time…time that would allow the bandit to possibly separate. In this situation, the HnC pilot should pull up on his attack heading. Once in the climb, he may pull up in a loop-type reposition or may roll into a bank to incline his climbing turn into a pitchback-type maneuver.

Good! Let’s move on to the climb itself.
The second angle is the climb angle…the angle of the HnC fighter’s flight path above the plane of the bandit’s turn. Let’s be careful here. We are talking about the angle between the HnC pilot’s flight path and the plane of the bandit’s turn. Do not use the horizon as a reference unless the bandit is in a level turn.
What if the bandit is not in a level turn? Can you still fly a HnC attack? Of course! Remember…BFM is always flown in relation to the bandit, not the horizon. The climb portion of the HnC is a vertical reposition…but the “vertical” in this case is in relation to the bandit’s plane of turn…not the horizon. The next figure shows this.

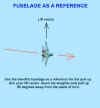
Ideally, you want to orient your lift vector 90 degrees opposite the bandit’s plane of turn. One way to help you visualize this is to use his fuselage as a reference. You want your lift vector to point 90 degrees away from his fuselage line. Be careful, though. Remember, this is a three-dimensional problem, so you need to consider the bandit’s bank attitude as well to ‘see’ his plane of turn. Rather than make this issue too difficult, let’s just level our wings with the bandit’s flight path prior to beginning our pull. That should be good enough for most situations.
There is no “right” value for this angle. The purpose of the vertical move is to get turning room in the vertical. The amount of turning room needed is a function of the HnC fighter’s airspeed and G capability at the pulldown point. The HnC pilot wants enough turning room to be able to get his nose back on the bandit. He also wants to have enough acceleration distance to be able to re-engage the bandit with sufficient energy to continue the HnC attack profile or allow a successful separation/disengagement. At the same time, he does not want to needlessly extend the climb…to do so allows the bandit to gain separation and energy. A perfectly executed HnC vertical move is one that allows the HnC pilot to reposition for his re-attack while forcing the bandit to maintain a defensive turn.
You must always be aware of your energy as you enter this pull up. WW2 fighters will deplete their energy quicker in the pull up than a modern jet will. Because of this, WW2 climb angles may be less steep than a jet’s. This is not all bad since WW2 aircraft require less turning room in their re-attacks. Conversely, because of a jet’s greater speed (and resulting turn radius), it usually requires a steeper angle to keep lateral spacing within desirable limits. The HnC pilot wants the vertical separation to be greater than the lateral.
Let me suggest a climb technique. I’ll do this with two entry situations in mind. The first is the beam entry, and the second is the front quarter entry.
For the beam entry, I suggest that you use a 45 – 60 degree climb angle if you are flying a WW2 fighter…and a 60-90 degree angle if you are flying a modern jet. Now, these are only approximates and will vary with your energy level and bandit position at the pull up. The point is that you will probably need a steeper climb to get the needed vertical flight path in a jet…and that you need to have at least 45 degrees to get the same relative displacement in a prop fighter. The 60-degree max for the WW2 fighter is a concession to the more rapid energy depletion rate of a prop fighter.
How about the front quarter attack? This one is relatively easy! When your energy level permits, regardless of fighter type, pull up to about a 90-degree angle. The bandit’s speed in the other direction should take care of the lateral spacing that you need…what you want now is the vertical turning room. Fine, you say! But what if your energy level doesn’t allow this? Then make your climb similar to a pitchback, in other words, incline your turn.

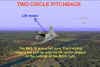
One note of caution. If you are forced to use a pitchback type of inclined climbing turn, as a rule do not turn into a bandit that is in a turn…you may not be able to get the needed vertical and lateral room and even worse, the bandit may be able to meet you head on. Instead, turn to the bandit’s six (away from his turn direction). Make a ‘two circle’ type of re-attack. Accept the extended time that this will take on the notion that caution is often much more advisable than a ‘no guts, no glory’ approach.
From a top view, it looks like this:

Now we are ready to begin the pull. Your objective is to gain spacing as quickly as you can. If you over-rotate and pull too hard you may stall your aircraft or bleed energy too rapidly. So, your pull is not a max G effort. Instead, smoothly increase backpressure to get an energy sustaining nose rotation. As a rule, look for 3-5 G’s for WW2 aircraft, and 5-7 G’s for modern aircraft. These are again rough numbers based on average conditions…experiment a bit with your specific aircraft to get best results.
Our last discussion item regarding the pull up is the HnC pilot’s aircraft attitude relative to the bandit. Let’s use his lift vector as our frame of reference. In the climb, the HnC pilot will want to aim his lift vector in a specific direction based upon the flight path of the bandit. In doing so, he will establish a pursuit course…either lead, pure, or lag. Remember the general rule…lead is for increasing your closure, lag is for increasing your separation.
The HnC pilot usually establishes the initial direction of his lift vector as he is pulling up. Once his climb angle is established, he can ‘fine tune’ his attitude based upon the bandit’s behavior.
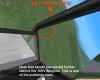
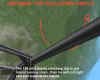
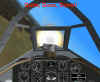
Great so far…but how do we point the lift vector? Or more to the point, how do we recognize the lift vector? We remember that we can visualize our lift vector as coming out of the top of our canopy. This is important since the padlock and snap views both have cues that allow us to recognize this direction. The forward snap view is easy…the lift vector is always at the top of the monitor screen…in fact, in most snap views, you can think of the top of the monitor screen as the lift vector. In many padlocks, there is a lift line that can be used (as well as cockpit structure) to identify the top of the canopy area. Figure 21 shows a padlock view from Flanker2…and Figure 22 is an external view of the same shot. The Flanker has pulled up outside the bandit’s turn and should roll right to place the lift vector arrow over the bandit to begin the pull down.


When we think of lift vector orientation, we often use the concept of the pirouette. The pirouette is an unloaded aileron roll in which the pilot rolls to aim his lift vector in a particular direction. The HnC pilot uses the pirouette to position his lift vector in relation to where he wants his flight path to be in the pull down. If this pull down flight path is to be lead pursuit, then the HnC pilot pirouettes to aim his lift vector in front of the bandit. If the HnC pilot need to increase his lateral spacing, he will point his lift vector either at the bandit (pure pursuit) or behind the bandit (lag pursuit).


What comes next? Let’s call it the ‘pulldown’, or the return to the fight. In your climb, you do not want to bleed all of your speed off. You will need speed to get your nose back down. Let’s start with a minimum of 150-200 mph for WW2 fighters and 350-400 KIAS for modern fighter types.
Well, that sounds easy enough in theory, but what you want to know is how to do this in your sim. What cues do you have available to help you? First, you must keep a close eye on your energy level. This means airspeed…so you should cross check your speed frequently. Sounds reasonable, right? But, be careful…it’s not that easy! Many people use snap views in their sim…and snap views do not have any airspeed info. So, if this applies to your style of flying, be sure to cycle back and forth between your snap view and your forward view. Most padlocks include flight data so airspeed cross-checking is not much of a problem.
Your view type is your next cue. Regardless of what type of view you are using, your objective is to maintain an awareness of the bandit’s flight path relative to your own. What are you looking for? An indication that the bandit is beginning to increase its separation from you. You do this two ways.
First, watch the bandit’s fuselage axis. Maintain your climb until you see the bandit flight path begin to move away from you. Look at the bandit’s fuselage and nose position. As you see his nose move away from your flight path, you may consider the pull down, I say ‘consider’ because you may want to get a little more separation in the climb. This is OK…the important thing is that you recognize that the bandit is pulling away from you.
The second cue is more subtle…and may also vary with the sim viewing display. In the first instance, you can use bandit relative size as a cue…look for the bandit size to begin to get smaller. In the second instance, some sims include distance labels that you may use to see that the bandit is beginning to move away from you.
To begin the pulldown, we want to first orient our lift vector into a pursuit course relative to the bandit. How do you know whether to use lead, pure, or lag? Make this decision depending on your closure and position on the bandit. If the bandit is pulling away at a noticeable rate, then you may want to pull down using lead pursuit. On the other hand, you may use pure or even lag pursuit if you need additional spacing. One good example of this is if you are in an ‘overhead’ position on the bandit and want to move more to his six o’clock.
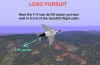

While still in the climb, unload and pirouette your aircraft until you are looking at the bandit out of the top of your canopy. Then, smoothly bring in the backpressure to start your nose moving towards the bandit. Make sure you have max power, and drop flaps if appropriate (and it is almost always ‘appropriate!’ Some aircraft like the F-16 will configure automatically…or should…but for the WW2 types, flaps can really help out.).
Then pull your nose into your desired pursuit course…you should now be back in a dive and heading for another gun attack. Keep your power in, retract your flaps, and start working on your gunnery aiming problem.
The BnZ Attacks As Seen from a Sim’s Viewing System
Next, we’ll take a look at how these attacks can be visualized using the padlock and snap views. The screenshots come from MS CFS, Aces High, and Janes USAF. One note regarding Aces High…on line sims have a strong following, and BnZ tactics are a favorite with their pilots. These sims have one similarity…none of them include a padlock view. Instead, snap views are used to provide the pilot with a sense of three-dimensional SA. As we go through the HnC maneuver step by step, I’ll use snap views from Aces High to supplement the views from the other sims. Please note that I have drawn in the bandit on these snap views as a matter of convenience. These ‘bandits’ will be drawn larger than they would normally be in actual play in order to make the desired academic point more easily seen.
In addition, I used a Tu-22 as the bandit in the USAF shots, again as a matter of convenience. It was a lot easier to position the USAF F-16 against the Tu-22…when I first tried using a fighter adversary, I couldn’t get the sim AI to cooperate with the positional set ups I was looking for!!
As in Part Two, I’ll describe a WW2 and a modern jet HnC scenario.
The HnR Attack
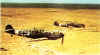
We’ll begin with the WW2 profile…using an MS CFS P-40 vs Ki-27 engagement and supplemented with an Aces High Me-109G-10.
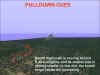
The first screenshot shows the P-40 pilot beginning his pull up after making a beam gun attack. He will level his wings with the bandit’s plane of turn and pull up on his present heading since the forward speed of the Ki-27 will move the P-40’s flight path behind the bandit’s wingline.
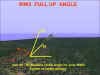
The P-40 pilot smoothly rotates to about 45 degrees of pitch angle above the plane of the bandit’s turn and then checks his left rear snap view.


The P-40 pilot now unloads and climbs while watching the bandit. He is looking for cues that the bandit is beginning to pull away from him. Along with diminishing relative size, the P-40 pilot is looking for the bandit’s flight path (nose position) to begin to move behind his own wingline. In this next figure, note the increasing angle between the bandit and the P-40.
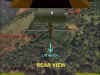
Seeing the Ki-27 moving away, the P-40 pilot rolls inverted and then checks his rear view. The roll is complete when the P-40 pilot orients his lift vector across the turn circle relative to the bandit.

From this attitude, the P-40 pilot pulls through to begin his re-attack. As he completes the pull, he will fine-tune his heading to establish the desired lead angle.
Now let’s look at a HnC profile using the snap views available in Aces High.
I’ll draw in the bandit positions to simplify matters (and because getting good, specific screenshots was a pain in the rear end!!). Remember that, unlike a padlock view, in a snap view, the lift vector always points up to the top of your monitor screen.
One other thought before we get into the action. In sims such as Aces High that do not offer either a padlock or external view for use, you have two types of views that you may use in your BFM. These are snap views and pan views. Snap views are individual views looking out of the cockpit in a specific direction…up, aft, left, etc. Pan views are slewable (movable) views looking from the cockpit to the outside. Both snap and pan views may be ‘zoomable’ depending on the sim.
Snap views have been around since the earliest sims and are the easier of the two types to use. Pan views are more difficult to control, requiring a higher level of manual dexterity in using the keyboard and/or flight stick hat switches. In either case, the pilot that has success in using these views in a three-dimensional BFM situation is as much an accomplished view manager as he is a good BFM pilot.
The point to keep in mind when using snap or pan views is that, unlike padlock or external views that automatically follow the bandit, these views require you to manually switch or pan the view to follow the bandit. In padlock or external, the sim’s AI is responsible for centering the bandit in the field of view…in sims such as Aces High, you must do this for yourself.
OK…so much for philosophy!! Let’s get to it!
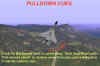
We begin with the bandit turning left across the attacking Me-109’s nose. The 109 pilot plans a snapshot and a vertical reposition.

Once the pilot begins the pull up, he must switch out of the forward view to keep the bandit in sight. The pull up requires him to keep an idea of where the bandit is (and is going) in his mind as well as having a pitch (horizon) reference for basic aircraft control. Selecting a side view (or panning sideways) is the answer.

Once the climb angle is established, the Me-109 pilot must manage his view selection to keep the bandit in sight. A slight roll may help keep the bandit centered in the side snap view. One tip is to think of the wingtip as a pointer…raise or lower the wingtip as a means of keeping the bandit in the view. One thing I might mention…don’t use the rear view in this situation…here’s why:

The bandit is not there! Why not? Because it is moving off to the 109 pilot’s left aft side. He needs an aft rear view to continue to watch the bandit. Here it is:
The 109 pilot now looks for the same pulldown cues as described before…diverging flight paths, bandit getting smaller as its range opens. Seeing this, the 109 pilot prepares for his pulldown. To do this, he needs to get his lift vector pointed across the circle in the direction of the bandit. This can be a problem when using snap views. Here’s why.

This figure shows a pyramid-shaped cone extending upwards from the climbing 109. This represents a viewing area that is difficult to use while maneuvering. It is NOT a blind area as such…your snap views include a view straight up…but it is a view that I consider very disorienting to use when maneuvering due to the lack of cues that tell you ‘where you are going!’ Note in Figure 38, that the pilot will be rotating the ‘blind cone’ towards the bandit as he rolls to put his lift vector on the bandit for the pulldown.
The end result is that the 109 pilot is going to have to use other views for the pulldown. Initially, he uses his side view. He rolls to move the bandit towards the top of the view (towards his lift vector) and then begins to apply backstick pressure. This will bring his nose back down and may be assisted through the use of flaps. The next figure shows the nose returning to the horizon.
This transition from a climb to a descending pursuit curve will be the most critical part of the HnC when using the snap views. It helps if the pilot can maintain a good sense of positional relationships in his mind. This will allow him to roll and then pull his nose into a general area with some expectation that the bandit will also be there!
As soon as the 109 pilot has his nose down near the horizon, he can change to a forward side view to keep the bandit in sight.

Now, with the lift vector pointed back towards the bandit (and with a view that keeps his sense of orientation), the pilot can fine-tune his pulldown angle.
In the next two forward views, the 109 pilot maneuvers to set up his next gun attack.


Well…what about you padlock users?
Let’s go to that view type now with a jet scenario…an F-16 maneuvering against a Tu-22. These shots from Janes USAF include the lift line.
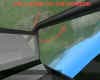
Speaking of the lift line, here are a few words on its meaning and use. In many of our padlocks, when we look at the target out of the top portions of the canopy, we no longer have any cockpit structure in view. This tends to disorient us since we lose track of where our nose is. The lift line concept was developed to help solve this problem. While the actual depictions vary from sim to sim, the general idea is the same.
In USAF, an add-on file was built that would add a white line on the top of the canopy, running down the centerline of the canopy from front to rear. This line has a series of arrows spaced along its length. The arrows point towards your nose, and the number of arrow diagonal marks are placed to tell you what part of the canopy you are looking through…one arrow indicates the front portion of the canopy, while the four arrow marks indicate you are looking up through the rear top of the canopy. In the next picture, you are looking down into the F-16 cockpit from directly overhead. The location of the lift line corresponds to that part of the canopy that the pilot will be looking up through.


Notice also the two side arrows located approximately half way from the canopy rail to the main lift line. These include the letters ‘L’ and ‘R’ plus the arrowhead to indicate that you are looking out of the side of the canopy, and not the top.
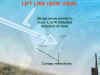
Since the placement of the arrow line is along the top of the canopy, we can think of it as representing the lift vector. When we pull backpressure, our aircraft flight path will be towards what ever the line is superimposed over…hence, the name lift line.
The lift line can be used for out-of-plane maneuvering as well as in-plane. By rolling to place the lift line away from the target, you can align your flight path in lead, pure, or lag pursuit. This will be shown in the following HnC maneuver. One last note on the USAF lift line…in my screenshots, I will highlight the lift line since it is difficult to see in some of the shots.
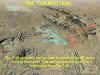
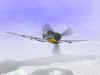
Let’s begin with the F-16 at the end of a beam pass on the Tu-22.

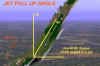
As his nose passes the target’s tail, the F-16 begins its pull into the vertical. The pilot selects full afterburner and rotates the nose quickly to keep his forward velocity to a minimum. In the following padlock views, I’ll circle the bandit, show his wingline, and indicate his flight path for easy reference.


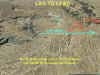
The F-16 pilot continues his pull into a near-vertical attitude as he watches the flight path of the target. He is looking for the target to begin moving forward on his padlock side view…this will indicate that the target is beginning to open the distance between the two aircraft, thus giving the F-16 additional lateral turning room.


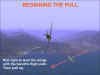
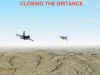
Now, at the top of his zoom, and with the target beginning to pull away, the F-16 pilot rolls right to aim his lift vector (lift line) at the target. As he reaches this new inverted attitude, he takes another look at his vertical and lateral spacing. Is there enough room to pull down for another attack?
“Don’t think so…,” the Viper driver says to himself. He’s got a little too much forward velocity…not enough lateral turning room. If he pulls down from here, he’ll end up with a rushed attack. He needs to buy himself some time…some more lateral spacing…and he does this by rolling further right and pulling his nose into lag on the target. This will allow the target to move further away. The F-16 has plenty of vertical turning room, so the pilot is not worried about making the corner when going downhill. This lag reposition using the lift line will result in him rolling out at the target’s six with sufficient spacing to make a controlled attack…if he had not corrected his lift line, he may well have pulled out too close to the target.

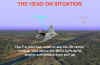
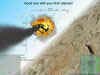
Now, the F-16 pilot quickly rolls upright and plays the bottom of his pull out to move into the target’s six. He comes out of burner, double checks his gun switches, and presses the attack.
And the inevitable result of a well flown HnC reposition.
Well, folks, that just about wraps up the series on BnZ tactics and considerations. Hope you learned something…and the next time you see me stooging around in Aces High…just remember this article…and be gentle!!
Alfakilo out.
Related posts:
 Air Combat Basics: The Scissors Maneuver Page 4
 Boom and Zoom Tactics, Part Four: 2v1 Techniques
 Boom and Zoom Tactics, Part One
 Boom and Zoom Tactics, Part Two
 Discussion Of Boom And Zoom Tactics
 The Falcon 3.0 Manual Tactics Section – Introduction to Defensive BFM
 The Falcon 3.0 Manual Tactics Section – Introduction to Head-On BFM
 The Falcon 3.0 Manual Tactics Section – Introduction to the Geometry of Air Combat