Edited by Ed “Skater” Lynch
For those of you that are “old salts” when it comes to flight sims, and for those of you that are new to flight sims, this article should be of some value to you. This is largely a reprint from the manual of one of the best combat flight sims ever released. Spectrum Holobyte’s Falcon 3.0 was indeed the father of all modern, “realistic” combat flight sims. The F3 manual was one hell of a paper weight. Weighing in at something like seven pounds, the F3 manual was jam packed with information on flying the sim, and the usage of tactics, and the deployment of weapons and the employment of the aircraft. Here is a little jewel from the tactics section. Enjoy!
Credit goes to Microprose / Hasbro Interactive, Spectrum Holobyte, and the Falcon 3.0 team.
Introduction to Offensive BFM
The ultimate goal of offensive BFM is to kill the bandit in the minimum amount of time. In order to accomplish this goal, the fighter pilot must understand basic offensive maneuvering. It is helpful to think of offensive BFM as a series of fluid rolls, turns and accelerations. Some of the maneuvers in offensive BFM have names, but the modern day fighter pilot thinks in terms of driving his jet into the control position from an offensive setup, rather than in terms of executing a series of named “moves” to counter the bandit’s defensive maneuvering. The sustained maneuverability of a modern fighter has made a “move-counter-move” discussion of offensive BFM obsolete. This study guide reflects current offensive BFM thinking.
It may seem obvious, but the primary reason that you need offensive BFM techniques is to counter a bandit’s turn. When you are behind a bandit who is flying straight and level, it is a simple matter to control your airspeed with the throttle and fly around behind him. When the bandit turns, however, things change dramatically. A turning bandit will immediately create BFM problems.

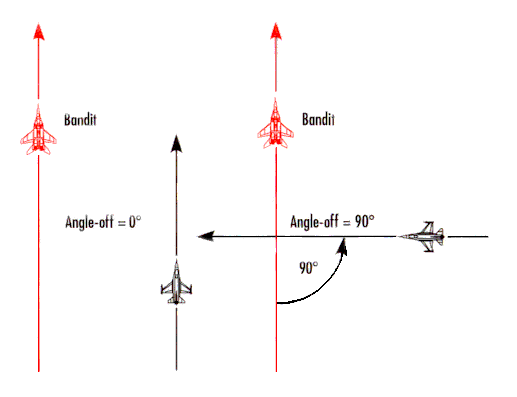
In order to stay in weapons parameters and in control of the bandit, you must stay at his 6 o’clock. To do this, you must maintain control of angle-off, range and aspect angle. Remember these terms defined the angular relationship between two aircraft. The above image shows how a bandit’s turn will change the angular relation-ship between the offensive and defensive fighter. To control the “angles” and stay at 6 o’clock, the offensive fighter must also turn his jet. The below image shows why an immediate turn by the offensive fighter will not work. If the offensive fighter goes into a turn to match the defensive fighter, he will just end up out in front because the center of there turn circles are offset.

An immediate turn will not work, and driving straight will not work. A turn of some sort is the solution to solving the BFM problems of angle-off, aspect angle and range caused by the bandit’s defensive turn. The problem is twofold-how to turn and when to turn. Let’s look first at the mechanics of turns.
BFM and Turns
BFM has a lot to do with turns. It is important to under-stand several concepts about turns in order to be successful at BFM. These include the concepts of positional energy, turn radius, turn rate, corner velocity and vertical turns.
Power for Position
“Ps (specific power) for position” is a concept that is an integral part of BFM. Fighters have two types of energy: kinetic and potential. Kinetic energy is simply the velocity or speed at which the jet is traveling. Potential energy is “stored” energy that can be converted to kinetic energy. Potential energy is directly related to aircraft altitude. If a jet is at high altitude, its potential energy is high. If the same jet is flying at low altitude, its potential energy is low. Always remember that you can trade altitude (potential energy) for speed. Likewise, you can convert aircraft speed back into altitude or potential energy.
You can also exchange energy for nose position. Anytime you maneuver or turn a fighter; it “costs” energy. When you turn a jet at high G, you “spend” or lose energy. That’s the bad news. The good news is that the defensive fighter also gives up energy to turn and defend himself.
Turn Radius and Turn Rate
The first two characteristics of turns are turn radius and turn rate. Turn radius is simply a measure of how tight your jet is turning. If you are looking down on the aircraft as it turns, the turn radius is the distance from the center of your turn circle to the aircraft, measured in feet.
It is not important that you understand how to compute turn radius. Just realize that velocity is squared in the turn radius equation, meaning that turn radius will grow exponentially based on velocity. The equation also includes aircraft G’s. The more G’s that you pull, the tighter the turn. Still, velocity is squared, so airspeed has a greater effect on turn radius than G.
Turn rate is the second important factor for turning the jet. Turn rate indicates how fast the aircraft moves around the turn radius or circle we just talked about. It is also described as how fast an aircraft can change its nose position. Turn rate is measured in degrees per second and is also dependent on G’s and airspeed.
The higher the G in the above equation, the faster the turn rate. Velocity still remains an important factor. Notice that G is divided by velocity. If G remains at maximum, a higher velocity will cause turn rate to decrease. The reverse is true: a lower velocity will yield a higher turn rate.
Corner Velocity
You may think that slowing down to minimum airspeed and pulling as hard as you can is the best course of action in order to achieve a high turn rate. Not so fast. There is a relationship between airspeed and G’s. At lower airspeeds, you have less G available or, in other words, you can’t pull as many G’s as you get slow. Less lift is produced by the wings of an aircraft at slower speeds, and as a result, there is less force available to turn the aircraft. If you get going really fast (above Mach 1, for example), you also lose G availability. For every fighter, there is an optimum airspeed for achieving the highest turn rate. The airspeed where the jet has the quickest turn rate with the smallest turn radius is called corner velocity. In most modern fighters, it is between 400 to 500 KCAS. The F- 16 has a corner velocity of about 450 KCAS.
The next image shows the relationship between airspeed (labeled as a Mach number), turn rate and turn radius. The top of the image shows turn rate and turn radius broken out individually, while the bottom of the graph shows them combined. These graphs in the image below are generic turn rate and radius charts. The bottom chart represents the approximate turn performance of an F- 16.
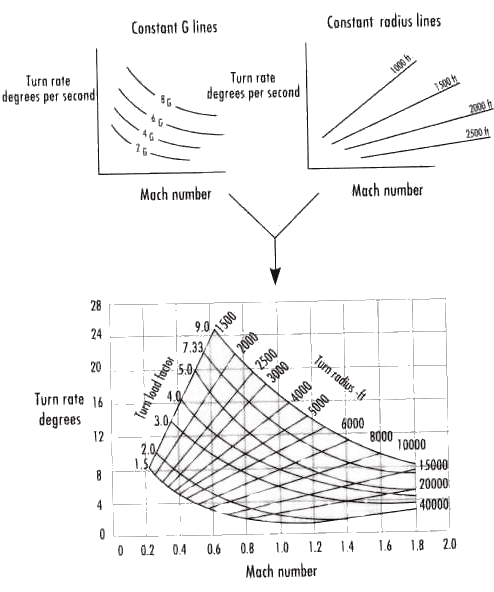
Note that at 0.6 Mach, the jet can pull 9 G’s and turn at a rate of 24° per second. At 0.6 Mach, the jet can also turn in a radius of 1,500 feet. This is the best (tightest) radius the jet can achieve at the highest turn rate possible. The jet can turn this same radius at slower airspeeds, but turn rate will go down significantly. At 0.4 Mach, for example, the jet can turn with a radius of 1,500 feet, but the turn rate falls from 24° to 16° a second. Just to put this figure in perspective, a 2° per second turn rate advantage will allow you to dominate an adversary.
The airspeed of a jet can be controlled by the pilot in the following four ways:
- Throttle position
- Drag devices
- Nose position in relation to the horizon
- Aircraft G
Throttle position controls how much slow, cold air you turn into fast, hot gas. Drag devices refer primarily to speed brakes. Nose position in relation to the horizon also affects airspeed. For example, a nose-low position will increase your airspeed because of the effect of gravity. Finally, G force causes airspeed to bleed off. Remember the brief discussion earlier about exchanging energy for position. No modern fighter flying at medium altitude can stay at corner velocity while pulling max G’s for long. As you pull G’s, you will get slower. It is important, however, to start maneuvering close to corner velocity because the first turn you make is usually the most important in the fight.
Fighter pilots should think in terms of both turn rate and turn radius. A fighter with a superior turn rate can outmaneuver a fighter that has a poor turn rate but a tighter turn radius. Fighter pilots have a simple two-word saying: “Rate kills.” What this means is that the ability to move (or rate) your nose is the primary means of employing weapons (which is what offensive BFM is all about). A bandit may have a tight turn circle, but if you can rate your nose on him and shoot, the fight is over. The flaming wreckage will no longer cause you BFM problems.
Vertical Turns
I have heard it said (incorrectly) that you fly in relation to the bandit and not the earth. While it is obvious that you must fly in relation to the bandit, you must simultaneously keep your nose in control of the horizon. Gravity affects airspeed, as already mentioned. Gravity also affects G availability. If you pull the nose of a fighter straight across the horizon, gravity will have no effect on your turn performance. When you pull the nose up or down, however, gravity becomes a player.
The next image introduces a new term: radial G. To understand how an aircraft turns, you must understand that there are two factors that determine the rate and radius of a fighter’s turn. The first is the G being felt and read out on the G meter in the cockpit. The second is the pull of gravity. Radial G is a term used by fighter pilots to describe the effective G that determines a fighter’s turn. This shows this concept by depicting a fighter doing a loop. In the image below, the cockpit G (the G felt by the pilot) is a constant 5 G’s. You will notice that when an aircraft is straight and level and trying to pull in the vertical, the effective G or radial G is only 4. Gravity is subtracted from cockpit G so that the jet is pulling only 4 radial Gs. When the fighter is pulling 5 G’s in the cockpit in the pure vertical (90° point) either straight up or straight down, gravity has no effect, so radial G is equal to cockpit G. When the fighter is inverted and pulling straight down at 5 G’s, gravity adds 1 G to your effective or radial G. The fighter, in effect, is turning at 6 G’s at this point. Radial G then is simply a term that describes the effective or turning G created by combining the positive or negative influence of gravity with cockpit G.
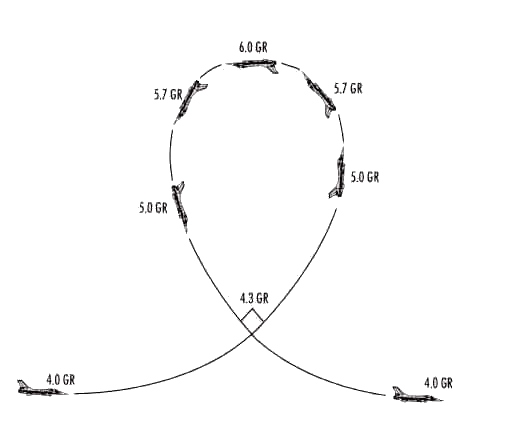
What the above image shows is that cockpit G is not equal to radial or turning G when maneuvering in the vertical. Remember that 2′ per second is a significant turning advantage. The extra G you can get by placing your nose below the horizon when you turn can give you at least 2′ per second turn advantage. Most of the time, 1 GR equates to 3°-4° per second.
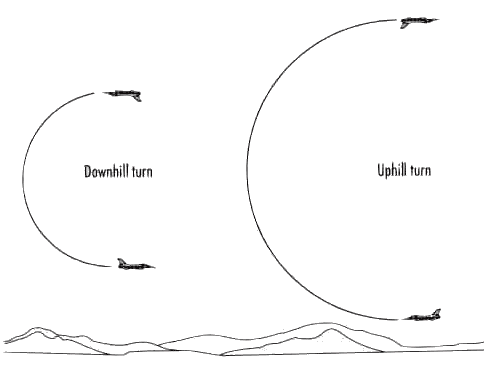
The concept of radial G can be seen in our next image. In this image, both fighters are pulling the same cockpit G. Notice that the fighter with his lift vector below the horizon is turning tighter. What is not so obvious in this figure is that the fighter turning toward the ground is also moving or rating the nose faster.
Turning Room
When a bandit turns his jet, he creates BFM problems for you. To solve these problems, you need to turn your jet. In order to turn your jet and solve these BFM problems, you need turning room. Turning room is the offset or distance from the bandit. There are three basic types of turning room: lateral (or horizontal) turning room, vertical turning room, and a combination of both. In order to understand the concept of turning room, you must first understand turn circles. Turn circles are simply the paths that a fighter cuts through the sky when it turns. Our next image shows a turn circle.

The concept of turn circles is critically important to understand because, in order to turn and solve BFM problems created by the bandit, you must first drive your jet inside the bandit’s turn circle.
Here’s how turn circles and turning room are related.
A bandit turns his jet to defend against your attack. You need to get displacement from the bandit in the horizontal or vertical in order to turn and stay behind him. If you try to get displacement while you are still outside the bandit’s turn circle, it will not work. Why? Because if you are outside the bandit’s turn circle, the bandit can get around the turn and meet you close to head-on. This means that the bandit can turn and take away your turning room. Now we show a fighter turning for lateral offset outside a defender’s turn circle.
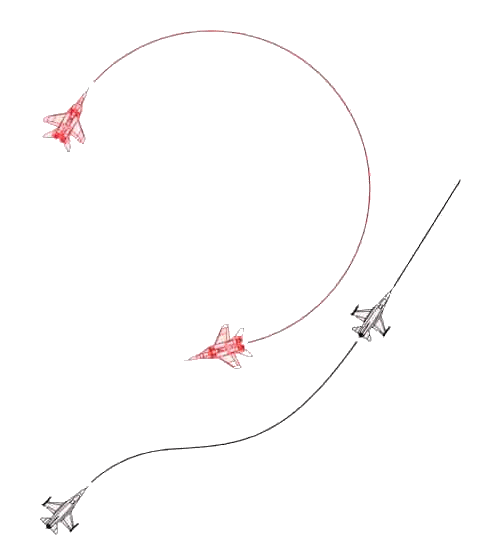
The bandit just keeps pulling, leaving the defender with no turning room. This same principle also works in the vertical. Next shows a fighter climbing, doing an old maneuver called a “high yo-yo.”

It is very dangerous to try to get turning room in the vertical, outside the bandit’s turn circle. If you are climbing in the vertical outside or dose to the bandit’s turn circle, the bandit can get his nose around on you. When you pass at high aspect, the bandit will be nose high while you will be nose low. The bandit gets the first use of gravity to increase his radial G as you pass and will probably get behind you. For this reason, do not try to get turning room outside the bandit’s turn circle.
Any maneuvering you do outside the bandit’s turn circle will delay you from getting inside the bandit’s turn circle. You must be inside the bandit’s turn circle in order to turn and solve the BFM problem. In the next section, we will describe how to determine if you are inside or outside the turn circle of the bandit and how to use BFM to get and stay in weapons parameters.
Solving the Offensive BFM Problem
The reason you are out there burning jet fuel is simple: to get into weapons parameters and shoot. BFM is real simple against a guy hanging in a chute. All you have to do is watch out for him shooting at you with his pistol as you fly by and wave. Anytime you can take a shot and end the fight, do it. The problem is that when you start from 1.0 to 1.5 nm behind the bandit and he turns, you will only be in AIM-9M parameters for a very short time. The AIM-9M is just like every other heat missile out there today it doesn’t like the high line-of-sight rates generated by targets in tight, turning fights. You have time for one shot. If you miss, you had better be ready to put some offensive BFM on him, or you will end up wearing an AA- 11 Archer. The end result of your best offensive BFM will be a gunshot. Here is how you do it.
The bandit turns. The first question you must ask yourself is “Am I inside or outside the bandit’s turn circle?”
How do you know? Watch the bandit’s turn.
If the bandit’s present turn rate will force his nose on you or even close to you, you are outside the bandit’s turn circle. For modern fighters at high G, you are normally outside the bandit’s turn circle at ranges outside 2 nm. At 1 nm, you are normally inside the bandit’s turn circle, and between these ranges, you are in a transition zone. These ranges, of course, do not really matter to a fighter pilot. When you start behind a bandit, you simply fight what you see. As the bandit turns, you predict where he is going and maneuver based on this prediction. For example, if the bandit is only pulling 4 G’s, then at 2 nm you are still inside his turn circle. The next image shows the difference between starting at 2 nm from a 4 G target and starting at 2 nm from a 7 G target.

Most fighter pilots will not pull only 4 G’s, however, when they are in danger of dying. Still, you fight what you see.
If you are outside the bandit’s turn circle at the beginning of the fight, you are not in an offensive fight-you are in a head-on BFM fight. Head-on BFM is the subject of Chapter 4, but for now, just think about an AIM-9M shot in this situation. The bandit cannot shoot you until he gets his nose around to within about 40° of your jet. You should be able to get one good missile shot at him before he forces you inside Rmin.
Gun Shot Procedures
Flying good offensive BFM against a bandit will put him right in your gun sights. You’ll get him there by under-standing the dynamics of getting into position, closing and firing.
Flying into Gun Parameters
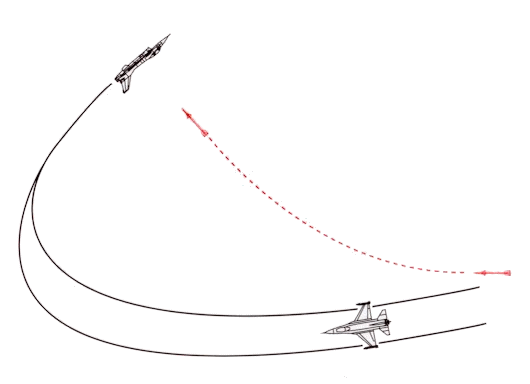
It is time to discuss how and when we turn to stay behind the bandit. You are inside 1.5 nm on a hard turning bandit, and you need turning room to get around on his six. The first step is to observe the bandit’s turn. If you are outside the bandit’s turn circle, get ready for a head-on BFM fight. If you are near or inside the bandit’s turn circle, you have a positional advantage that you can keep. Shoot, if a shot presents itself, but don’t get mesmerized watching your own missile and forget to BFM. Next, drive to where the bandit started his turn. If the bandit drops flares or chaff, he will mark the point in the sky where he started his turn. Drive to this position (called the entry window). Next you’ll see the entry window. The entry window is located inside the bandit’s turn circle. You can start your high G turn into the bandit once you arrive inside this window.
In the below image, the F- 16 drove in a lag pursuit course to a position inside the bandit’s turn circle. By driving to this position, the F- 16 gained horizontal turning room that the bandit can’t use or take away. You know you are at the entry window and must start your turn when the bandit is approximately 30° off your nose.
When you get into this relationship with the bandit, start your turn. Remember corner velocity. If you arrive at the window too fast or too slow, you will get stuck in lag pursuit because you will not have sufficient turn rate to get your nose out in front of the bandit.
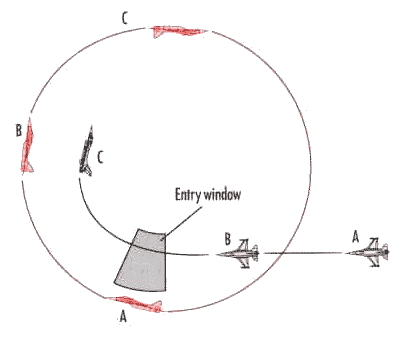
The next step is to pull 7 to 8 G’s into the bandit. As you come around the corner, keep your nose in lag. If you see the nose of your jet approaching pure pursuit, ease up on the G. Hold this lag pursuit course until you get within 3,000 feet of the bandit. At this range, go to lead pursuit and get ready for a gun shot.
When you arrive inside 3,000 feet on the bandit with your nose in pure or lead pursuit, your throttle controls your overtake. Note this. In close to the bandit, with your angle-off less than 45° and your nose in pure or lead pursuit, the position of your throttle controls your closure. When you get saddled up for a gun shot, you must match airspeed with the target. In most cases, this will require constant movement of the throttle. In addition to banging the throttle off both stops, you may have to maneuver out of plane to control your airspeed. If a throttle reduction and the speed brakes dot slow you down enough, roll the jet to orient your lift vector out of the bandit’s plane-of-motion and pull. Hold this lag pursuit pull for about two seconds; then ease off the G and watch the bandit. When he starts to move forward on your canopy, it is time to pull back into him. Pull your lift vector out in front of the bandit as you pull down.
Taking a Gun Shot
You are inside 3,000 feet on the bandit with your nose in lead. How do you take a gun shot? The gun in most fighters is actually a cannon. The F-16, for example, has an M-61A1 20mm cannon, which is common to almost every U.S. fighter. The M-61A1 shoots High Explosive Incendiary (HEI) rounds at the rate of 100 per second. At the proper range, the gun is like a giant buzz saw. In order to carve up the enemy, however, you must understand the fundamentals of taking a gun shot. To hit a target with the gun, you must meet the following conditions:
- You must be in range. This range varies, depending on aspect, but it is usually about 2,500 feet at low aspect angles and about 4,000 feet at high aspect.
- You must have your nose in lead pursuit. The bullets fired by the gun are unguided projectiles that take time to get to the target. For most gunshots, the bullet time-of-flight (TOF) is .5 to 1.5 seconds. If you point directly at the target and fire, the bullets will pass behind the target. If the bullet moved at the speed of light, you could point right at a turning target and score a hit. Since the bullet is considerably slower, you must pull lead. This lead may not be very pronounced, however, at dose range.
- You must be in the bandit’s plane of motion. When an aircraft turns, it carves a circle in the sky that creates a plane. In order for you to hit the target with the gun, you must be turning in the same plane as your target. For example, if the target is flying a loop and creating a vertically oriented plane of motion, you have to be flying a loop in the same plane as the target.
Using the Gun Sight
The new gun sight for the F-16 and F-15 is called EEGS. EEGS (pronounced as it is spelled) stands for Enhanced Envelope Gun Sight. The EEGS funnel allows the pilot to match the wingspan of the target with the width of the funnel to determine the proper firing range. The other important gun aiming cue in the HUD is the gun cross. The gun cross represents the departure line of the bullets. You can consider the gun cross as the gun barrel. Bullets pass straight out the gun cross.
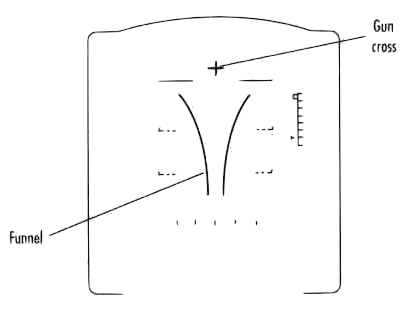
So, how do you use the funnel? The gun in the F- 16 is boresighted to 6 mils. This means that the gun is adjusted to fire a burst that will put 80% of the rounds inside a 6-foot diameter circle at 1,000 feet. This is a tight pattern. You can have either a highly concentrated burst that completely misses the target or a very lethal burst that vaporizes the target. It just depends on the quality of your gun sight (and your ability to aim it.) Air-to-air situations are always dynamic, and targets under attack will normally jink violently to stay alive. Since the sight (and your reactions) are not instantaneous, it is likely you may achieve a highly accurate miss; that is, a tight burst that finds only empty air. The sight was lined up and stable, but you missed. How could this happen? The sight was lying because the target was jinking faster than the sight could react. The way to overcome this problem is to strive for an inaccurate hit. You do this by using the EEGS funnel to fire a burst while moving the target through the area of uncertainty. The EEGS funnel gives you a perfect solution when the wingtips of the target match the width of the funnel. If the target is jinking, however, this “perfect solution’ may be in error.
Here is how to use the gun cross / funnel combination to kill the bandit:
Place the gun cross out in front of the target. Picture the target with a long pilot boom sticking out the nose. The gun cross should be placed on this extended pilot boom. If the target changes his plane-of-motion, then fly to place the gun cross on the new position of this imaginary pole sticking out of the nose of the target.
Next, over lead the target by making the wingspan of the target extend past the funnel. This will place your bullet stream in front of the target’s nose.
Fire the gun while easing up on the G. This will move the target from the bottom of the funnel to the top. Cease fire when the target’s wings are inside the funnel.
Make a slight jink out of the bandit’s plane-of-motion so, when he blows up, you don’t suck a body part down your intake.
This technique uses the gun cross and the EEGS funnel to place the bullet stream in front of the bandit. When you ease up on the G, the target should fly through your bullets. Our last image shows how to make this shot.

Part One: The Geometry of Air Combat
Part Three: Introduction to Defensive BFM


