Mission Building
For this preview, I’ll skip the “instant action” and Training missions…instead, I’ll begin as we would in real life…in mission planning. The mission planning function in LOMAC is a powerful tool, probably the best I have seen to date. You can go about mission planning in two ways…the Fast Battle Planner is an abbreviated mission editor that gets you into the action quickly, while the Mission Editor is a much more involved process that allows you a wide latitude in selecting mission elements.
 Here is a look at the Fast Battle Planner set up screen…variables include type and number of aircraft, time of day, season, and weather conditions…avionics complexity and weapons effectiveness, and overall survivability. If this isn’t scalable realism, I don’t know what is!
For more in-depth mission planning, I use the Mission Editor to build a new mission or change (edit) an existing one. This editing function is one that I’ve grown to really like as I can return to a previous mission and modify its game settings (such as number and type of targets, change terrain, load different weapons, etc.) to spice up the action a bit.
My objective in planning today’s mission is to give you a look at a typical medium difficulty CAS mission. The location is the Caucasus region on the coast of the Black Sea. We are tasked to help defend this area from the bad guys who are invading from the north.  Our two-ship flight will depart from the south and ingress through some spectacular scenery until we arrive at a town where the enemy is about to beat down the front door. Once there, we’ll use our Mavericks to takeout any organic air defenses and then close to gun range to finish the job. Here’s how we set it up.
We begin with the initial mission building screen. First, we set up the coalitions by selecting the good guys and the enemies.
We OK that and this takes us to the Airgroup Planning screen where we do the majority of work in selecting mission elements and placing them on our map.  I use the Add New menu on the top left to select aircraft and ground objects…both friendly and enemy. Scalability is present again in the form of buttons that allow you to select different levels of map detail.
 Zooming in on each map style brings out much finer detail.
You have three choices of map types…a Satellite format that has the appearance of a high altitude photo, and two Geophysics formats. One is a “Plain Jane” map and the other is a format that includes terrain elevation. I prefer the terrain format as it is most like the maps we use in real life. Fast mover pukes don’t use maps (and wouldn’t know how to use one anyway!)…but us warthounds need a good reference to get down in the mud with.
 |
 |
 |
| Satellite View |
“Plain Jane” View |
Terrain Elevation View |
I won’t bother with the finer points…but the basic idea is that you select object types and then place them on the map. The map is “zoomable” so you can be precise in where you want things to go. I begin by choosing my start point…on the ground or in the air. The next two pictures of the set up screen show how you can elect to begin the mission at the takeoff point…or airborne…just by specifying where you are at and what your flight status is.
 |
 |
| Depart From Base |
Depart Airborne |
 Then I add the enemy force by selecting the “ground object” icon from the Add New list. I scroll the map until I get to the desired target area…in this case the town of Ust’-Dzheguta. Then I use the zoom feature to enlarge the map to show the close in details around the town.
The idea is to select a target from the drop down target list and stick it on the map with a simple mouse click. Note the wide range of target types (there are more…the menu has a scroll button to access them). First, I add a ZSU-23 to defend the enemy force. Then, I repeat these steps to select and place a convoy of tanks along the road.
 |
 |
| Placing The Target |
Adding More Targets |
 With the forces in place, I then use the map to plan an ingress and egress route. The route will consist of waypoints that will show up as data on my HUD. Route planning is where the terrain features of the Geophysics map come in handy. I look for high terrain to hide behind as I approach the target area. The map screen also allows me to measure leg distance and heading.
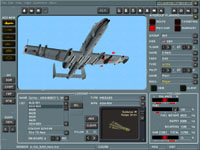
Finally, I add weapons to my jet. The Airgroup Planning menu on the right lets me select “Side”, “Task”, and “Type”…this then brings up the appropriate external stores in the Loadout/Payload sections. 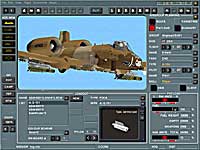 Here I choose my weapons types and location, aircraft color scheme, and fuel load. Both the “shark” and “warthog” nose art styles are available as options, and I was happy to see that one of the RAF Bentwaters squadrons, the 510TFS Vultures, was represented as well.
Enough of this planning! We’re pilots, not bean counters! So let’s go fly! I save the mission, assign a mission name, and then click “Fly”. Without any further ado, we’re airborne and on our way.