Formations
Two-Ship
We’ve spent a fair bit of time philosophizing on the tactical partner concept and spelling out some of the standard terminology for the limited comm environment. Now, let’s turn our attention to formations. Until the state of the art allows us to gesture hypnotically and appear at the IP, you, the Warthog driver, must find a way to get your armada from the home drome to a point at which you can employ it. The formations to be discussed are obviously not the only ones at your disposal… — their success will depend upon a number of factors: weather, terrain, and defenses to name a few, and they must be modified in response to these factors. The formations described are to be considered as wing standards and used as a basis for tactical planning. We think they’re good formations, but we don’t want to imply that they are the only ones worth using. Flight leads may (and should) innovate, but if every pilot in the 81st remembers a few standard parameters, things could be a lot easier when you join up with a tactical partner who doesn’t know your favorite tricks.
Line Formation
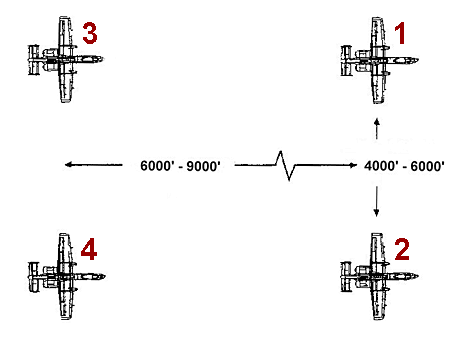
The favorite of many Hog herders. Flying line does some good things for you — good mutual support for both aircraft, both in terms of visual lookout and firepower support (the ability to turn and point the gun at anyone who threatens your partner). On the other hand, it’s tougher to fly than others we’ll mention… it requires more proficiency from both partners, is difficult for the leader to manage, lacks ease of maneuverability, and is less than magnificent in poor visibility or rough terrain. Basically, line is most appropriate when your biggest threat is enemy aircraft. Here’s our shot at a set of standard parameters:
Line Formation
These numbers are based on an average lateral separation of 4000 feet. Use your head though…if you are medium altitude with an air threat, you might want to spread it out a bit, stack your wingie high or low, and set up a weave for visual and pod coverage. On the other hand, if the cirrus makes your partner look as though you were viewing him through a gunny sack, you might tighten it up a tad and remember, when you are low, the wingie always stacks level to high…never low). Four thousand feet of separation in the semi-gork makes your lost wingman drill a little easier, but won’t do much for your two-ship employment. Ten degrees of slop is provided both fore and aft for underpowered Hogs, sun in your eyes, etc…but the closer you are to line abreast, the happier your leader will be.
To get into line, a radio call is easiest:
“Cobra, go line.”
Once you are in line, you may find it necessary to turn. A couple rules of thumb apply. First, all delayed turns should be made using the same parameters…max power and 3-4 g’s. Next, assume that you will be going to line from either wedge or trail. Finally, the leader should use an aggressive wing flash to signal which way the turn will go. Real life used a number of techniques for turning the flight. For our sim flying, let’s keep it simple. If you are the wingman and lead signals a turn into you, then he will turn hard into you right away…you remain wings level until he approaches your wingline (roughly your 10:30 or 1:30 position)…. Then you turn hard to join into line. If lead wants to turn away from you, he’ll first wingflash in that direction. You immediately turn hard to that direction…lead will play his turn to roll out in line using you as a reference. Turns of more than 90 degrees are handled as multiples of the 90-degree technique I’ve just mentioned. As a wingie, vary your g to achieve the proper spacing and line position.
Here’s a further plug for tactical partnership…as a rule, he who ends up out in front is responsible for getting back into line. An example. You are warting along as the wingie when the lead rolls into a hard 90-degree turn away from you. Other than shouting “come back, Shane”…what can you do? The OK answer is to turn to follow…and then wait for the lead to maneuver to put you back into line. After all…he put you into a lag position…now it’s his responsibility to maneuver to get you back into line. Why would he turn away like that and leave you behind? He’s probably got a good reason. Let him get you back into line and then he’ll probably clue you in on what’s going on. Trust your lead…it’s part of the contract.
One final responsibility to mention and this one’s important. The wingman is responsible for collision avoidance in all turns. It may be all well and good to brief a “lead goes low (or high) procedure, but this requires both pilots to put their attention, at least momentarily, on deciding where low or high is for a given turn…and anyway, you may not want anyone to go high if it means unmasking or exposing yourself to the threat. In this instance, going wide is a better option. If the wingman is responsible, lead can concentrate on turning, navigating, and not hitting the ground. The wingman simply avoids hitting lead…in all cases. Common sense, however, must prevail. No contract authorizes anyone to be stupid.
Wedge Formation
Here’s the recommended alternative when all the MiGs are in the washrack, or the weather is delta sierra, or the terrain is such that your partner wets his pants during the first delayed 90 turn. Wedge provides you the flexibility and maneuverability that may be your best defense when conditions get really lousy. It’s much easier for the wingie to fly and much simpler for lead to manage. Wedge is an excellent attack formation on its own, and it can easily be converted into line or trail as conditions dictate.
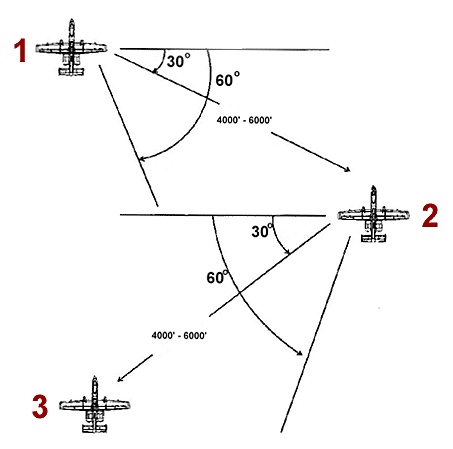
No specific signals are needed to maneuver a wedge formation…the lead turns and the wingie follows. When the turn is complete, the wingie maneuvers to regain his wedge position. The most obvious drawback to wedge is the reduced lookout coverage that lead can give the wingie. For this reason, the wingie needs to keep his own six clear and not trust lead to do it for him. Here’s how to fly the formation:
Wedge Formation References
(click on the above for the full screen image)This formation can be modified to meet the situation at hand. The wingie should strive for a line that is 30 degrees back from the leader…terrain and weather permitting. This allows the lead to keep track of him and provide some visual mutual support. However, there will be situations that require the wingie to fly further back than the 30 degree line…back to as much as 60 degrees…for example, narrow valleys, hard maneuvering, etc. The name of the game in any case is to work to hold that 30 degree position as much as possible. The wingman is cordially invited to cross whenever that seems to be the thing to do…this flexibility gives him the cutoff needed to hold or regain his position when terrain or maneuvering forces him into lag. The next picture shows a “window” to fly wedge in. Try to keep the leader outside the canopy bow. Right next to the bow represents the maximum angle back that you want to fly…the desired is to put the lead further away from the bow. In LOMAC, you can expand the cockpit forward view to make this easier to see.
Wedge Positioning
One word of caution…getting lazy and dropping into trail is a no-no, except for a very few circumstances (weather, heavy maneuvering, tight terrain). Put yourself in the place of the ZSU shooter…miss the first guy, nail the second! The best way to avoid this is to keep lead outside the canopy bow.
Ménage à Trois (Three-Ship)
For the uninitiated, this catchy little phrase loosely means “doing it with three”. Aside from its everyday context, it has an application in warthogging. Specifically, that situation when you, the head Hog, wind up with two wingmen instead of one. “Oh heresy”, some might say, knowing that the two ship is the standard fighting element and the backbone of our tactics. Well…back off a little. The three ship has a few things going for it. In the formation we’re about to discuss, navigation is easier…the lead has only himself to worry about. Also, you improve lookout and firepower with the addition of that extra set of eyeballs. Finally, you’ve got another buddy ready to leap into the fray when needed…he’ll have to sequence himself in, but that won’t be that hard and the extra firepower will be handy to have.
Certainly there are problems involved too. Three birds are more of a challenge to manage than two, both enroute and in the target area, but this is not an insurmountable problem. We’ve got two recommendations for getting your three ship from point A to point B…vic and wedge.
Vic
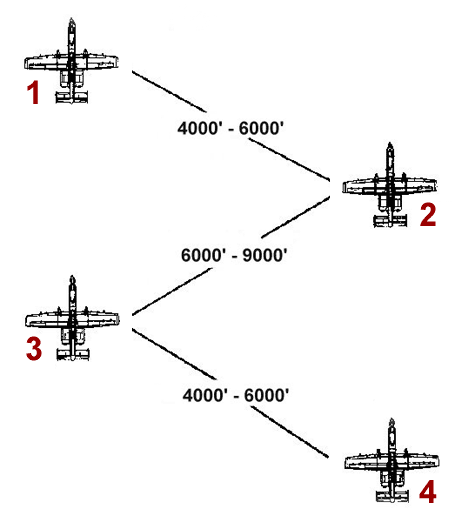
The vic formation is a nifty way to arrange your three ship. It combines navigational flexibility for the point man with a good six o’clock lookout for the trailing element. All the pros and cons associated with line apply to the element…and they have the additional responsibility to keep up with the leader. Here’s the vic:
Three Ship “Vic” Formation
To the discerning tactician, this would appear to be nothing more than our standard line formation behind a singleton. Right you are! The only difference lies in the way it’s managed.
First, let’s discuss the point man…usually the leader. We say that because he may not necessarily be the flight lead…the best way to get the job done is to let the best navigator do the leading. That may not be the designated flight lead…he may choose to temporarily pass off the lead position to another flight member for selected portions of the mission. In this instance, the flight lead will fly as the element lead and retake command of the three ship when the situation dictates…an in-place turn of 90 degrees is all that is required to put the flight lead back in front.
Wedge
Wedge is the other option is available for maneuvering your three ship. In a three ship, wedge works exactly the same as with a two ship as far as formation positioning goes. The wingmen are free to maneuver in their 30 to 60 degree cones. The number three man places himself back off the number two and takes the same spacing that number two has off the lead. The wingmen can cross at will to maintain their spacing and position.
Three Ship Wedge Formation
Four Ship
Four ship is not the favorite formation in the Hog community…our tactics are based on the two ship…so this is not an attempt to escalate our CAS missions into “thousand plane raids”…but there are situations where more firepower is needed, and you can’t hack it with two. The recommendation here is to hack it with more than a single pair…we’ll call it “sequenced” or “coordinated” two-ships.
It may or may not be necessary to get to a given contact point (CP) with all the Hogs at the same time. If not, your problem is solved…take your wingie and get to the CP on time. Let the other lead worry about his arrival time.
But this may not be an option. You may have to get there in a four ship. If so, then I suggest multiples of the formations already discussed (line and wedge). The rationale for choosing one over the other is exactly the same as for the two ship rationale…when navigation, terrain clearance, or weather becomes a problem, drop into wedge…otherwise, fly line.
Box (or Card)
Do not fly four ship line in a line abreast formation. Instead, fly the elements in standard line and position the second element behind and offset. Call this the box or card formation.
Four Ship Box Formation
Wedge
Four ship wedge is formed much the same way…two elements in standard wedge with the second element staggered back on the wedge 30-60 degree angle.
Four Ship Wedge Formation


