The Initial Aiming Problem
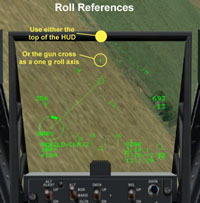 To aim with, we need an aiming reference. We have a flight path symbol… the TVV… but it isn’t much good when we’re turning or pulling g. We know when we are at one g that the TVV is pretty much centered in the top half of the HUD. However, when you pull g, the TVV moves down in the HUD, and in doing so, loses much of its value as a flight path reference. To replace the TVV when pulling g, I suggest you use the top edge of the HUD or the gun cross as your initial aiming reference when rolling into the dive.
When you roll in, disregard the CCIP, the PBIL, and the TVV. In your mind’s eye, turn “off” that symbology and maneuver only with the top of the HUD/gun cross as a reference. This will help reduce pendulum effect (see the previous LOMAC Week article on HOG weapons for an explanation of pendulum effect).
Initial Aim Point
 As you roll in, pull the top of the HUD/gun cross to a point on the ground just to the target’s 12 o’clock. Keep the horizon in your peripheral view and visualize your flight path on the ground. Point the top of the HUD/gun cross along that flight path past the target.
Pull the top of the HUD/gun cross to that point and then unload (relax backpressure to one g) and roll out. I want to put special emphasis on the “unload” part. It is easy to inadvertently maintain a little backpressure as you roll out. This will pull your nose away from your desired AOP. To avoid this, relax all backpressure on your stick and let the stick springs return the stick to neutral… then apply side pressure only to roll. Unload, then roll!!
Correcting The Initial Aim Point
 As I roll wings level, I keep the AOP past the target. Now bring the PBIL and TVV into your cross check. Is the PBIL extending down from the TVV through the target? If not, note the lateral spacing error (the distance that the PBIL is away from a line extending from the target’s 6 o’clock to its 12 o’clock). Next, roll into a low bank angle… 10 – 20 degrees is fine… and begin a slight turn to move the TVV a distance sideways equal to the lateral spacing error.
In this shot, you can see that I have rolled out with the PBIL left of the target.
To correct for this lateral error, I roll into a slight right bank and ease the TVV over to the right… and watch the target to make sure I line up the TVV with the target’s 12 o’clock.
 In the image at right, note that the PBIL, even though dashed, is running down through the target.
Then roll wings level and recheck your PBIL to see if it is now running through the target. If it is, great! If it isn’t and you see a need for a second correction… don’t! At least not yet! We’ve got bigger fish to fry right now! We need to establish the desired dive angle.
Getting On The Desired Dive Angle
If you used the base leg or pop-up parameters in the figure above, you should be pretty close to your desired dive angle. Once again… why is this important? Because in real life, fuze activation, altitude lost in the pull out, weapon function altitude (for CBU), frag pattern deconfliction, etc all depend on you “being on parameters”. In LOMAC, this is not such a big deal. I mention this only to pass along real world need-to-know for those would like to know!!
OK… back to the bombing pattern. Here we are with the top of the HUD aimed past the target… and we’ve adjusted our PBIL so that it runs through the target. Now we need to adjust the AOP-target-CCIP ratio to meet our expected release altitude.
What I want you to do is to now raise or lower your nose slightly, keeping the wings level so that you do not turn. As you move your nose, the TVV will move up or down and the CCIP will as well. Our objective is to reposition the AOP so that the TVV, target, and CCIP are arranged so that the distances between them form a ratio where the distance from the TVV to the target is about equal to the distance from the target to the CCIP. I call this the 50-50 AOP-target-CCIP ratio.
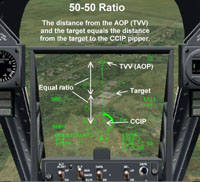 In our example at right, this is what the new AOP “picture” looks like after I reposition my nose.
Technique… I tend to roll out with my AOP close to the target. As a result, my typical repositioning is one of raising the nose to get the 50-50 ratio. I find that I minimize lateral errors by aiming initially just past the target, rather than at a point further along the target’s 12 o’clock axis. Ultimately, it doesn’t really matter as long as you stick the target half way between the CCIP and the TVV.
Why a 50-50 ratio? For one thing, that relationship is typical of real life parameters in a number of situations… and it is easy to visualize. Secondly, this ratio helps establish a final where you are more likely to release on parameters… meaning the desired release altitude.
What effect does this ratio concept have on release altitude? Simply this… the closer the CCIP is to the target, the sooner it gets there. Assuming a valid computer computation, the sooner the CCIP reaches the target, the higher up you pickle. This may or may not be good, depending on weapon type. In real life, CBUs are meant to function at a specific altitude in order to get the desired pattern density… pickle too high and the weapon canister opens up too soon, spreading the bomblets out over a wider area.
Also, earlier release altitudes mean greater release slant ranges… and this tends to increase potential miss distances. Accuracy varies with release slant range… so, long range releases have to be carefully considered, particularly when attacking point targets.
Conversely, if the CCIP-to-target distance significantly exceeds the target-to-AOP distance, then it will take longer for the CCIP to “move up” to the target. All the while you are in your dive… so the potential exists for excessive altitude loss prior to release. Attendant with this altitude loss is the very real possibility that the weapon fuze may not have enough time to activate, resulting in a “dud”… or if the weapon does explode, you may be too low to safely escape the frag pattern.
So… be a good bomber! Don’t pickle too high… or low! Fly the parameters I’ve listed!
All right… enough of the preachin’! Back to our bombing example!!