Feature: Employing the Vikhr - Part 1
Back To Page 1
Vikhr Launch Process
Enough of the books, here's the fun stuff:
- Arm the system. Flip the master arm switch to arm ['lAlt+w'] to enable the weapon system to initiate the weapon launch sequence and flip the laser switch to standby ['rShift+o'] to enable the high-powered targeting laser that the Vikhr will ride down to the target. Now would also be a good time to reset the targeting system ['backspace'] and give the targeting system a clean slate to start with.

- Set the appropriate targeting mode. If the target is a moving vehicle, engage the Ground Moving Target mode ['n'] to ensure the Shkval will keep track of it. For a shot at an aircraft's side or long aspect (i.e., you're looking at the guy's tail), the normal Airborne Target mode ['v'] sets the Vikhr's fuze delay such that the warhead will detonate near the fuselage and do the most damage. If the target is low aspect (i.e., heading straight for you), the Head-on Airborne Target mode ['lAlt+s'] will set a short fuze delay, ensuring the missile won't detonate uselessly behind the target.
- Track the target with the Shkval. Uncage the Shkval ['o'] and use the slew controls ['; . , /'] to place the target at the center of the Shkval monitor. Then use the target gate size keys [ '[ ]' ] to size up the dashed-line box so that it just contains the target.
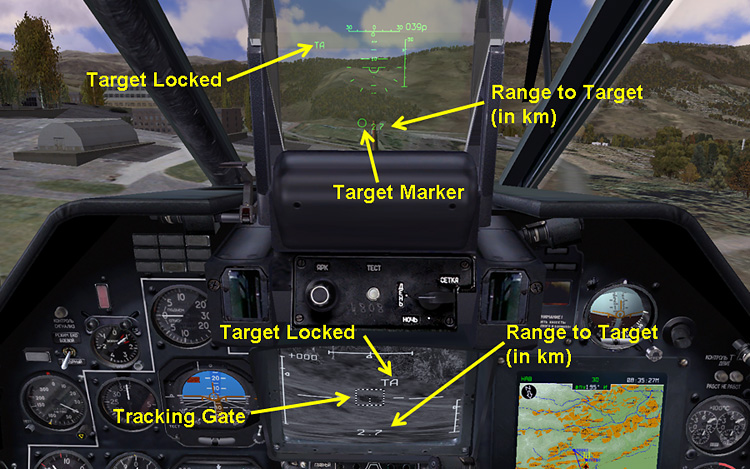
- Lock onto the target. Once you've got the target centered on the Shkval and contained within the track gates, press the target lock key ['enter'] to attempt a lock on to the target. You'll see a "TA" show up on the HUD and on the Shkval screen if the targeting system was able to establish a track on the image. You'll also see two other important items: the measured range to the target (in km) and a laser cooling countdown. You need to be within 7km to be able to launch a Vikhr using the automatic targeting system defaults. Additionally, to prevent overheating and permanently damaging the laser, don't re-attempt a lock or to launch a Vikhr until the cooling countdown has gone to zero.
- Select your weapon. Vikhrs are always installed on the outer weapon stations, so select them ['y'] and the Vikhr targeting reticle will pop up on the HUD. If necessary, the Vikhr launcher will now depress to the same elevation angle as the target. You'll also see the number of Vikhrs remaining on the weapons display on the center console beneath the Shkval monitor.

- Line the targeting reticle up with the target. Maneuver the helicopter such that the target (small circle on the HUD) ends up under the Vikhr targeting reticle (large circle on the HUD). If you're too close and too high, the target may be below the bottom of the HUD. Back off and/or reduce altitude, while being careful to avoid a Vortex Ring State (aka "Certain Death"). Use the Trimmer to help maintain the correct attitude. The Auto Hover ['lAlt+t'] and Auto Turn to Target ['q'] modes are quite helpful here.
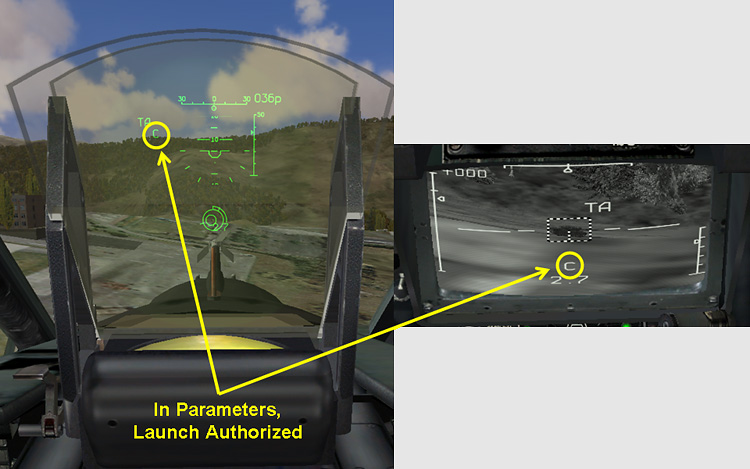
- Check parameters. If you're in automatic mode (default), a "C" will appear on the Shkval and on the HUD once the calculated launch parameters for the selected weapon are met. If you don't see a "C", re-check the steps above to see if you missed something. Still no dice? RTB and file a squawk with your ground crew (or post it on our forums). We're here to help!). If you're using the manual mode of the weapon launch system, you'll have to verify that launch parameters are met yourself. Don't blame Kamov if you miss!
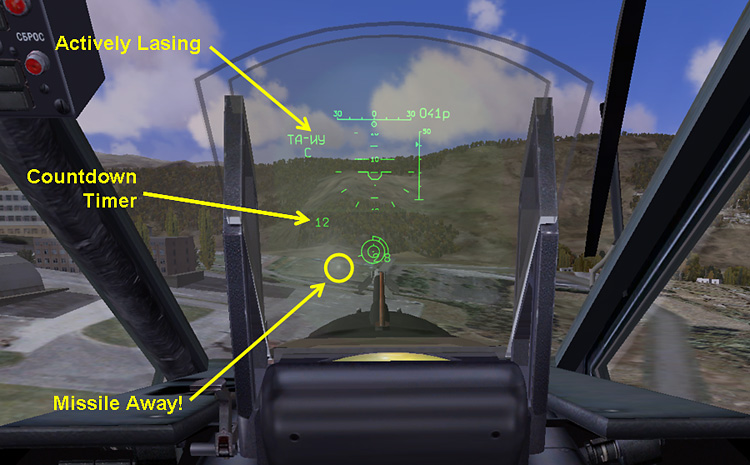
- Unleash the hounds. If the target is lined up and you're within parameters, you're ready to rock and roll. Press *and hold* the weapon release key ['rAlt+space'] to launch a Vikhr at your target. Don't relax once the weapon flies off, however. You still have to guide it all the way to bad guy. A new countdown timer will appear on the HUD upon launching a Vikhr. This timer shows the estimated time to impact plus an additional 6 seconds.
- Maintain track. As described in the first part of this article, the Vikhr is not an autonomously homing weapon but rather rides down the laser beam sent by the launching platform. Keep the Shkval on target all the way until missile impact.
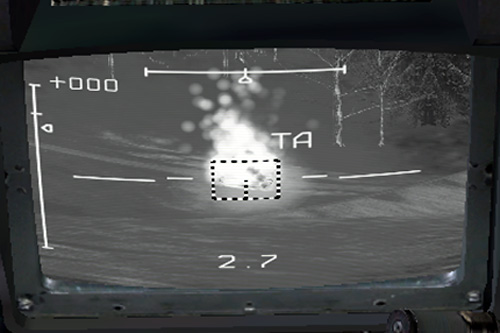
- Enjoy the show. When the countdown timer hits 6 seconds look for a big splash on the Shkval screen and continue to watch for secondary explosions or fires. Some tanks can survive a direct hit from a Vikhr, depending on where the missile impacts.
Splash one mover...
Due to the spiraling flight pattern, the Vikhr may impact just short of the target, sending up a big fireball and leading an impatient pilot to prematurely mark up the kill. Don't be that guy.

...or maybe not!
It's best to keep watching for the sure-fire signs that the target is a goner.
 |
| Ouch! |
Smokin'! |
Splash! |
Now, get out there and blow some stuff up, comrade!
Author's System Specs
- ASUS P6X58D-E Motherboard
- Intel i7 950 CPU (stock)
- EVGA GTX 480 video card
- 6 GB DDR3 RAM
- Western Digital 300 GB Velociraptor HDD
- Saitek X52 Pro HOTAS
- CH Pro Rudder Pedals
- TrackIR4 PRO
Watch for the next DCS: Black Shark Technical Report: Fun with Unguided Rockets!
Previous SimHQ DCS: Black Shark Technical Reports
DCS: Black Shark: Technical, Simplified
DCS: Black Shark and Coaxial Rotor Aerodynamics
DCS: Black Shark and the Trimmer
DCS: Black Shark - Autopilot: Part 1
DCS: Black Shark - Autopilot: Part 2
DCS: Black Shark - Preview 1
DCS: Black Shark - Preview 2
DCS: Black Shark - Preview 3
Para_Bellum's excellent DCS: Black Shark tutorial
"How to Take Off and Blow Stuff Up"
SimHQ's DCS: Black Shark Review (RC8)
Part 1 Part 2 Part 3
SimHQ's DCS: Black Shark Interview
Producer Matt Wagner discusses DCS: Black Shark
Other SimHQ DCS: Black Shark Feature Articles
A Stick and Rudder Man's Guide to DCS: Black Shark
More on Controllers in DCS: Black Shark - English Version
We want your Feedback.
Please let us know what you thought of this article here.
Click here to
go to top of this page. |