Review
Aeroworx Beechcraft B200 Super King Air: Reality vs. Simulation
by Chris "BeachAV8R" Frishmuth
I owe an enormous debt of gratitude to the flight simulation community. I believe my interest in aviation was but a tiny speck of my genetic makeup, but it was computer flight simulators that fostered that curiosity and developed my natural desire to fly into a hobby. That hobby branched into a career and now I consider myself among the fortunate few that do what they love for a living. Throughout the years my intertwined interests in computers and aviation have led me down the long path that has been the evolution of modern flight simulators from basic wire-framed, RGB graphics to the current crop of spectacular simulations that are blurring the borders between reality and simulation.
While browsing the forums recently I was made aware that a new product had been released for Flight Simulator 2004, the Aeroworx King Air B200. You can imagine how excited I was to hear of this since I have been flying King Airs for the past seven years and B200s for over five years for my current employer. I contacted Aeroworx and was answered by Henning van Rensburg. We were very excited to make one another's acquaintance. Henning checked out my bio-page on SimHQ and shot me an e-mail asking if, as my bio stated, I still lived in Charlotte. To our mutual great amazement we learned that we lived barely a mile apart! Within a matter of days we had met and he gave me the grand tour of why, how and what Aeroworx is all about.
 Aeroworx
has partnered with Flight1 Software to provide a quick and easy distribution
method for their B200 using a secure purchase, direct download option
which will deliver the product to your hard-drive in minutes. Obviously
FS2004 is required as the basis for the installation. In addition to the
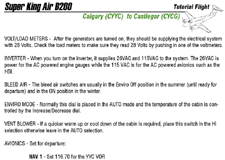
B200 aircraft you get an incredible 23-page tutorial PDF written by the
B200 pilot/consultant, Jack Colwell. The tutorial is an outstanding resource
since it takes you from a preflight condition step-by-step (including
flight planning) through an entire flight from Calgary, Alberta (CYYC)
to Castlegar, British Columbia (CYCG). Using a combination of setup data,
checklists, introduction to systems and acquired experience, Jack will
lead you through the entire sequence of flight events that a real King
Air B200 pilot would experience during a normal flight.
Aeroworx
has partnered with Flight1 Software to provide a quick and easy distribution
method for their B200 using a secure purchase, direct download option
which will deliver the product to your hard-drive in minutes. Obviously
FS2004 is required as the basis for the installation. In addition to the
B200 aircraft you get an incredible 23-page tutorial PDF written by the
B200 pilot/consultant, Jack Colwell. The tutorial is an outstanding resource
since it takes you from a preflight condition step-by-step (including
flight planning) through an entire flight from Calgary, Alberta (CYYC)
to Castlegar, British Columbia (CYCG). Using a combination of setup data,
checklists, introduction to systems and acquired experience, Jack will
lead you through the entire sequence of flight events that a real King
Air B200 pilot would experience during a normal flight.
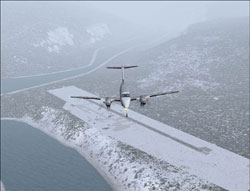
I used the tutorial to fly the Castelgar LOC / DME approach and was suitably impressed at the difficulty and unique layout for this procedure. If you think your instrument skills are pretty good I highly recommend attempting the tutorial flight.
Also included with the package is a comprehensive 109-page Aeroworx designed Pilot's Operating Handbook which really should be the starting point for the exploration of the entire product. The POH is filled with excellent data on the aircraft, product support information, and volumes of specific operating procedures for the Aeroworx B200. Let me take this opportunity to state that the Aeroworx B200 is what I would consider a high-fidelity, study simulation on a very specific aircraft with extremely detailed systems, avionics, 3D model and flight model. This B200 add-on far and away surpasses any level of detail that I have seen in any civilian flight simulation in terms of striving for accuracy of all modeled systems and flight parameters. As such, an uninformed and poorly trained pilot (both in reality and using the simulation) is not likely to derive the full benefit from the product. Read the manual! It is an excellent (and essential!) resource and unless you are an experienced King Air pilot you will be asking a lot of questions that the POH has been designed to answer!
The Aeroworx B200 features an incredible array of realistic panel options. The 2D panel is simply stunning. The 2D panel features both a "heads-up" mode and a "heads-down" IFR panel useful for more demanding IMC (instrument meteorological conditions) flying. Copilots and First Officers will be happy to see a complete right side analog 2D panel as well featuring the more traditional "steam gauges". The PIC side features dual-tube Collins EFD-84 EFIS displays and a Honeywell CAS 66A TCAS I display while the rest of the panel is home to myriad of other Collins radios and navigation heads. Beyond the main 2D panels are 12 individual pop-up panels representing the left and right sub-panels, side panels, engine controls, flight director, autopilot, environmental and pressurization controls, overhead electronics panel, and lighting switches and rheostats. Radio stack pop-up panels, GPS, pop-up EFIS tubes, engine gauges and other instruments provide easy and precise control over all of the B200 systems and avionics.
The 3D cockpit is a work of art with smooth tracking using my TrackIR2 with an interactive 3D environment that allows you to access and control all of the 2D panel functions via the knobs and controls in the 3D cockpit. The attention to detail and operational accuracy of the systems and instruments is simply jaw dropping to this real-life King Air pilot. I have shown the Aeroworx B200 to my colleagues at work (18 experienced King Air B200 pilots) and all have shown a similar reaction of astonishment at the realistic depiction and operational accuracy of the B200. In fact, our B200 ground school instructor has made it known that he'd like to use the Aeroworx B200 2D cockpit to teach new-hire first officers the functions of the switches and systems that he is teaching in class!
Aeroworx has also incorporated a nifty "maintenance module" into their product that allows the user to track the wear and tear on their own aircraft. Engine hours are accumulated, oil is burned, cycles (landings) are counted and tire condition is monitored. As engine time accumulates the engines actually start to respond accordingly, running hotter and requiring overhaul. Landing gear and flap damage can be repaired and prop overhaul times can be monitored. The maintenance module is a fun feature that gives the user a sense of "ownership" in their B200.
With the overview of the software package complete, let's get on to the answering the important question: How does she fly??!

For the comparative goals of this review (and for my own personal amusement) Henning was kind enough to take time out of his extremely busy schedule to repaint the Aeroworx 3D model in my company paint scheme. This was no slapdash procedure either. Henning did an outstanding paint job with incredible attention to detail. It should come as no surprise that the newly painted MedCenter Air King Air came out so well; throughout this software package you will see time and again a painstaking attention to detail that can only be described as fanatical.
It is abundantly clear in my reviewing the product, and in my personal interactions with Henning, that the Aeroworx team not only has a love of aviation, they also have a personal goal of perfection for their products. It is amusing to see Henning become animated over something that he wanted to model but due to constraints of Microsoft FS2004 he might not be able to do. In describing the hurdles he and his team had to overcome relative the constraints of the underlying product (FS2004) I came to appreciate how innovative and adaptive they had to be to fit a round peg into a square hole.
In all the following shots the Aeroworx pictures will appear on the left or above, the actual King Air photographs that I took will appear on the right or below. This is important because time and again I found myself actually confused between reality and the sim! One other important thing to remember is that all of the simulation screen captures have been re-sized to smaller resolution and reduced in quality significantly for bandwidth purposes. The actual in-game screens are even better than these!
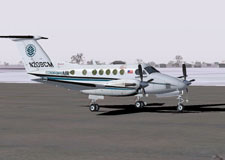
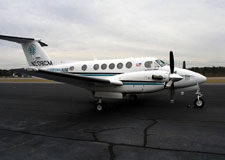
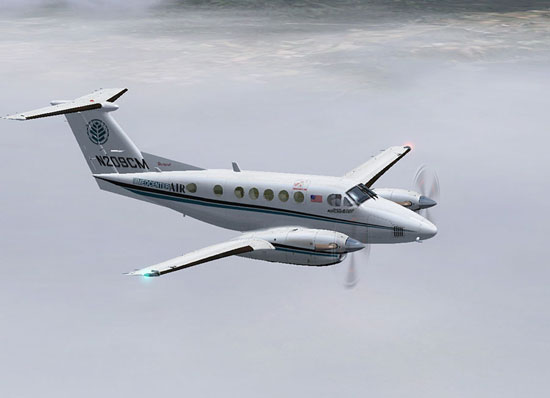
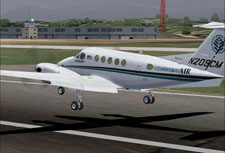
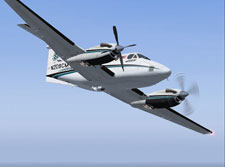
The Aeroworx Beechcraft Super King Air B200 and the MedCenter Air Super King Air B200:
 |
 |
 |
 |
At MedCenter Air we actually have three King Airs in the fleet. Two of the aircraft are B200 models (N207CM and N209CM) and one is a plain Super King Air 200 (N210CM). In our fleet N209CM most closely resembles the Aeroworx B200 since both represent later serial numbers equipped with EFIS and upgraded avionics among other things. Though most of the comparative shots are from N209CM I have also used a few photos from N207CM and N210CM since I fly all three and had to take photographic opportunities when the situations were available.
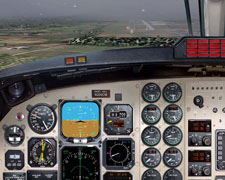
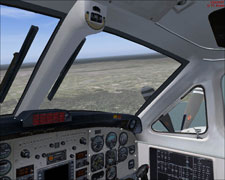
After loading up the Aeroworx B200 for the first time I was plopped down into what I think is the most accurate cockpit representation I've ever seen in a simulator. Obviously I have the distinct advantage of having logged thousands of hours in King Air cockpits, so I already felt right at home when confronted with the array of instruments, knobs, gauges and switches.
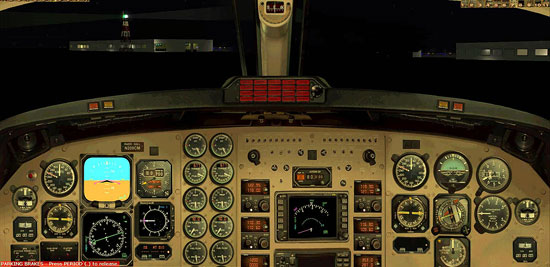
The 2D cockpit (the Aeroworx picture is actually a composite of the left and right 2D pits put together for comparison to the actual full cockpit photo I took):
 |
 |
The 2D cockpit is a joy to work with. The resolution is extremely fine with all of the instrument lettering and annunciators clearly readable. The integration of the working gauges within the cockpit is outstanding and I'm amazed at how Aeroworx was able to realistically animate all of the appropriate instruments on the panel. All of the tasks that you would normally be required to do flying a King Air can be accomplished using the 2D cockpit and virtually all of the switches serve a function in normal operations.
The "heads-down" 2D cockpit view:
 |
 |
All of the sub-panels, side, overhead and other panels can be accessed via a row of 12 clickable icons at the top of the 2D cockpit. Each icon brings up the appropriate sub-panel and after a bit of learning and practice it becomes second nature to find the switches. Again, having experience in the actual aircraft significantly shortened my learning curve so I would encourage you to explore the 2D cockpit with the aid of the included POH.
The throttle quadrant with movable trim, throttles, prop controls, condition levers, and flap selector:
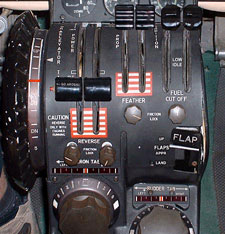 |
 |
The left side fuel management panel with boost switches, aux-transfer switches, fuel cross-feed, firewall shutoff valves and aux vs. main tank quantity selectors and indicators:
 |
 |
This review isn't intended to be an exhaustive tutorial on how to fly the King Air B200, so I won't go through all of the normal operation procedures for flying the aircraft, but I will say that the systems functionality from startup to shutdown are ultra realistic in the Aeroworx B200. Normal start procedures require several switch and lever movements in a relatively rapid sequence so you would be well advised to read the thorough POH to get the most out of this add-on.
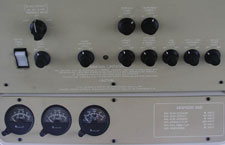
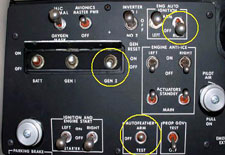
The pilot-side (left) sub-panel featuring the starting switches, lights, ice protection, auto-feather and a multitude of other functional (and required!) switches:
 |
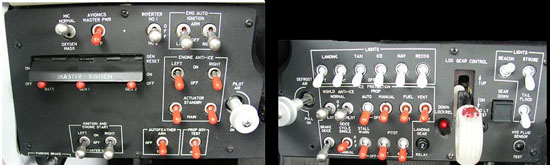 |
Be careful starting the engines! If you hot start them there will be consequences! As a pilot flying turbine equipment on a day-to-day basis I'm very aware that engine temperature has a direct effect on operating costs. Maximum starting ITT is 1000 degrees for 5 seconds and our standard operating procedures limits ITT in normal flight regimes to 750 degrees. A new engine can easily cost over $200,000 each, so give them lots of TLC.
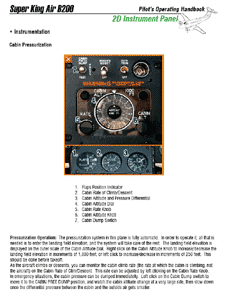
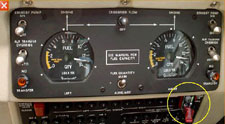
The copilot's sub-panel contains the environmental controls including pressurization and temperature controls as well as important pneumatic and suction gauges:
 |
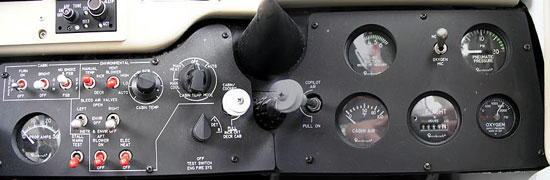 |
The overhead panel contains lighting rheostats, windshield wiper controls, volt/load meters and the A/C volts/frequency gauge:
 |
 |
All appropriate caution lights are modeled on the caution panel. A master caution light flashing on the eyebrow panel should direct your attention to the caution / advisory panel. This panel will alert you to some abnormal items that aren't necessarily immediate action items, but things that you should know about (such as a generator off-line or props not forward for landing):
 |
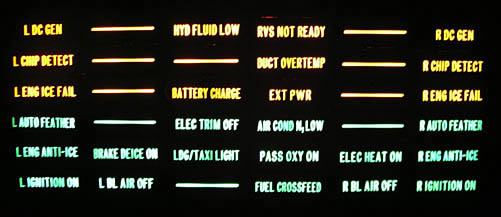 |
My first engine start in the Aeroworx B200 was just like the real thing (I actually started to wonder if I was going to get paid for this flight!). Turning the ignition switch on (after fully completing the pre-start checklists: 36 items!) and hearing the "tick-tick" of the igniters was music to my ears. At 12% N1 I push the condition lever forward and hear the familiar "whoosh" of the engine lighting off as I keep diligently monitoring the engine gauges for normal indications. Usually I'm glancing back and forth between ITT, fuel-flow, oil-pressure and N1.
Normal engine start checklist from the Aeroworx B200 POH:

Time for a "war story"!
Though most of the time the Pratt & Whitney PT6A-42 is extremely reliable there are occasions when things don't go right. Several months ago I was getting ready for a dead leg (no patient) near midnight from BNA (Nashville, TN) to our home base CLT (Charlotte, NC) when I got a no-light start. Above 12% I put the fuel to the engine and nothing happened: no ITT, no oil pressure, no "whoosh", but there was fuel-flow. The engine clearing checklist in this case states to motor the starter in the starter only position (full down — with no igniters) for 15 seconds to purge the fuel from the combustion chamber. I asked the copilot if he could see any fuel spilling out and indeed fuel was being vented overboard onto the ramp.
Turning off the battery I put the mechanical wheels in motion and a couple hours later another company King Air was winging it's way west with a mechanic and parts aboard to fix our problem. Since the combustion section of the engine has two igniters it was unlikely that both had failed (one is plenty to "light the candle") so the suspect part was the exciter box that actually sends current to the igniters (as the mechanic described it to this dumb pilot anyway!). After replacing the exciter box I tested the igniters by simply turning the battery on and moving the auto-ignition to the ARM position which fires them with an audible clicking. Problem solved, cowling back on and we are ready to go home. Going through the start procedure once again we get the engine spooled up above 12%, add the fuel and HOLY MOTHER OF… FIRE... FIRE... EVERYWHERE FIRE! I looked toward the copilot and all I could see was him haloed in a terrifying orange glow as fire shot 12 feet back from the exhaust stacks right next to his window! Quickly killing the fuel and once again motoring the engine the mechanic came back grinning and with a chuckle told me he forgot to mention that the engine was likely to "torch" once it lit off due to residual fuel being in the engine after the no-light start attempt. No harm — no foul, but it sure was impressive!
The sound sampling in the Aeroworx B200 is spot on. Altitude chimes, prop and turbine sounds, ambient noise, gear motors and flap sounds are all dead on. One sound that sent chills down my spine even though I knew I was only flying a simulation was the "TRAFFIC TRAFFIC" call that unexpectedly was broadcast by the modeled Honeywell CAS 66A TCAS system when I approached too close to a Cessna Caravan in the Charlotte Class-B airspace. I don't care if it is simulated or real-life, that baritone "TRAFFIC" voice pops my head up every time! Aeroworx has also included the option of having a copilot voice call out items such as "gear up/down", "flaps up/down", etc.
With my engines up and running there is a bit of "housekeeping" to do prior to blasting off into the wild blue yonder. Inverters need to be checked and selected, avionics should be turned on, tuned and set prior to taxi, pressurization, auto-feather, trims, flaps, ATIS, clearance, etc. The nice thing about the Aeroworx B200 is that it really does immerse you into a realistic cockpit where you very closely approximate a real pilot with very real procedures, tasks and workloads. Flying most airplanes is quite simple, managing the entirety of the flight efficiently and SAFELY are the more time consuming aspects.
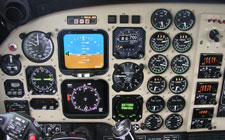
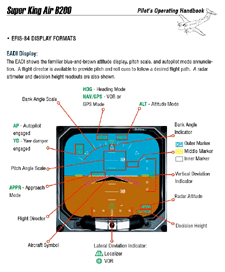
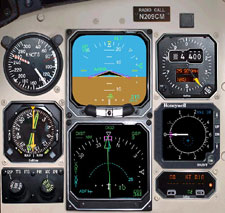
For comparative purposes I loaded up a simple flight plan from Charlotte, NC (KCLT) to Myrtle Beach, SC (KMYR). As with all models of aircraft there are subtle differences with regards to types of avionics and panel layouts since these are infinitely customizable. The Aeroworx B200 very closely resembles our late model B200 but there are some very slight differences in the EFIS system (so small that even hard-core sim pilots might not even recognize them). For instance, our B200 uses an integrated Universal UNS-1M FMS for primary navigation (at right).
I enter the route data and both the Aeroworx B200 and the real aircraft show a very similar EFIS display.
 |
 |
The EFIS, autopilot, and flight director control panel is located on the center pedestal. Here you can select such things as whether to display a normal HSI, semi-ARC, or MAP mode on the EHSI as well as change the data fields that are displayed on both the EHSI and EADI (ETA, ground-speed, timer, decision-height, etc...) The selector for the map range is circled as well as the GPS / NAV toggle button since I wanted to select GPS navigation for my trip to MYR. The OBS course knob and heading knobs straddle the range/mode selector and the autopilot mode selectors and annunciators are in the next row down.
Though most real pilots enjoy hand flying I have to admit to being spoiled by the features that modern autopilots offer. After takeoff and the initial departure the autopilot pretty much stays on for most of the flight (except in icing!) until arrival into the terminal area on the other end of the flight. Therefore this whole panel is one of the most often used during the entire flight.

Once again I'd like to point to the Aeroworx POH (am I starting to sound like the flight instructor that I am?) which has an excellent appendix that details precisely how to use the EFIS-84 and APS-65 systems correctly and how to interpret the data they display. Even a relatively high-time King Air pilot can learn a thing or two from this excellent resource!
 |
 |
I've only just briefly touched on the depth, complexity and accuracy of the Aeroworx B200 avionics and systems modeling but suffice it to say I was floored with the level of detail that went into this package. Not only am I impressed by the simulated aircraft, but the documentation is topnotch, something I honestly didn't fully realize until I started writing the review since I was already intimately familiar with the King Air systems. Now that I've delved into the POH, performance charts and checklists I'm stunned at the depth that the developers have delivered with this add-on. They didn't just throw together a pretty 3D model and some avionics, they really released a polished product.
The POH and performance specifications are freely downloadable at the Aeroworx web-site if you'd like to see for yourself here!
Blah, blah, blah... ok… can we finally get to the question?? How does she fly??! In a word: outstanding!
With the engines running, all the systems up and the avionics set we are ready to take to the air. Taxi response is great, with heavy rudder use required to both displace the nose-wheel and return it to center. The B200 has a spring assisted nose-wheel steering but I can tell you that a good amount of rudder pressure and differential braking is required to get this aircraft turning tightly. Some pilots use a bit of asymmetric power to turn but except in extreme cases I rarely see the need to use that technique in day-to-day operations. On unprepared fields it is recommended (temperature permitting) to taxi with the ice vanes extended to prevent foreign object damage to the engine from ingested materials kicked up by the props.
For review and demonstration purposes I'll be hop-scotching around a bit; this won't be a structured point-to-point flight. I'll start off on a cold winter morning at an airport we frequent quite often, Chapel Hill, NC (IGX). The runway at IGX is about 4,000 ft. long, plenty of room for the B200. The sun is just rising as a few snow flurries sprinkle down. All the anti-ice systems are on and the ice vanes get extended for this takeoff.

Pushing the throttles forward slowly until the props are on the governor is a sign of good B200 pilot technique. Once the props reach 2000 RPM the rest of the power application can be done fairly rapidly. If one prop gets on the governor first the result is an embarrassing and uncomfortable (for the passengers especially) "King Air waggle" as the tail whips back and forth and you dance on the rudders to compensate. At around 95 knots easing back on the yoke pulls her free of the ground and around 10 degrees of pitch (go-around attitude on the flight director) will have you climbing away smoothly.
With a positive rate the gear comes up and the landing lights go out. Aeroworx did a great job on the gear extension and retraction sounds. Around 400 feet the flaps come up, yaw-damper goes on and the climb continues while the props are reduced to 1900 RPM, prop-synch comes on and auto-feather is turned off. During the climb the after takeoff checklist should be accomplished.
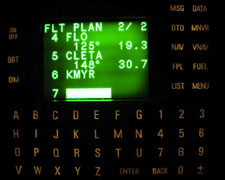
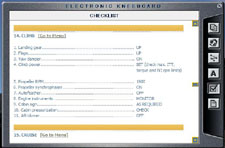 Hitting
F10 brings up the kneeboard which has an extensive checklist for
the Aeroworx B200 (at right).
Hitting
F10 brings up the kneeboard which has an extensive checklist for
the Aeroworx B200 (at right).
Flight control response is spot on. Roll and pitch rates feel very good and a bit of tweaking on my trim repeat mapping got the trim in-line with what I would expect. Glancing around the cockpit at normal indications I honestly feel right at home in this B200.
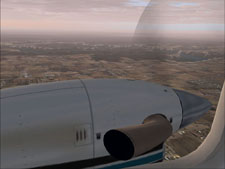
The external 3D model on the Aeroworx B200 is simply jaw dropping. I am running FS2004 on a mid-level (some would say low) graphics card: a GeForce 4-460 Go, which is a mobility chip for laptops (64MB) based on the MX iteration of the GeForce 4 line-up, so it certainly won't win any benchmarks. That said, with FS2004 on medium settings and 1280 x 1024 resolution, everything ran very smooth. There is a bit of a frame-rate hit which is noticeable, but totally acceptable, when flying with the 3D pit. Discussing this with Henning he noted that FS2004 has a bit of a performance bug regarding 3D pits in that they somehow stay loaded in memory even when you cycle out of them back to the 2D pit.

The specular highlights, shadows, glare effects and paint effects are really outstanding. This is another airplane that I can spend hours just panning around looking at (LOMAC is another sim that distracts me that way!)
The Honeywell TCAS display showing traffic at 12 o'clock, 800 feet below at around 5 miles.

Heading over to Asheville, NC (KAVL) I decide to try out the autopilot and flight director systems. Asheville is a frequent destination of ours and often, since the airport is located in a mountainous valley, the weather can be pretty miserable. Arriving in the terminal area low clouds shroud the peaks and a few light rain showers move through the area.
Preparing for the approach I slow down and get the approach flaps out and the props forward (usually I don't put the props forward until just inside the final approach fix) while being vectored on the left downwind leg for the ILS 34 at AVL. There is a bug in the damage model that Aeroworx is aware of and plans to fix in release #2. Normally approach flaps can be extended at speeds below 200 knots (the white triangle on the airspeed indicator) but the Aeroworx B200 reports this as damage to the flaps which will require you to use the maintenance module on the ground to repair the flaps. Holding off on extension of approach flaps until you are under 160 knots (near the full flap limiting speed) prevents the damage from occurring.
After configuring the airplane for the terminal area I brief the approach plate and start entering frequencies into the radios and adjusting the course selector and EFIS tubes to give me all the data I'll need on the approach.

The plan is to come in on the left downwind, make two left turns to put me on a course to intercept the localizer well outside of Broad River (NDB). Initial approach altitude is 4400 (when cleared to descend to that by ATC) and decision altitude will be at 2340' MSL for a standard ILS decision height of 200'. The ILS will be in the #1 and #2 NAV, the DH is set on the EADI and the NDB bearing pointer is brought up on the EADI to give me an idea of my position relative the initial approach fix (Broad River).

So the autopilot is on, power is set to keep me on a stable airspeed, the flight director is on heading mode (HDG) and the approach mode is armed (APPR) to capture the ILS once the course comes alive.

After several minutes on the final intercept heading the CDI needle starts to move off the right side of the display and the autopilot captures and tracks the course inbound. After passing Broad River the glide-slope comes alive and when the needle is one dot above the landing gear comes out.
 The
autopilot flies the aircraft smoothly down the ILS while I back off the
power slightly to keep the airspeed at around 135 knots. Once the airfield
is in sight I'll put in full flaps, kick the autopilot and yaw-damper
off and commit to landing. The fog occasionally parts giving me intermittent
glimpses of the ground and the high terrain all around. Asheville is no
place to clown around in the clouds.
The
autopilot flies the aircraft smoothly down the ILS while I back off the
power slightly to keep the airspeed at around 135 knots. Once the airfield
is in sight I'll put in full flaps, kick the autopilot and yaw-damper
off and commit to landing. The fog occasionally parts giving me intermittent
glimpses of the ground and the high terrain all around. Asheville is no
place to clown around in the clouds.
I have a saying: "As long as you stay on the black lines on the chart, you won't hit anything!" Whenever I'm in mountainous terrain I chuckle to myself when I think of the Gary Larson "Far Side" cartoon where the pilots are looking out the window and one asks the other: "Say, what's a mountain goat doing way up here in a cloud bank!??"
At 400' above DH (600' AGL) I catch sight of the lead-in lights and put in full flaps and disengage the autopilot.
 |
 |
Crossing the airport boundary I recite my personal mantra: "Three in the green, full flaps, props, yaw-damper, cleared to land."

Over the numbers the throttle comes back and I roll in a bit of nose-up trim as the plane settles toward the ground. Ideally the throttle reaches full idle just as the airspeed winds down through 85 to 90 knots a few inches above the pavement. Touching down the nose-wheel gets lowered and moderate braking brings us to a stop in less than 1400' feet. Using full reverse would further shorten that distance and normally using reverse is preferable to braking since brake replacements are one of the most frequent recurring costs with King Airs. (Of course replacing worn props can also be a factor, so choose your poison!)
 With
our plane safely on the ground (although the flight isn't over until the
chocks are set and you are in the car driving home!) now is a good time
to visit two points that seem to come up often enough to warrant attention
in the Aeroworx B200.
With
our plane safely on the ground (although the flight isn't over until the
chocks are set and you are in the car driving home!) now is a good time
to visit two points that seem to come up often enough to warrant attention
in the Aeroworx B200.
The first involves the perception that the Aeroworx flight model isn't "draggy" enough. With the condition levers in high-idle, the airplane does seem to be a bit reluctant to slow down. This can be remedied however, by simply operating with the condition levers in low-idle. This concession, in my opinion, is totally fine since the only time we operate the engines at high-idle is when it is extremely hot outside. The air-conditioning compressor is run off the right engine and occasionally in the summer we have to bump up the right engine N1 until the "AIR COND N1 LOW" annunciator extinguishes. Other than that, running the engines at low-idle is completely normal.
In low-idle the airplane performs spot on. A reduction in throttle to flight idle with the props forward results in significant drag and very accurate descent and approach & landing performance.
The second point has to do with throttle response. Several people have complained that the torque response is a bit "laggy" and not responsive enough. I've noticed the toque instrumentation (more the instrument than the actual feel of the aircraft) response to be a just a touch slow during rapid power reduction but I feel it is totally fine given the reality of flying the King Air. In my 7 years of flying the King Air, I've never once "jammed" power in nor "yanked" power back, for any reason, under any circumstance. Smooth power applications and reductions will be appreciated not only by your passengers, but by your accountant when engine changes come due. The power response in the Aeroworx B200 seems spot on when used appropriately (meaning normal operations) and only seems "off" (and only a bit off) during wildly unrealistic power changes that I've never done or observed in my time as a King Air pilot.
In talking with Henning he has been very forthcoming about the bugs and limitations that they are aware of in the Aeroworx B200 and he has made it abundantly clear that they strive for perfection. Explaining to me how incredibly difficult it is to model a turbo-prop engine within the constraints of the FS2004 architecture made me aware of just how much work and fine tuning went into the engine and flight models. For every small change or tweak there is a massive cascading effect that threatens to disrupt the balance of every other parameter. Working within the limitations of the simulation I feel that they have done an exceptional job of balancing the flight model and aircraft performance to mirror the real-life counterpart.
One last point I'd like to make that is that if you fly the Aeroworx as it was designed to fly, you have on your computer a simulation that, in my mind, rivals the best flight training simulators out there (and I've spent quite a few hours in the FlightSafety King Air 200 full motion simulator!).
My last demonstration is a reenactment of my greatest "oh crap" moment flying in the B200. A few years ago, departing Nashville (again Nashville!), I was in the right seat letting my copilot fly the "dead" leg return to CLT when we had what I refer to as "an un-commanded right engine shutdown". The reenactment will be shown in daylight even though the incident occurred at night.
 It
was a bit after 10PM central time as we were climbing routinely through
14,000 feet on our way to FL210 for the return leg to CLT. Suddenly there
was a large bang from the right engine and the airplane rolled slightly
to the right while the right-seat flying copilot countered the yaw and
roll as he lowered the nose. Flames started pouring out of the engine
stacks, extending a good 10 feet past the exhaust stacks and licking up
over the inboard section of the wing between the nacelle and the fuselage.
It
was a bit after 10PM central time as we were climbing routinely through
14,000 feet on our way to FL210 for the return leg to CLT. Suddenly there
was a large bang from the right engine and the airplane rolled slightly
to the right while the right-seat flying copilot countered the yaw and
roll as he lowered the nose. Flames started pouring out of the engine
stacks, extending a good 10 feet past the exhaust stacks and licking up
over the inboard section of the wing between the nacelle and the fuselage.
I got on the radio and declared an emergency to the Memphis center controller and we advised our intention to return to Nashville since it was directly behind us only 14 miles distant or so. Meanwhile the flames continued to pour from the stacks while we went through the engine shutdown procedure. The prop had feathered itself, so it was merely a formality to go through the motions of completing the shutdown (confirming that you are shutting down the CORRECT engine!) by putting the condition lever into fuel cutoff, feathering the prop, and closing the firewall shutoff valve. For 30 seconds that felt like a lifetime the engine burned, then finally went out (our aircraft was not equipped with fire bottles).

We completed our 180 degree left turn and the controller at Nashville must have turned the runway lights up to full intensity because there in front of us in the dark was the most beautiful row of approach and runway lights I've ever seen!
In fact, we had climbed so steeply to get up to altitude and catch the roaring tailwind that when we turned around we were looking over the nose at a pretty steep descent to get back down to Nashville. I'll take too much altitude over not enough any day!
A look out the 3D cockpit; yeah, it's stopped all right!
 |
 |
Proceeding via the engine secure checklist we turned off the affected engine auto-ignition, generator, and the auto-feather switch.
Verified we had closed the right-side firewall shutoff valve (to prevent pumping more fuel into the nacelle).
With a bunch of altitude to lose we had the operative engine back at flight idle, so there was almost zero asymmetric thrust or drag. In fact, we had to execute a few gentle S-turns on long final to bleed off more altitude. In the 3D cockpit you can see the operative engine throttle (left) is at idle, the prop is forward to give us more drag and power during the unlikely event of a single engine go-around. All of the shutdown tasks can be accomplished via the clickable 3D cockpit.

Looking out the right forward window at the runway as we aim for a long straight-in to runway 31.
During emergency procedures it is even more critical to follow the appropriate checklists since in the heat of the moment you can forget even the most basic things (i.e.: landing gear!). We had time to accomplish both the engine shutdown checklist and the single-engine approach and landing checklists line by line. They are there for a reason; use them!
Once landing was assured full flaps were selected and we made an uneventful single-engine landing while the fire-trucks followed us down the runway.

Pratt & Whitney later determined the engine malfunction was caused by fatigue on the compressor turbine disk which fractured and caused the catastrophic engine failure. The fire was actually harmless engine oil from the cracked case leaking into the exhaust section, catching fire and getting shot out of the stacks. By all accounts the PT6A engine is one of the most reliable engines ever built, and statistically I should be able to fly 5 more careers worth of flying and not experience another catastrophic engine failure (I hope!).
Short final 36R CLT:
 |
 |
Copilot panel, 10,000' enroute between RDU and CLT:
 |
 |
Looking west toward Lake Wylie on final to 36R CLT:
 |
 |
Aeroworx King Air B200 Q & A
Here's an interview with Henning van Rensburg,
Aeroworx Aircraft Technician and self-proclaimed resident tea-boy.
Q: How many people worked on the project
and how long did the B200 take to develop?
A: In total, we were five people that contributed to the project, of which two (Mark Dirsuwei and myself) were involved from beginning to end. The other team members were Dave Harbold, Fabio Miguez and Matt Kaprocki.
It took us 18 months in total to develop. This
was our first aircraft project for Flight Simulator and the learning curve
was rather steep. Future releases will take far less time to develop.
Q: The
B200 is Aeroworx's first release, what made you choose to model the B200
as opposed to other aircraft?
A: Mike Hattingh, a pilot and avid flight-simmer,
suggested the B200 as our first project. We were at Grand Central airport
(FAGC) busy taking pictures of a Cessna 210 Centurion, when a B200 taxied
by. That was that. The decision was made, and when I told Mark about it,
he was more than keen although he (and I) regretted it later, as we had
very little in the form of plans to work with for the 3D model, and basically
had no idea what we were getting ourselves into.
Another reason is the fact that the B200 is and always has been my personal
favorite when it comes to turbine engine aircraft. It is such an amazing
aircraft (the real one that is), and now I can fly one whenever I feel
like it LOL.
Q: How did you authenticate and test
the behavior of the flight model, avionics and aircraft systems?
A: Jack Colwill, one of our beta testers,
is the B200 check captain at North Cariboo Air in Calgary, Canada. Jack
was relentless in his testing, and did not (well, almost) take no for
an answer. He really made a huge contribution. We would not have come
close to the current status of the product without his help.
Q: Regarding the integration with FS2004,
were there many difficulties working within the framework of the simulation?
A: Although a great product overall, there
are always difficulties with FS, no matter what you do. However, when
you start thinking outside the box, things do get a bit more tricky, especially
when you start implementing custom systems and avionics, as well as accurate
flight dynamics. The flight model is really close in terms of numbers,
but there are still some idiosyncrasies when you look at the way certain
instruments react to for example throttle manipulation. We basically had
to work within the constraints of the sim in order to make the aircraft
behave accurately throughout all phases of the flight envelope. So yes,
there were difficulties, and there always will be, especially when you
(try to) work outside of the parameters.
Q: Will there be any updates to the
current B200 package?
A: Yes, we are busy working on version
2.0, which will include a list of bug fixes, as well as some new features
and enhancements. These will all be published on our web
site not too long from now. There are also plans for a version 3.0,
which will include your aircraft (N209CM) with the medical interior, and
updated avionics to match.
Q: What future products/projects are
in the pipeline for Aeroworx?
A: We are currently in the final stages of completing the T-6 Texan / Harvard Mk. III. You can have a look at the dedicated web site here. We are also working on a BE58 Baron. Work is progressing well on that, and we will be showing screenshots of the model in the near future.
In Closing
I'd like to thank Henning for taking the time to answer all my questions and sharing with me not only specifics about the B200 project, but giving me a glimpse at all the things happening behind the what actually shows up on the monitor. This B200 pilot thinks their product is a great addition to FS2004 and really sets a high standard for companies looking to model complex aircraft. If you want an extremely close approximation of what it is like to be a professional air-ambulance pilot, set your alarm clock for 2AM. When it goes off, go drive your frosty car 10 miles, return to your house, boot up FS2004 and randomly select two airports with unknown weather. Climb into the Aeroworx B200 and head off into the night sky to help someone in need!

System Specs
- Toshiba 5205-S703
Notebook
- Pentium 4, 2.0
GHz / 512MB RAM
- NVIDIA GeForce 4-460 Go 64MB Mobility graphics
chip
- 1280 x 1024 - no FSAA
Copyright 2008, SimHQ.com. All Rights Reserved. Contact the webmaster.