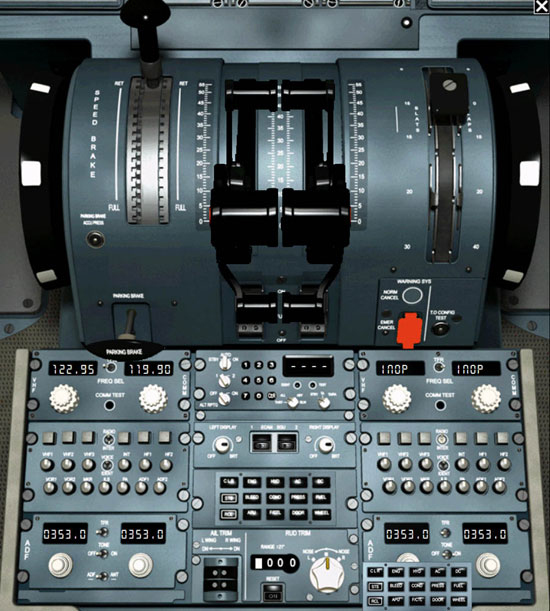
Now it’s time to start the engines. Once again we turn to the secondary overhead panel to find the main engine start selector and start buttons. Moving the selector we can use either Start A or Start B and next we press the illuminated start switch.

As the engine spins up we add the fuel at about 15% N2 by opening the fuel shut-off valves under the throttles allowing the engines to light off.
The sounds of the SSW A310 starting up are very nice, although they may be a bit more pronounced than in the real aircraft. I’ve sat on the jump-seat of Airbus 319/320 aircraft and the sound was definitely much more subdued than that of the SSW Airbus, but I like the effect. I have to confess that starting the engines at this time was a bit premature since normally the aircraft would be configured for the upcoming flight with just the APU running to save fuel. Programming the FMC, setting the radios, etc., would normally be accomplished well before starting the engines. Engine start is usually accomplished during the push-back.
With the engines running however, I’m able to take a good look at the various ECAM pages that give a very clear graphical picture of the various aircraft systems. Obviously all completed circuits (whether hydraulic, electric or pressurization) are fully green, while breaks in the systems (indicating incomplete settings) are orange or red.
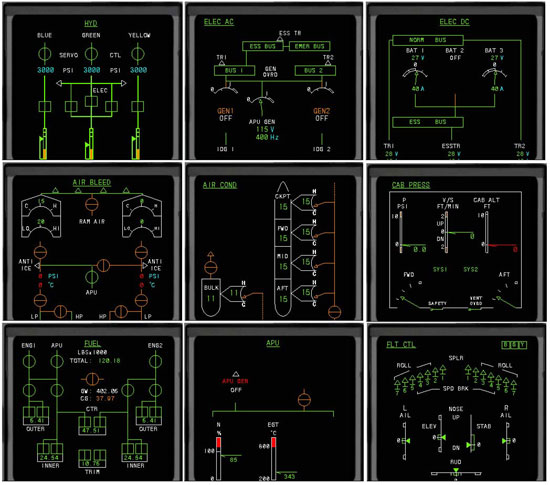
Access to the various ECAM pages is done through a very nice small pop-up window that has text icons for all the various ECAM displays.

Trouble-shooting systems (or correctly configuring them) is made very easy with the visual feedback that the ECAM displays.
With the main hydraulics systems on line I test the flight controls and compare the inputs to the displays on the ECAM verifying proper movement and deployment and retraction of the speedbrakes and spoilers.

The cargo is loaded and the cargo doors and main entry door are closed and verified secure on the DOOR page of the ECAM.

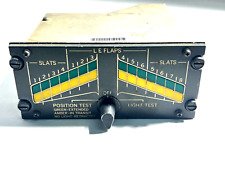
For this take-off we’ll be using leading edge slats only and no flaps. After moving the flap selector I make sure the display shows the correct setting and the wing leading edges extend as the slats move into position.

Related Posts:
Related posts:
 Boeing vs. Airbus – Part 1 Simulation Software Workshop Airbus A310
 Page 2
Boeing vs. Airbus – Part 1 Simulation Software Workshop Airbus A310 Page 4
Boeing vs. Airbus – Part 1 Simulation Software Workshop Airbus A310 Page 5
Boeing vs. Airbus – Part 1 Simulation Software Workshop Airbus A310 Page 6
Boeing vs. Airbus – Part 1 Simulation Software Workshop Airbus A310 Page 7
Boeing vs. Airbus – Part 1 Simulation Software Workshop Airbus A310
Boeing vs. Airbus – Part 1 Simulation Software Workshop Airbus A310 Page 2
Boeing vs. Airbus – Part 1 Simulation Software Workshop Airbus A310 Page 4
Boeing vs. Airbus – Part 1 Simulation Software Workshop Airbus A310 Page 5
Boeing vs. Airbus – Part 1 Simulation Software Workshop Airbus A310 Page 6
Boeing vs. Airbus – Part 1 Simulation Software Workshop Airbus A310 Page 7
 Boeing vs. Airbus – Part 3 Phoenix Simulation Software Airbus A320 Page 3
Boeing vs. Airbus – Part 3 Phoenix Simulation Software Airbus A320 Page 4
Boeing vs. Airbus – Part 3 Phoenix Simulation Software Airbus A320 Page 3
Boeing vs. Airbus – Part 3 Phoenix Simulation Software Airbus A320 Page 4