Firing up the sim I load the LD767 and am plopped into the “cold and dark” cockpit. Very impressive! The left side of the panel is dominated by the 2-tube EFIS screens while the right side (actually “center”) of the panel features a 2-tube EICAS display (Engine Indicating and Crew Alert System).
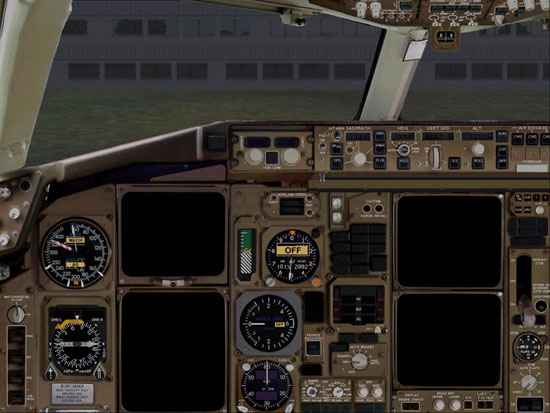
A nice feature is a fully functional co-pilot side containing separately configurable EFIS tubes and the shared center EICAS displays. I did have a blurry graphics artifact over the power pre-select panel (just above the flap position indicator) that looks like perhaps a missing texture?

Looking up to the overhead panel I am once again presented with button-pushing nerd glory with a vast array of things to twist, push and pull! The text resolution and graphics are very sharp and detailed.

Breaking out the tutorial PDF I start the process of bringing this baby to life. First we’ll get some power on the beast so I turn on the main battery which brings all of the panels to life. On the overhead panel I find the switch to turn on the APU and turn it to START. After about 1 minute the APU annunciator indicates RUN telling me that the APU is up and running and ready to supply electrical power to the aircraft. During the 60 second APU spool up time period, I could find no indication in the cockpit that the process was actually happening. I don’t know how it works on the real aircraft, but it would be nice to have an RPM or ITT gauge or something indicating that the APU is in fact starting (or shutting down).

Immediately we can see the systems which are turned off or inoperative as their associated annunciators glow orange. The Boeing panel uses a systems flow diagram switch set-up similar to the Airbus and provides logical groupings of systems. The white lines and white ON indicators recessed into the buttons blend in a bit with the white text labeling however and the flow paths don’t stand out to my eye as readily as on the Airbus panel.

Had I wished, I could have used the vast Level-D pull-down menu within the sim to hook up ground power to provide electrical juice in lieu of the APU. On the captain’s panel all of the instruments and the EICAS displays are powered now giving the cockpit a comfortable “ready to work” look.

A closer look at the EICAS displays shows the current abnormal conditions and the engine parameters. The LEFT FUEL SYS PRESSURE annunciator is not lit because starting the APU automatically powers the left forward fuel pump on, just one of the many small indications of the Level-D attention to detail!

Having learned my lesson from the Airbus flight, I know to start setting up the cockpit prior to starting the main engines so I get to work slowly ticking off items on the checklist in preparation for the upcoming flight. Yaw damper switches, hydraulic, passenger oxygen, ignitions, fuel pumps, window heat, cargo heat, etc., The list goes on and on, and not all of the switches are being switched ON, some switches you must confirm OFF (you never know who last flew your aircraft!).
With most of the systems switches set we turn now to the aircraft configuration and navigation setup. Much like the SSW Airbus FMC, the LD767 FMS is the heart of the entire 767 configuration and navigation system. Fully 64 pages of the LD767 manual is dedicated to the programming and operation of the FMS system, which is an indication of not only how capable and complex the FMS modeling is, but also how essential the FMS is to successfully flying a 767 mission. The impression I get on all modern airliners, whether they be Boeing or Airbus, is that they are comprised of 2 million separate parts flying in close formation with the FMS(C): where goes the FMS, so goes the aircraft! Which also brings up the standard industry joke: “I can’t fly worth a crap any more, but I can type 80 words per minute!!”
Related Posts:
Related posts:
 Boeing vs. Airbus – Part 1 Simulation Software Workshop Airbus A310 Page 2
 Boeing vs. Airbus – Part 2 Level-D Simulations Boeing 767
 Page 3
Boeing vs. Airbus – Part 2 Level-D Simulations Boeing 767 Page 4
Boeing vs. Airbus – Part 2 Level-D Simulations Boeing 767 Page 5
Boeing vs. Airbus – Part 2 Level-D Simulations Boeing 767 Page 6
Boeing vs. Airbus – Part 2 Level-D Simulations Boeing 767 Page 7
Boeing vs. Airbus – Part 2 Level-D Simulations Boeing 767 Page 8
Boeing vs. Airbus – Part 2 Level-D Simulations Boeing 767
Boeing vs. Airbus – Part 2 Level-D Simulations Boeing 767 Page 3
Boeing vs. Airbus – Part 2 Level-D Simulations Boeing 767 Page 4
Boeing vs. Airbus – Part 2 Level-D Simulations Boeing 767 Page 5
Boeing vs. Airbus – Part 2 Level-D Simulations Boeing 767 Page 6
Boeing vs. Airbus – Part 2 Level-D Simulations Boeing 767 Page 7
Boeing vs. Airbus – Part 2 Level-D Simulations Boeing 767 Page 8