Another very significant loss was the downing of 2 of NATOs 4 available E-3 AWACS, which caused large gaps in the coverage. Once the AWACS is down the player is blind and even the planning map becomes just vague triangles with no identifiers available. If you see your AWACS heading into trouble, you can click on him and order him to return to base at any time. Better to go without the AWACS for a short period than risk losing him altogether.
 |
 |
Even the carrier task force with the Roosevelt began taking damage as the picket ships started taking losses.

Into Day 3 the enemy forces kept up the pressure with constant attacks on ground troops in support of their own advancing army. The battle for Albania was shaping up to be a NATO Dunkirk!

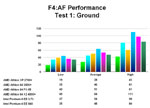
Tracking of the campaign progress can be done by watching the fortunes of war unfold graphically on the war map, or you can get into detail by opening up the INTEL section and looking at specific numbers and graphs. The blue and red bars represent friendly and enemy strength and the variables in the four graphs can be changed to suit whatever parameter you are seeking whether it be air defenses, airfields, player rating, etc.
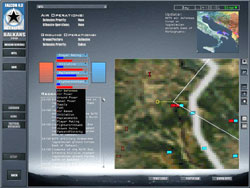
Graphs display a chronological history of the war and easily show the trends of defeat, victory, and resupply.

Related Posts:
Related posts:
 Falcon 4.0: Allied Force
 Falcon 4.0: Allied Force – Part 3 Page 8
Falcon 4.0: Allied Force Page 7
Falcon 4.0: Allied Force – Part 3 Page 8
Falcon 4.0: Allied Force Page 7
 Falcon 4.0: Allied Force Part 5 Page 2
 Lead Pursuit’s Falcon 4: Allied Force Page 5
 Tom’s HiTiles for Falcon 4: Allied Force Page 2
Tom’s HiTiles for Falcon 4: Allied Force Page 3
Tom’s HiTiles for Falcon 4: Allied Force Page 4
Tom’s HiTiles for Falcon 4: Allied Force Page 2
Tom’s HiTiles for Falcon 4: Allied Force Page 3
Tom’s HiTiles for Falcon 4: Allied Force Page 4