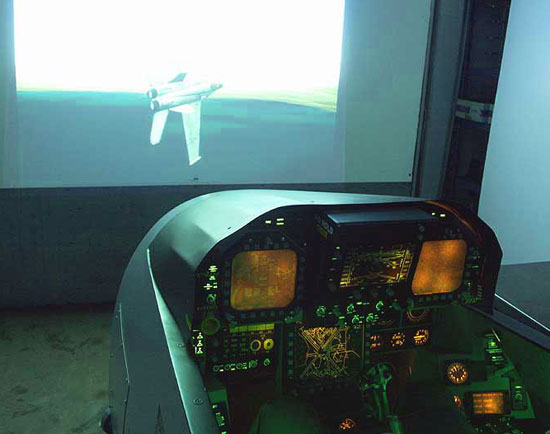
20mm: Well, I can tell you that there were definitely a lot of people who were pleasantly surprised when they saw the announcement of F4:AF and that your cockpits were going to an integral part.
I am sure this is complicated, but if you would, take us through the process of creating a virtual cockpit for a simulation such as Falcon 4: Allied Force. To begin with, how do you research the real thing, what sources do you use?
Aeyes: Wow. How much time do we have? To answer your question, there is a whole series of preparations that take place before making a virtual cockpit.
The basic ones are:
Know the aircraft, try and find any technical info available. Sources are:
- The internet
- Libraries
- Talks with pilots/ground crews
- Manuals
Find image source material for reference, color and sizes:
- A dash manual is a must
- Find pictures and info everywhere: internet, books, TV etc.
- Take pictures inside the cockpit
The start:
It is a major advantage if you can get a chance to sit in the cockpit yourself, preferably with cameras to snap every panel in detail and from the pilot’s point of view.
Thus far I have had the chance to sit in several F-16’s, including some stick time in the RNLAF MLU simulator, an F-15A, an EF2000 (mockup) and JSF (mockup) at an airshow, a MiG-21, MiG-29, F-5 and an F/A-18C. I use 2 types of cameras, both of good quality. I use a Canon film camera with a very good lens and a digital Sony Cybershot, which uses a Zeiss lens.
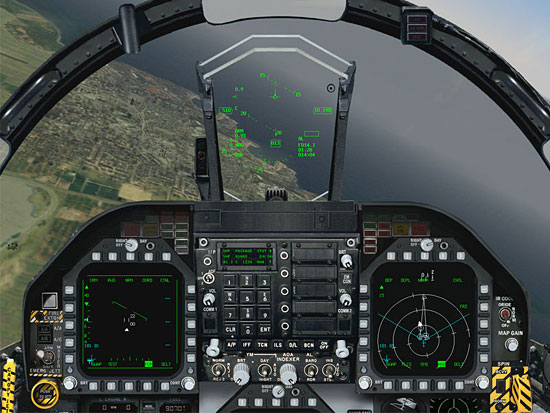
FA-18 Cockpit
The film camera is used as backup, for panels that I missed out on or that didn’t show what I expected in digital form. Usually I shoot approximately 150 MB of digital material in 1600×1200 and 3×36 film. The digital material saves me one step from analog to digital, plus I don’t have to wait for the slides to be developed and can get to work right away with the source material I shot.
This quickly getting to work also helps to keep me in touch with the feeling of the cockpit. Whether it is small and cramped, or roomy and modern, ergonomically or not, this feeling has to be transferred to the actual virtual cockpit. Things that are up close or further away are hard to achieve on a monitor screen but they have to appear that way in a 2D or 3D cockpit panel.
Based on the feeling of sitting in the pit, a line drawing from a manual or a rough picture of a whole cockpit are the starting point for the detailed drawing of panels and instruments.
The background of the individual panels themselves are the second stage of the cockpit. On top of that the switches and lights are placed, including their shading to get a 3D effect, and last phase is the adding of the panel’s text. This all happens in Photoshop layers, so that if necessary certain items can be moved or removed without harming the total view and its details.
20mm: Wow is right! I had no idea. I guessed it was involved but listening to what all you actually do makes it a lot more understandable.
Aeyes: You ain’t seen nothing yet. Tell you what, let’s take a look at this little animated gif I made up. Like the old saying, a good picture, a moving picture in this case, is worth a thousand words.

Building a Panel. Click the image to view this gif animation.
It will open in a new page. (file size: 329 kb)
20mm: That is incredible. I’ve never seen anything like that before, you’re right, it sure helps to see that animation. So how do you give us button-pushers what we crave?
Aeyes: The movement of switches is the tricky part. Say a switch has 3 options, OFF/STBY/ON, and the current position of the graphics is OFF. That means 2 additional switch graphics have to be made for the STBY and ON position. I usually first remove the whole switch except for the base. Then I start drawing a new switch from the OFF position graphic, moving and turning it to the STBY and overlapping the OFF area with the background panel. And so on for the ON position. The perspective and shading always has to follow the switch position and point of view. This is tricky but rewarding if managed well.
For me it is hardly useful to make separate pictures inside the pit for every position of the switch, drawing them gives a more balanced feeling of similar graphics, lighting and color.
20mm: Cool. You mentioned perspective before, managing to take what is a real world cockpit and translating it into something for a computer monitor, where things that are closer appear to be so, farther away likewise. How do you go about that?
Aeyes: You’re talking about view and perspective. Let me tell you a little about how that works:
For a 2D cockpit, to determine the correct view within the limit of say 1600×1200, I first make a rough cockpit showing 180 degrees in the forward position before doing the side panels. This very big forward view I make in a resolution of let’s say 4000×4000, and after that the actual views and zoom factor are selected based on the instruments placement within the cockpit in relation to the sims options.
These are being refined and worked out and when ready placed back in the big overview. So there always is a bigger picture of the pit, this is required for adding the side panels, these have to match and connect flawlessly. From there the rest of the cockpit is added and each view carefully selected and refined. What is very important besides how the views are placed is the point of view and perspective from the pilot. After all, the cockpits simulate this viewpoint.
In a MiG-21 for example, it is very small and busy inside and the view very limited. While in the F-15 you have lots of space and quite a good view forward and backwards. If you compare the US made cockpits with the Russian ones, it usually feels as if the US made pits have a better outside view. As if their seats are placed higher. In a MiG-29 for example the room is comfortable but the edge of the canopy is as high as your shoulders. In an F-16 with its bubble canopy it is placed much lower, plus a lot of vision at the 5 and 7 o’clock.