by Andy Bush

“Fighter pilots kill them one at a time…attack pilots kill them by the hundreds..”
Introduction
“Two’s in hot,” you say as you roll into the dive. Pulling your nose to the target, you aim the pipper at the target, mash the ‘pickle’ button, and go on your merry way, confident that you have blown the target to smithereens…if only it were that easy!!
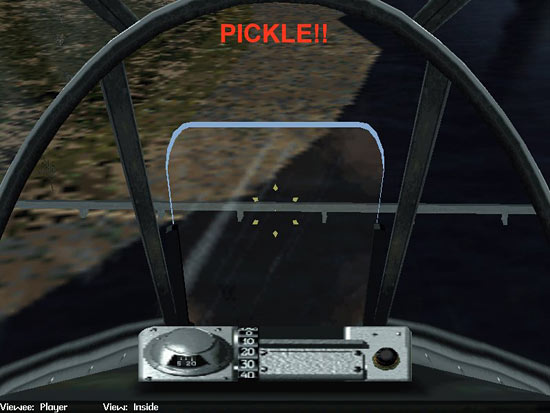
Fig 2 – Pickle!!
Air combat is a two-sided coin. While we all enjoy a good turn and burn, the air-to-mud flip side can be just as exciting, if not more so. Our sims continue to become more and more realistic in their scenario development and portrayal of weapons delivery. Perhaps it’s time for us to add to our understanding of the finer points of air to ground weapons delivery.
When it comes to this aspect of air combat simulation, there’s a whole new world out there…little has been said regarding this area. Few sim manuals get into the basics…most manuals will describe air to air maneuvers in considerable, if somewhat repetitive, detail…few, however have tried to explain the basics of bombing, rocketry, and strafing. Not surprisingly, these disciplines are just as demanding as air to air concepts…in fact, air to ground maneuvers have often been referred to as ‘BFM’ing the ground.’ The objective of any fighter maneuver is for the pilot to fly his aircraft to a specific point in the sky and to get there at a desired speed, heading, and altitude. Air to air…air to mud…it’s all the same. This series of articles will discuss the method of doing just that…getting your aircraft into a weapons delivery position…this time with your nose pointed at the ground!!
This article could be sub-titled “What You See Is Not What You Necessarily Get!!” While Figure 2 may look like a picture of a perfect dive bomb pass, reality is often far different. In this article, we will see how different aspects of a weapons delivery attack affect our ability to hit a target. The point will be to separate fact from fiction…when it comes to realistic weapons delivery, many of our sims are closer to the latter than the former. If you were not interested in simulation accuracy, you would not be reading this in the first place, so my objective is to make you a little bit smarter about the subject of air to ground weapons delivery. Let’s get started!
First, let me clarify one piece of terminology. Figure 2 is a typical screenshot of an air to ground attack. What we see is an aiming reference…in this case a circle of diamonds from a Korean War era fighter, but it could just as easily be the more common HUD circle known as a reticle or ‘pipper.’ For this article, I’ll generalize and refer to all gunsight aiming references as ‘pippers.’ Strictly speaking, of course, the pipper is actually the dot in the center of the circle. In the figure, the pilot has established himself in a dive and is aiming the pipper directly at the target. At some unspecified point (usually as soon as the pilot manages to fly the pipper exactly over the target), he’ll release or fire his weapon and pull out of the dive, confident that he has wrought death and destruction to the bad guys! In this article, I will give you a simplified explanation of why the delivery of air to ground munitions is a tad more complicated than what is typically seen in today’s sims.
Oh…one other minor point! In this discussion, I am not going to consider the effect of wind. I’ll talk about that in a future article.
We’ll begin by looking at a number of factors that govern the delivery of air to ground weapons. This material is, for the most part, real world academics. Not all of it is pertinent to our sims simply because the sims are not yet programmed to take into account these principles. For you ‘hard core’ types out there, you may find the material instructive. I’ll try to cover the material in enough detail to hold your interest. For the rest of us, you should find the discussions interesting and challenging. Regardless of the depth of your involvement, the end result will be an enhanced appreciation of what it takes to put the bomb, rocket, or cannon shell right where you want it…parked in the lap of the bad guys!
Related Posts:
Related posts:
 Air To Ground Basics – Bombing Page 2
Air To Ground Basics – Bombing Page 5
Air To Ground Basics – Bombing Page 6
Air To Ground Basics – Bombing Page 7
Air To Ground Basics – Bombing Page 8
Air To Ground Basics – Bombing Page 2
Air To Ground Basics – Bombing Page 5
Air To Ground Basics – Bombing Page 6
Air To Ground Basics – Bombing Page 7
Air To Ground Basics – Bombing Page 8
 Air To Ground Basics – Bombing, Part Two
 Page 3
Air To Ground Basics – Bombing, Part Two Page 5
Air To Ground Basics – Bombing, Part Two
Air To Ground Basics – Bombing, Part Two Page 3
Air To Ground Basics – Bombing, Part Two Page 5