Gameplay
Anyone who has played the original versions of Operational Art of War will be familiar with and comfortable with the latest version of the game. There are about fifty different fixes and upgrades from the original game. Some, like the Windows XP install problems, are obvious from the start. Most fixes are small, generally imperceptible and most regular players of the game won’t even realize the changes were made.
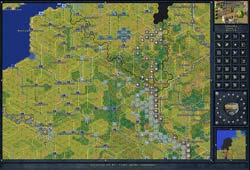
For those who aren’t aware, this is a turn-based hex sided game in the tradition of the old line wargames. For years this was about the only way to play a wargame, and the first computer wargames were simply electronic ports of the old board games.
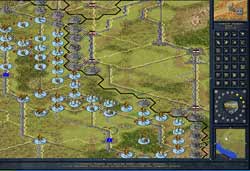
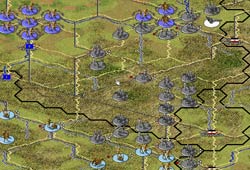
Playing a game is somewhat complex, although starting is pretty easy. Knowledge of NATO symbols is very helpful for anyone who wants to play the game. 3d bases are available as always but I haven’t really gotten into them. Using NATO icons is the best and quickest way to know what your unit is as well as the strength of the unit. Since this is a company size unit and larger game, in reality knowledge of what map icons look like on a map adds to the realism of the game.
Units can range from as small as platoon size elements to as large as entire Army groups. The size of the unit is, of course, dependent on the size of the map and the nature of the particular scenario you are playing. Map hexes can range from as small as 2.5 kilometers to as large as 50KM size. The size of the overall map will indicate what kind of units you will find.
In reality, although there have been some changes and updates to the game, the way you play TOAWIII is exactly the same as you would with TOAW I and II. You essentially select a unit or units and order them to move to a certain area. When they are adjacent to enemy unit, you can order them to assault enemy units. When attacking you can dictate whether you want a minimum number of losses vs. attacks where taking losses is acceptable. You also have the option of conducting a limited attack where you may not necessarily take an objective, but at the same time you will have a smaller decrease in your combat power.
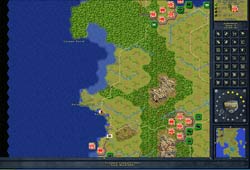
Ranged attacks are available with artillery units. The range of the units is based upon the type of artillery unit available. Most arty units can fire between two and four hexes away. Naval units are available as well and can conduct indirect fire missions, something essential for games that require shore bombardment.
A little bit more on the naval aspects. Naval units were considered the weakest component of the first game. I haven’t found the naval aspect to have improved much in the game. Naval units are really not much more than floating artillery, and attacks between naval units have been nothing more than a source of confusion with me. If you are interested in naval attacks in a wargame, you are better off with a game like War in the Pacific or Norm’s latest game (Distant Guns, another game that I am reviewing). This is a ground combat wargame, plain and simple.
Air units are represented in the game as well. Air units have a variety of options available depending on their specific capabilities. Bomber and fighter bomber units have the option of direct bombing strikes against enemy targets. In addition bomber units have the option of interdiction (strikes against enemy units as they move) and combat support (assisting ground units in resolution of attacks) or they can rest. Air combat units have the ability to perform air superiority missions. These units can interdict air missions by enemy bombers. These functions are essentially unchanged from earlier versions of the game.
Resolution of attacks and defenses involves ‘die rolls’ which factor in the attack ratings of a unit vs. the defense value of a unit, whether the unit is dug in vs. on open terrain and if there is artillery support available. Unit attack and defense strength is easy to assess based upon the numbers on the left and right hand side of each particular unit icon. The unit’s posture (dug in vs. in the open) is noted by the D or F in the icon. Fortified hexes are rendered on the map and give a defense bonus.
Several units can attack units in a given hex. The player has the option to have a single unit up to all adjacent units attack a specific hex. Upon the resolution stage of a battle, the game will determine the attackers and defenders attack vs. defense ratings and then will resolve the attack. If the attackers have enough assault strength to take the hex, the enemy unit will fall back into either a friendly controlled or an un-occupied hex. If there is enough assault strength brought to bear, or if the enemy unit is fixed and can’t move, then there is a chance that 100% of a unit will be destroyed.
If this seems fairly simple, well in some ways it is. The key to winning in the game is to find and exploit weaknesses in the enemy positions. Attackers need to find the chink in the enemy armor (so to speak) and pierce him there. Defenders have to use the fog of war and the ability to dig in with units to keep the enemy from overrunning his or her position.
The AI in the game is essentially unchanged (at least it appears to me) from the first game. The AI is competent, if not outstanding in the game. The AI appears to be very good on the defensive; it will certainly react to your attacks very well. On the other hand it is fairly predictable on the offensive and sometimes can be funneled and cut off by the smart player. It often fails to attempt a breakout when it is trapped, even when staying put means losing large numbers of units. In some respects this is historical, when playing the Stalingrad scenario I really didn’t have to worry about the 6th Army trying to break out. This meant that I could concentrate my units to beating back attacks from the West without worrying about my AI Von Paulus trying to thwart me.
This game shone in the past as well as today in PBEM play. PBEM is still there and is solid. The game has made some changes in the PBEM code which has eliminated some of the cheats that savvy Opart online players had used to exploit the code. Unfortunately PBEM is still the only way to play against another human being, short of having two people in the same room. It would have been nice if the hot seat play could have been transitioned into TCP/IP style play where two people could play against each other without relying on e-mail. PBEM was great back in 1997, but in 2006 there should be more available today.
 |
 |
 |
 |
 |
|
Related Posts:

Related posts:
 Battle of Two Turn-Based Strategy Games: Civilization IV Versus Shattered Union Page 2
 Combat Mission: Afrika Korps Page 3
Combat Mission: Afrika Korps Page 4
Combat Mission: Afrika Korps Page 3
Combat Mission: Afrika Korps Page 4
 Panzer Corps Page 2
 The Operational Art of War III
 Page 2
The Operational Art of War III Page 4
The Operational Art of War III
The Operational Art of War III Page 2
The Operational Art of War III Page 4
 WWII Battle Tanks: T-34 vs Tiger Page 5