World War III in 1985 – A Harpoon3 Battleset Diary
| First Contact 3norway1.scn |
Date/Time: 14 September 1985 Size/Duration: + |
| Location: Norway Playable sides: NATO |
|
| Type: ASuW | |
| Briefing: This scenario starts one hour before the initialization of hostilities in Central Europe. A powerful Soviet Red Banner Northern Fleet surface action group (SAG) and two large amphibious groups sailed into the Norwegian Sea 36 hours ago. The amphibious groups have now been spotted sailing towards the Norwegian coast. |
Briefing
NATO vs Soviet Union
Location: Norwegian Sea
Date/Time: 14 September 1985, 00:01:00
This scenario starts one hour before the initialization of hostilities in Central Europe. The Soviets have been conducting intense military exercises for weeks and have deployed considerable military hardware to Eastern Europe. Finland has also allowed unusually large numbers of troops to enter the country and Finish airbases have become crowded with Soviet fighters and attack aircraft.
A powerful SAG and two large amphibious groups consisting of ships of the Soviet Red Banner Northern Fleet left the Barents Sea 36 hours ago and sailed into the Norwegian Sea. The amphibious groups have now been spotted sailing for the Norwegian coast, probably towards the town of Bodo and Island of Andoya.
NATO has been closely monitoring the Soviets and a mobilization order was issued a few hours ago. The Soviets’ intentions are still unknown. No official statement has been made by the Soviets over the last days’ events.
Orders for CMDR NATO Operations
Intel:
Two Soviet amphibious groups are heading toward the Norwegian coast. NATO forces have been put on high alert.
Mission:
Launch Orions from Andoya airbase to investigate. If the Soviets turn out
to be hostile attack them with everything you got. Inflict as heavy losses as possible. Concentrate on the southern amphibious group and sink one (1) of the Alligator large landing ships. Scenario duration is one (1) hour.Remember we do not yet know the Soviets’ intentions. So do not fire until fired upon!!!
Command and Signal:
Headquarters – Bodo
Recommended EMCON State – B (Limited Emissions
After Action Report
Norwegian Central Command
Oslo, Norway
00:01Z Fixed search radars show all kinds of traffic around the coastal waters of Norway. However, there are two ominous looking groups of ships that are following parallel courses and headed towards the coast. One is angling in on Andoya and the other further south looks to be headed toward Bodo.

Figure 1 – Three Soviet flotillas stalk the Norwegian Sea.
00:03Z Three Orion P3s on strip alert at Andoya take to the sky and head out to take a look at the northern group. There are F-16’s on routine CAP further south; one flight is vectored to inspect the more southerly group. Initially all the reports are of fishing vessels; the normal run of the mill.
00:06Z The P3’s overfly a group of OSA II missile boats. Not good. But not overtly hostile either. The Orions press on.
00:08Z Meanwhile to the south the F-16s skirt the large formation and approach from the north. They pass a lone destroyer – perhaps a Kresta II – that appears for all the world to be placed just where you’d expect an AAW picket ship; not radiating though.

Figure 2 – F-16’s steer clear of Kresta II class picket ship.
00:12Z As they approach the larger formation they descend through the overcast for a better look, and Ro-Ro’s and LSTs loom into view. This is no exercise! Several other warships in the formation too but no time to classify those as the RWR gear lights off in the Falcons’ cockpits and they react instinctively to evade the missiles and beat a hasty retreat. They radio frantically repeating that they are under attack from a large Soviet flotilla. One Viper just can’t get away from the rush of missiles and the first combat loss of the day is recorded.
00:15Z There is initially confusion at command level as disbelief is the first reaction to news of the loss of our jet. Confirmations come in from survivors of the recon flight and the Orions tracking the Northern group also now report their quarry as hostile also. Not good. Disbelief turns to anger as reality sets in and grim faces turn to the map boards to plan our next moves.
Weapons are now free.
00:21Z To the far north, reports are coming in from the British task group centered on the Illustrious. Apparently they too are unprepared for the oncoming Soviet juggernaut. Word of hostilities reaches them too late and their weapons state remains at “tight” for a few minutes too long.
00:23Z Illustrious takes three hits from Kingfish missiles without ever detecting the launching aircraft. The third hit ignites the hangar deck into a conflagration that her crew has no hope of containing. Six more missiles slam into the carrier but these merely serve to underscore the point: the British flag ship is lost.
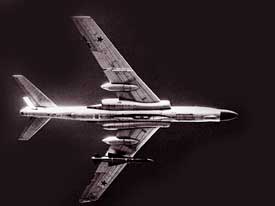
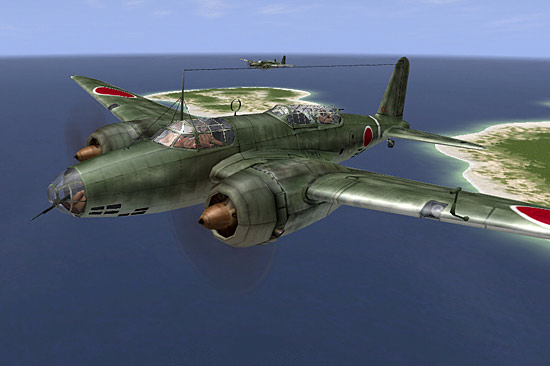
Figure 3 – Kingfish missiles were likely launched from Soviet Badger aircraft.
00:24Z Her escorts are also caught napping and the Brits are basically out of the fight almost before it begins. Phoebe takes two hits but for a frigate that’s more than enough to seal her fate even before two more finish her off. Argonaut is hit by three missiles and she too is ablaze and will sink fast.
00:25Z The destroyer Exeter is the last surface ship in the group that can maneuver but inevitably the last of the incoming wave of missiles picks up her signature and no fewer than nine Kingfish missiles pepper her from stem to stern.
00:26Z The few Harriers the Brits had aloft report Forger-A aircraft and press the engagement. With the usual professional dispatch the fleet air arm pilots convert the intercept on a pair of Forgers and nail both with Sidewinder shots. The Forgers don’t even maneuver when fired upon; apparently their pilots fixated on the burning ships and forgot to watch their own tails.
00:27Z We hear the Harriers the Brits had in the air are headed to Andoya for recovery. Perhaps they can play scout on the way and help out the P3’s there.
Not a bad thought but almost as soon as it’s spoken the P3’s up there come under fire themselves. Having been asked to make positive identifications on the ships in the surface group they have wandered in close. They never stood a chance.
00:28Z Command orders the squadrons of our missiles boats to the south to surge forward. The northern most one looks to have a good flanking position and hasn’t been detected yet. The southern one will have to keep the invaders’ attentions while the northern group closes to effective firing range for the Penguin missiles they carry. F303 Stavanger too is ordered forward to give the on-rushing soviets something to focus on.
00:30Z At Andoya four more P3’s are being prepped for an impromptu raid. They will carry Harpoons. Naturally the flight leader looks to the northern group bearing down on his home base but his orders force him instead to plot a course south to support the attack on the group there. Apparently Norwegian high command feels only one group can be stopped and better it be the one to the South to keep any Soviet incursion as far to the North as can be. He hopes his base is still there when his mission is over but just in case he searches out approach plates for Bodo and Trondheim too, just for good measure.
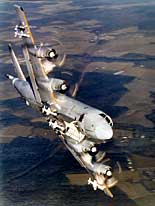
Figure 4 – AGM-84 armed P3 Orion aircraft lift off from Andoya.
00:34Z More Soviet missile boats appear among the islands off Bodo. They fire several salvos at our missile boats. Naturally the squadron commander has his boats return the favor. Point defenses kick in but these are small boats with limited means and three missiles incoming apiece are just too much. Two boats sink in moments and the other two are set ablaze. It’s not clear if the outbound missiles find their mark; there’s no one in range to report the results.
00:36Z The P3’s racing south are coordinating with the northern squadron of our missile boats. The harpoons and penguins are launched in a combined salvo at all the vessels in the northern most file of the Soviet formation. The weapons officers ignore the warships as much as possible and focus instead on the transports; they are determined to put a stop to any plans for invasion that Russian bear might have in mind.
00:38Z The Kresta II opens up with its attempts to knock down the penguins. It appears that no one in the Soviet force even sees the harpoons – they run in apparently unmolested.
00:48Z The Kresta knocks down two penguins but other than that, the rest get through. We are surprised to see so little attrition of our salvo.
00:49Z If only we’d known that we’d catch the Russians so unprepared we would have spread the weapons over more of the ships in the formation. Still, two Ro-Ro’s take multiple hits and an Alligator goes up in flames also.
00:51Z The big surprise of the strike is that a Sverdlov class cruiser takes a couple of hits from penguins; must have hit the magazines since it explodes in spectacular fashion and sinks below the waves very quickly. One of our missile boats not following the plot too closely apparently; still that’s twelve 152mm guns that won’t be bombarding positions ashore.
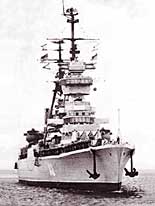
Figure 5 – One Soviet gun cruiser will not make it to shore bombardment range.
00:58Z Our forces pull back to regroup. We’ve hurt the invasion force to the south but it’s still coming on. We did better than expected in this first exchange but it doesn’t feel like much of a victory with the Russians almost into our territorial waters already.
Next Episode: Fighting Withdrawal
Related posts:
 A Modder’s Diary – Episode II: The Planeset Page 2
A Modder’s Diary – Episode II: The Planeset Page 4
A Modder’s Diary – Episode II: The Planeset Page 2
A Modder’s Diary – Episode II: The Planeset Page 4
 Command: Northern Inferno Expansion Released
 Episode Three: Barents Sea, Part 1 – The Boomer Bastion Raid
 Episode Two: Fighting Withdrawal
 IL-2: 1946 Page 5
 PT Boats: Knights of the Seas Page 2
 World War III in 1985 – A Harpoon3 Battleset Diary