Protocol
As I said, I determined the best method of judging the TIR4 was in comparison to its predecessor, the TIR3 with Vector Expansion, which is what I happened to be using previously anyway.
NaturalPoint’s web site has a really nice comparison page of the units, and their respective capabilities and prices.
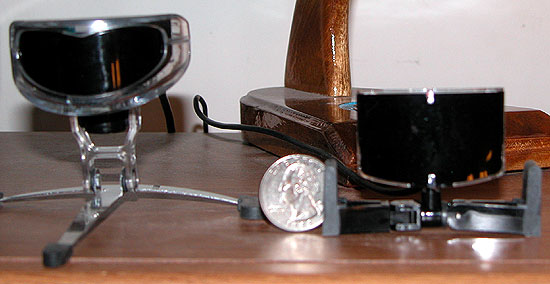
In addition to the size differential, the TIR4 offers a 30% wider tracking area with its 46 degree field of view, a 25% faster response time, and resolution doubling technology. All of which should definitely improve performance.
We’ll also look at differences in the Vector clips, the hats, and the software.
Following that, we’ll do a simulation shoot-out. I chose four simulations, three flight, and one auto racing, and played them first with the TIR3, then the TIR4. I did in-game videos of all four, a word on that in a moment. As yet, there are no tactical or FPS games with native TrackIR support. That should prove interesting when it happens. The simulations tested are the following:
- Microsoft Flight Simulator 2004 (FS9), with 6DOF
- LockOn v1.1 (Flaming Cliffs), with 2DOF plus the Z (zoom) axis
- EECH, with 6DOF
- GTL, with 6DOF
As you can see, all but one of the sims tested have 6DOF, which is where TIR4, and TIR3 with Vector Pro really shine, although as NaturalPoint states, TIR with Vector will improve performance even in games without 6DOF support. I also flew IL2/PF, Wings over Vietnam, SFP1, Korean Campaign, and Jane’s F/A-18, and will comment on these as well.
As we went to print with this review, the F4:AF v1.04 patch had not yet been released. Lead Pursuit has stated that TrackIR support for the 2D cockpit will be included in that patch, something we’ve all been looking forward to. So, we’ll do a follow-up to this review following the patch release and let you know what we think. As it stands now, TrackIR only works with F4:AF in the virtual or 3D pit. It works fine in that view, with either TIR3 or TIR4.
As mentioned, I took in-game videos with four of the above simulations. FS9 and EECH were taken using the TIR4 with FRAPS, then processed using Virtual Dub with the DivX® 5.1.1 Codec. The GTL video was done using the TIR4 as well, with FRAPS, but processed with Windows Movie Maker, and DivX® Codec.
The LOMAC video. Well, this is a special case, what can I say? For this one, I did two videos: One with the TrackIR3 and the second one with the TrackIR4. Both videos were taken with the in-game track recording capability, and are of the MiG-29A Quick Mission, for reasons which you will see later. In order to make this viewable to people who don’t have LOMAC, and more specifically, Flaming Cliffs, the video was then captured with FRAPS, and processed with Windows Movie Maker. Due to their huge size, the compression was significant and I apologize for the resultant quality, but I think they still serve the point.
I hope you all can view them, I think they’re quite illustrative.
Observations
Not only is the TIR4 small, it has more lights, and they shine in different ways from the TIR3. One thing I found surprising is that the yellow pause light stayed on even when the software was off, plus the blue “enhanced mode” light blinked on and off all the time. With TIR3, when the software was off, the lights were off. Not knowing why this was so, I called NaturalPoint’s support number and was told it was normal function. Just self-checking I suppose.
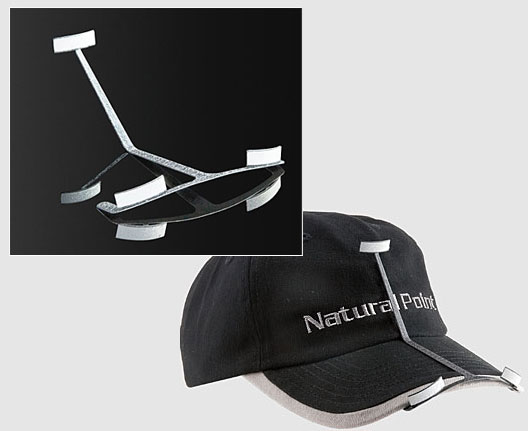
I found the metal clip design had changed, for the better. The old clip’s front bar that held the reflective squares bent down to clip underneath the brim, which in turn caused the squares to bend down with them and change the angle visible to the tracker. The new clip has a separate piece which bends and clips under the hat brim so that the squares stay at the same angle. I’m not totally sure, but I think this helps the unit track, certainly the squares are more uniform in size with the one at the top of the hat. Refer to the photo of the hat above, the pattern created is that of a triangle with one square at the top of the hat and two at the bottom, just over top of the brim.
The hat itself was different, again an improvement. The old hat, was designed for using two axis motion, and had a reflective square built into the middle of the brim. Fine for that configuration, but when you have 6DOF, and are using the metal clip, that built in square was superfluous. Worse than superfluous, because it confused the tracking unit since there were now four reflectors where only three should be. At least I think it did, so I covered it up with a piece of tape. No worries now, it’s all 6DOF-based.
I also found that the TIR4 was even more sensitive to light from behind the reflectors than the TIR3. Even with the filtering slider in the software, it would basically not function at all if I forgot and left a lamp on the table behind me on. Conversely, the TIR4 was at its happiest when the lamp on the computer shelf in front of me was on and shining down on the TrackIR reflectors.
The software is easy to use, to configure, to build your own profiles for a particular simulation or genre of simulation. Personally, I use a “bowl” shaped profile for just about everything. That’s because I like the view when I’m looking straight ahead to be very stable and relatively slow in response. When I start turning to the side and looking back to one side or up, I want the response speed to increase the farther I turn. You can make it however you want.
And I want to point out how much better the software is than it was when the TIR3 without Vector was released. You can make a response curve for a certain axis by just clicking and dragging a number of built-in points, raise or lower the whole curve with a set of arrows, and copy the curve to the other axis with one click, if that’s what you want to do. Very nice, very simple and easy to do.
For some reason, the only way to get to the “settings” area is through “View” > “Tracking” menu choice. Not really intuitive, I would prefer a separate menu option to go straight to the settings. In settings, you pick the type of object dot tracking and relative size in pixels, vector position, camera rotation, whether you want the camera LED’s on, and set the light filtering scale. The other TIR settings are found when you edit your profile. The only one there that didn’t make sense to me was that I had to check the “invert” box on the Roll axis to get it to move like I thought it should in the sims.
Related Posts:
Related posts:
 NaturalPoint’s TrackIR 4 Pro
 Page 2
NaturalPoint’s TrackIR 4 Pro Page 4
NaturalPoint’s TrackIR 4 Pro Page 5
NaturalPoint’s TrackIR 4 Pro
NaturalPoint’s TrackIR 4 Pro Page 2
NaturalPoint’s TrackIR 4 Pro Page 4
NaturalPoint’s TrackIR 4 Pro Page 5
 NaturalPoint® TrackIR 5™ Page 3
 TrackIR 3™ Vector Expansion™ by NaturalPoint
 Page 2
TrackIR 3™ Vector Expansion™ by NaturalPoint Page 3
TrackIR 3™ Vector Expansion™ by NaturalPoint
TrackIR 3™ Vector Expansion™ by NaturalPoint Page 2
TrackIR 3™ Vector Expansion™ by NaturalPoint Page 3