|
Capturing Screens and Videos
Using the Black Magic Intensity Pro Capture Card
Setting Up and Using Virtual Dub
1) Hook your console's component cables to the Intensity Pro's component inputs, then hook the RCA stereo cables to the audio input (I have my audio hooked into my SoundBlaster inputs).
2) First, boot up your console (while its hooked to component cables) running 720P mode.
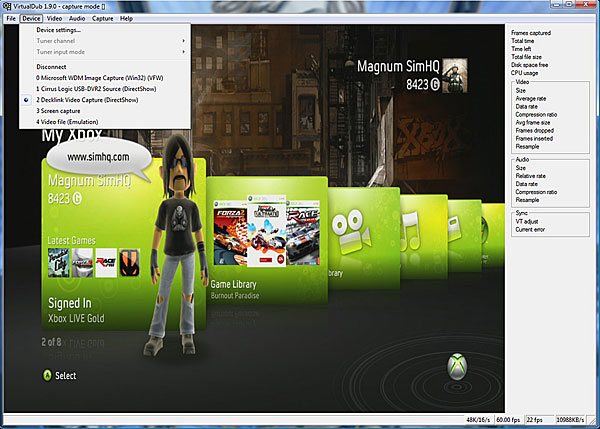
3) Open Virtual Dub, go to "File" and choose "Capture AVI".
4) You should see the window change and bring up a preview window.
5) Before recording, we must setup Virtual Dub or it will not display the feed correctly (blank window, etc.)
6) First, go to the "Device" menu and choose "Decklink Video Capture (DirectShow)"
7) "Video" menu > Choose "Overlay" > Choose "Stretch to Window".
8) "Video" menu > "Capture Filter" > Choose "HD720 60p 8 Bit 4:2:2" (time code format: timecode, and choose "Read from VITC")
9) Click "OK".
10) "Video" menu > "Compression". You Should Only Have 2 Options: "No Recompression: HDYC" and "Black Magic 8-Bit MJPEG Codec". Choose the "Black Magic MJPEG Codec". Note: If the MJPEG Codec is not listed, download it from Black Magic's support section of their site and install it. Reboot your PC. Also make sure you don't have any other mjpeg codecs installed that are set to primary (for example, "Pic Video MJPEG Codec" conflicts).
11) "Audio" menu > "Compression". Change it to "PCM Format" and 44.1 KHz / 48 KHz (48 KHz if you are using SPDIF inputs)
12) "Audio" menu > "Windows Mixer" > "Options" > "Properties". Choose the device you are recording from (USB Tuner Device or Standard Audio Device)
13) Tick the recording block and select the control that your audio is connected to (usually its "line-in").
14) "Audio" menu > "Volume Meter" > make sure you are receiving audio from your console.
15) "Capture" menu > "Capture Settings". Fill in the frame rate to "60.0000".
16) On the bottom right of the "Preview" window, you'll see a sound format button (I think default is 96 KHz).
17) Drop it to 48 KHz 16-Bit - Stereo
18) "Capture" menu > "Preferences" > Set the "Default Capture Driver" to the device your console is connected to.
19) "Default Capture File" > Set to whatever you want the filename / folder (click the "..." to set)
20) Check the "Save Current Capture, Video Format and Audio Format" boxes
21) Under the initial "Display" mode setting, choose "Overlay" (...or "Preview" if "Overlay" didn't work earlier)
22) "Capture" menu, Timing, Check the "Correct Video timing" Box, and the "Force Audio Clock.... " box
23) "Capture" menu > "Disk/IO" > Set Chunk Size to 512KB, and Set Number of Chunks to "16"
24) Check the "Disable Windows Write Buffering" box. This is the best setting I've found with a 16 MB cache HDD.
25) Under the "Capture" menu, make sure "Show Information Panel / Show Status Bar" is checked.
26) Under "File" menu > Choose "Set Capture File". Enter a filename and click "OK" Important Note: You have to manually change the file name before recording again or it will overwrite the original file!
27) You've now set everything -whew- so you can start recording by Pressing "F6" on your Keyboard (or Capture, Capture Video), Record the Footage, and Press ESC to stop recording, remember to change the capture file name if your recording multiple files.
28) You can "full screen" the preview window by pressing ALT+F5. However, the aspect ratio is unlocked and will fill your screen (so 16:10 monitors will stretch when viewing as full screen).
Click
here to go to top of this page.
|