Packaging
The HOTAS Warthog comes in a sturdy box that is similar but stronger than the earlier Cougar’s packaging. The box is designed to seal well at the top so that the carrying handle can take the product’s 14-pound weight without the box falling apart. The throttle and joystick are packaged in separate smaller boxes inside the main box, and they are protected inside these boxes by clamshell-style styrofoam molds. The packaging is very well done and should get any HOTAS Warthog to one’s door without damage. The video below shows a step-by-step slide show of the unpacking process.
Hardware
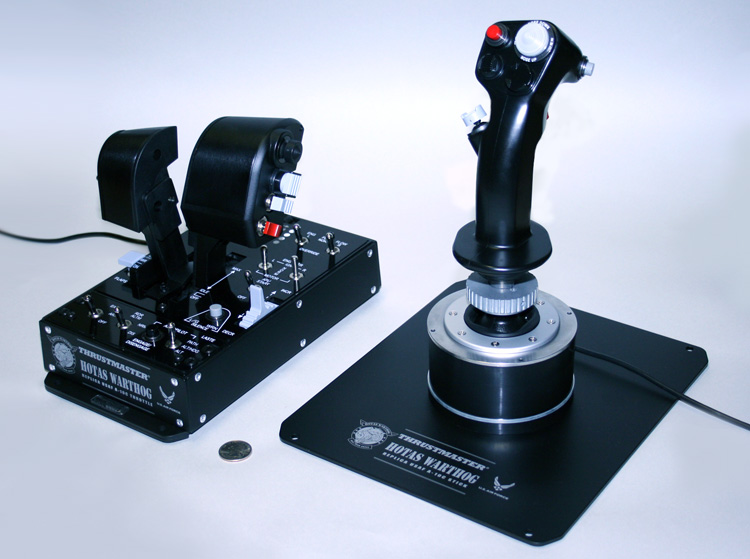
The Joystick
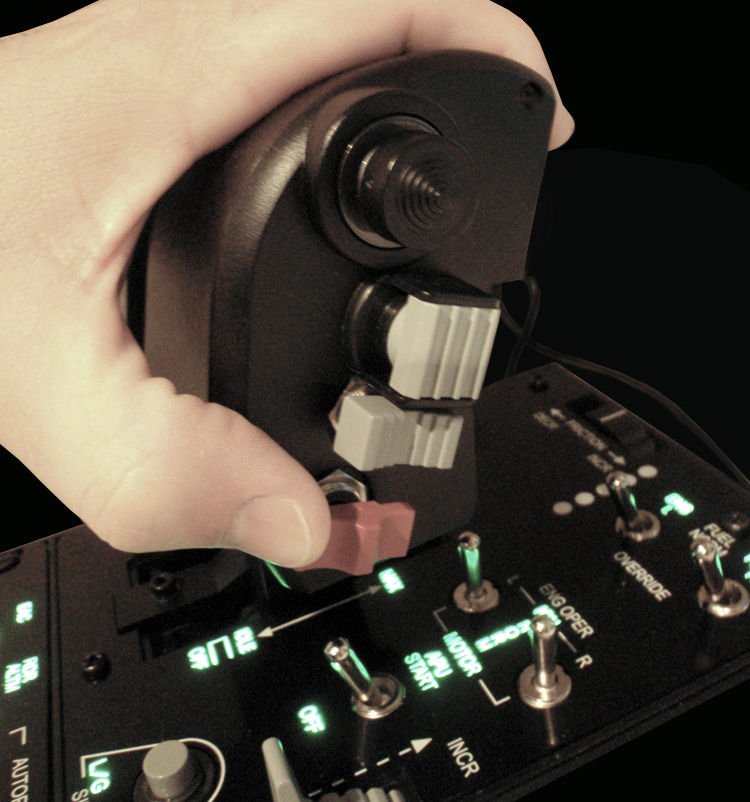
The HOTAS Warthog joystick comprises a replica F-16 stick grip fit to the stick base via a knurled knob. Although the Warthog is a replica A-10C controller, the A-10C stick does not have a paddle switch at the stick base. For the realism sticklers out there, the paddle itself is easily removable, although the small button it actuates stays in place. I anticipate that most virtual pilots will appreciate the paddle and will keep it in place, regardless of what aircraft one is simulating.
The joystick can be removed from the stick base by unscrewing the knurled knob at the bottom of the stick. This removable stick design was introduced on the HOTAS Cougar, and the original plan was for Thrustmaster to offer stick grips for aircraft types other than the F-16. While these plans never materialized, Thrustmaster has retained an identical electrical connection and knurled knob on the HOTAS Warthog.
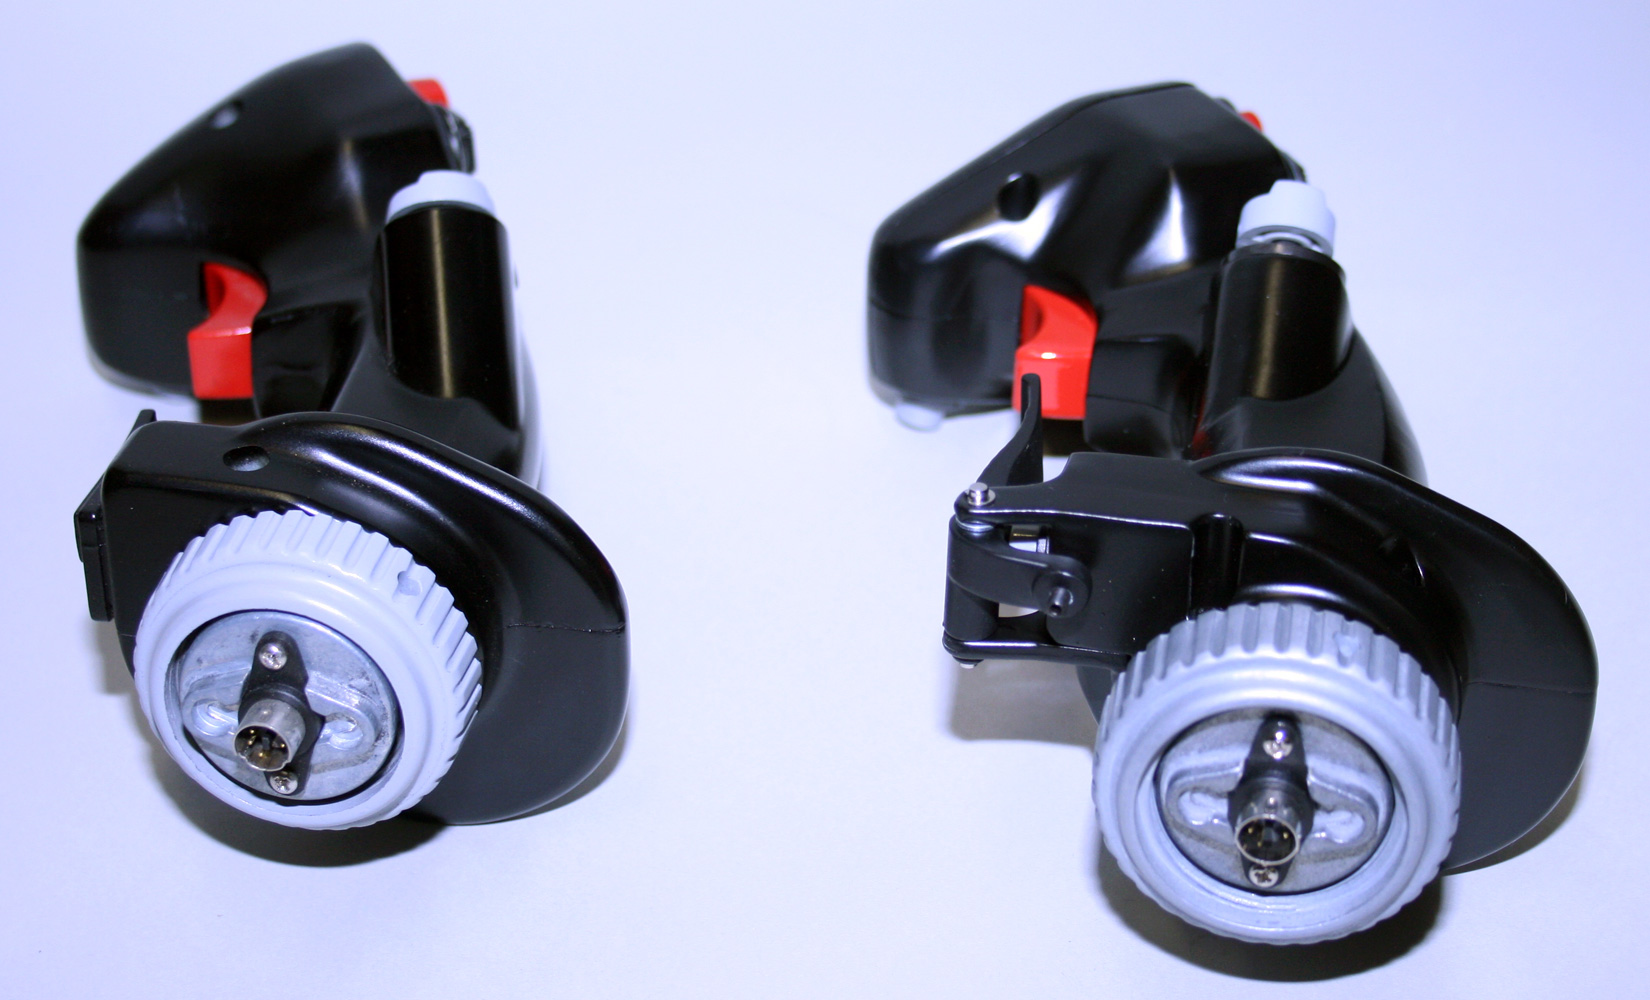 |
| HOTAS Cougar (left) and HOTAS Warthog (right) handle-base connectors |
This design choice means that the Warthog and Cougar stick grips are interchangeable. If you get a Warthog there is no reason to put the Cougar handle onto the Warthog base (because the Warthog handle is better), but owners of force-sensing Cougar mods will gain the ability to use the Warthog stick handle with these mods (minus the push-down action of the 4th HAT switch).
The HOTAS Warthog joystick buttons and HATs have all been engineered so that they have realistic tension values. That means that it will take the same amount of pressure to move or depress a button or switch on the HOTAS Warthog as it would if you moved the same control in a real F-16 or A-10C. The result is an incredibly solid and impressive feeling; some of these buttons take a deliberate and heavy-handed effort to activate. Considering these are the same button tensions used by real pilots, who fly wearing gloves, this is understandable.
 |
| Thrustmaster HOTAS Warthog Joystick |
The HOTAS Warthog joystick has four push-buttons, three 8-way HATs, one 4-way hat with push-down action, and a dual-stage trigger. Its X and Y axes are read from a single three-dimensional hall sensor in the stick base and have 16-bit resolution. The joystick is 11-1/8 inches tall when standing straight up.
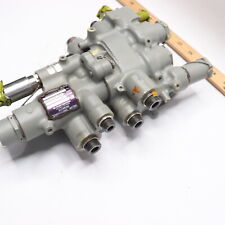
The inside of the HOTAS Warthog joystick looks similar to the inside of the Cougar’s joystick; space is tight and the confines don’t leave much room for variation. When opening up the review sample I did find one broken zip tie near the circuit board. Thrustmaster appears to have used hot glue to secure some of the buttons and to reinforce solder joints, as they did with the Cougar. I personally have no issue with this (all buttons and switches are solid and function perfectly, and that’s what matters), but some in the flight simulation community gave the Cougar negative marks for this construction method.
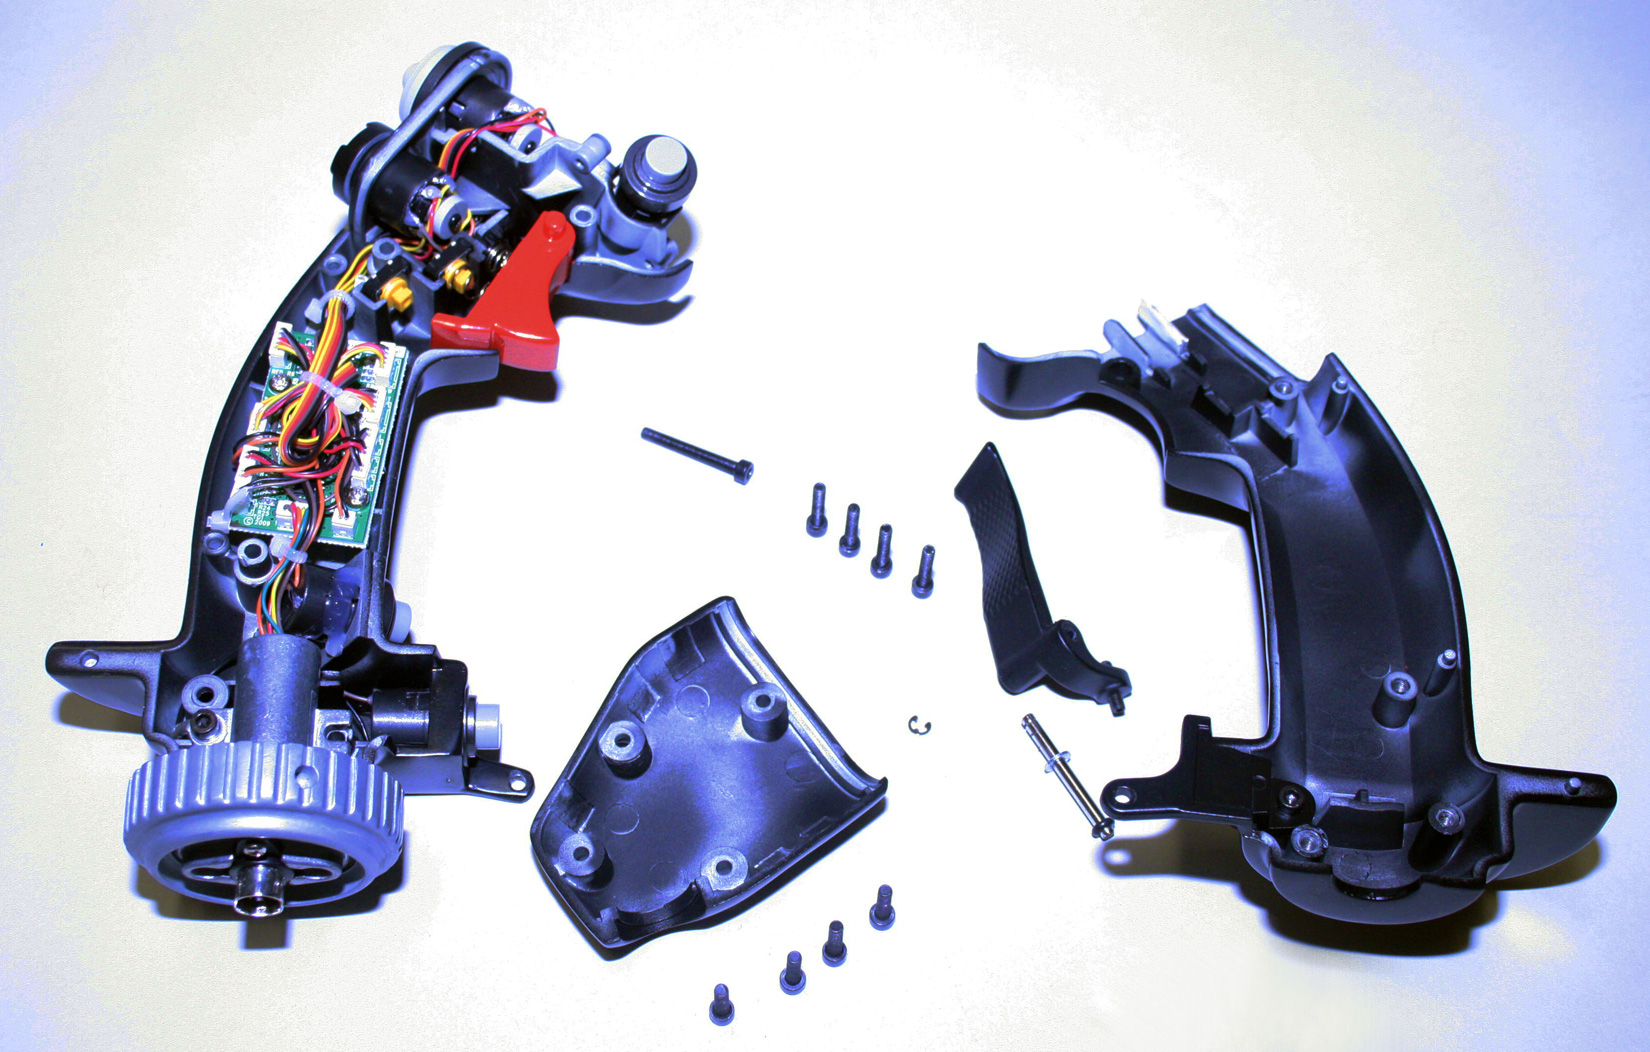 |
| The HOTAS Warthog stick grip disassembled |
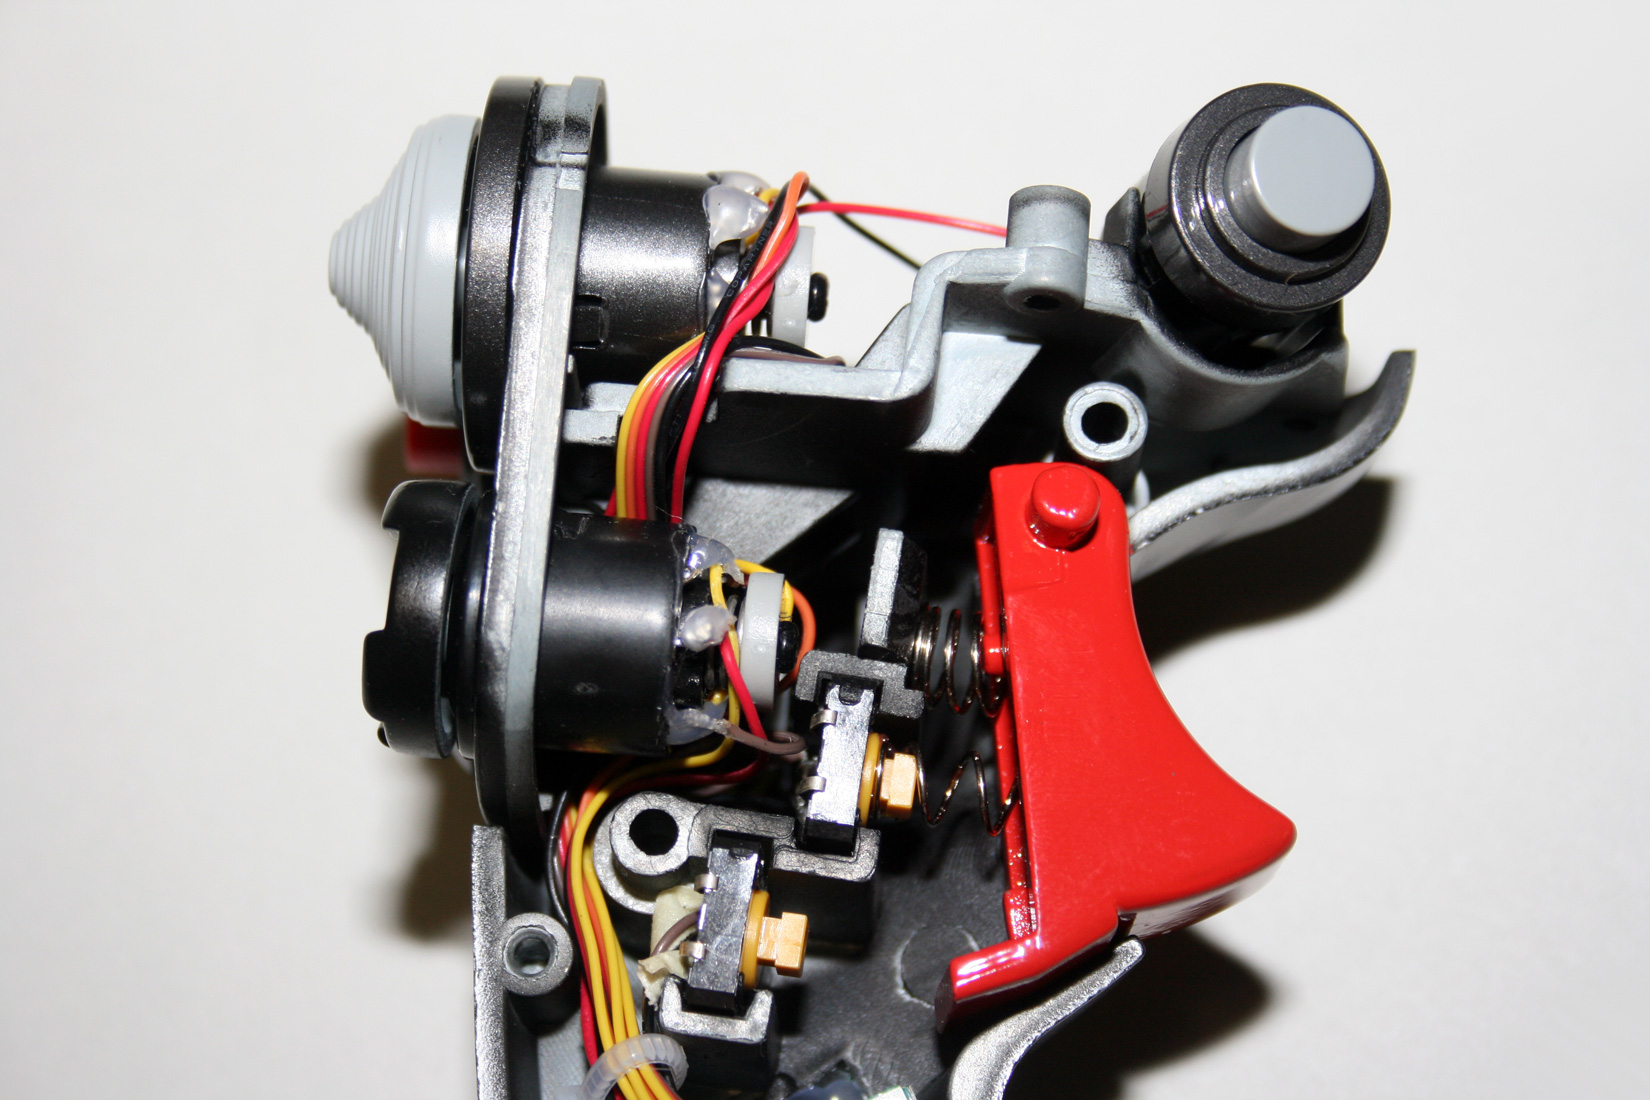 |
| Close up of top of HOTAS Warthog stick grip |
The stick base is a small cylinder, much smaller than the Cougar base, attached to a stabilizing plate for desktop use. The plate is 10-11/16 inches long and 9-1/16 inches wide, can easily be removed for cockpit mounting, and certainly resolves the tipping-over problem the Cougar had a tendency to display. The plate mounts to the stick base from the bottom, via four screws; these screw holes can also be used for mounting the stick in a cockpit. There is no bottom cover on the stick base other than the plate, which means that when the plate is removed, the electronics at the base of the stick are exposed. The video below shows how the stick base is easily detached.
| Thrustmaster HOTAS Warthog – Removable Plate |
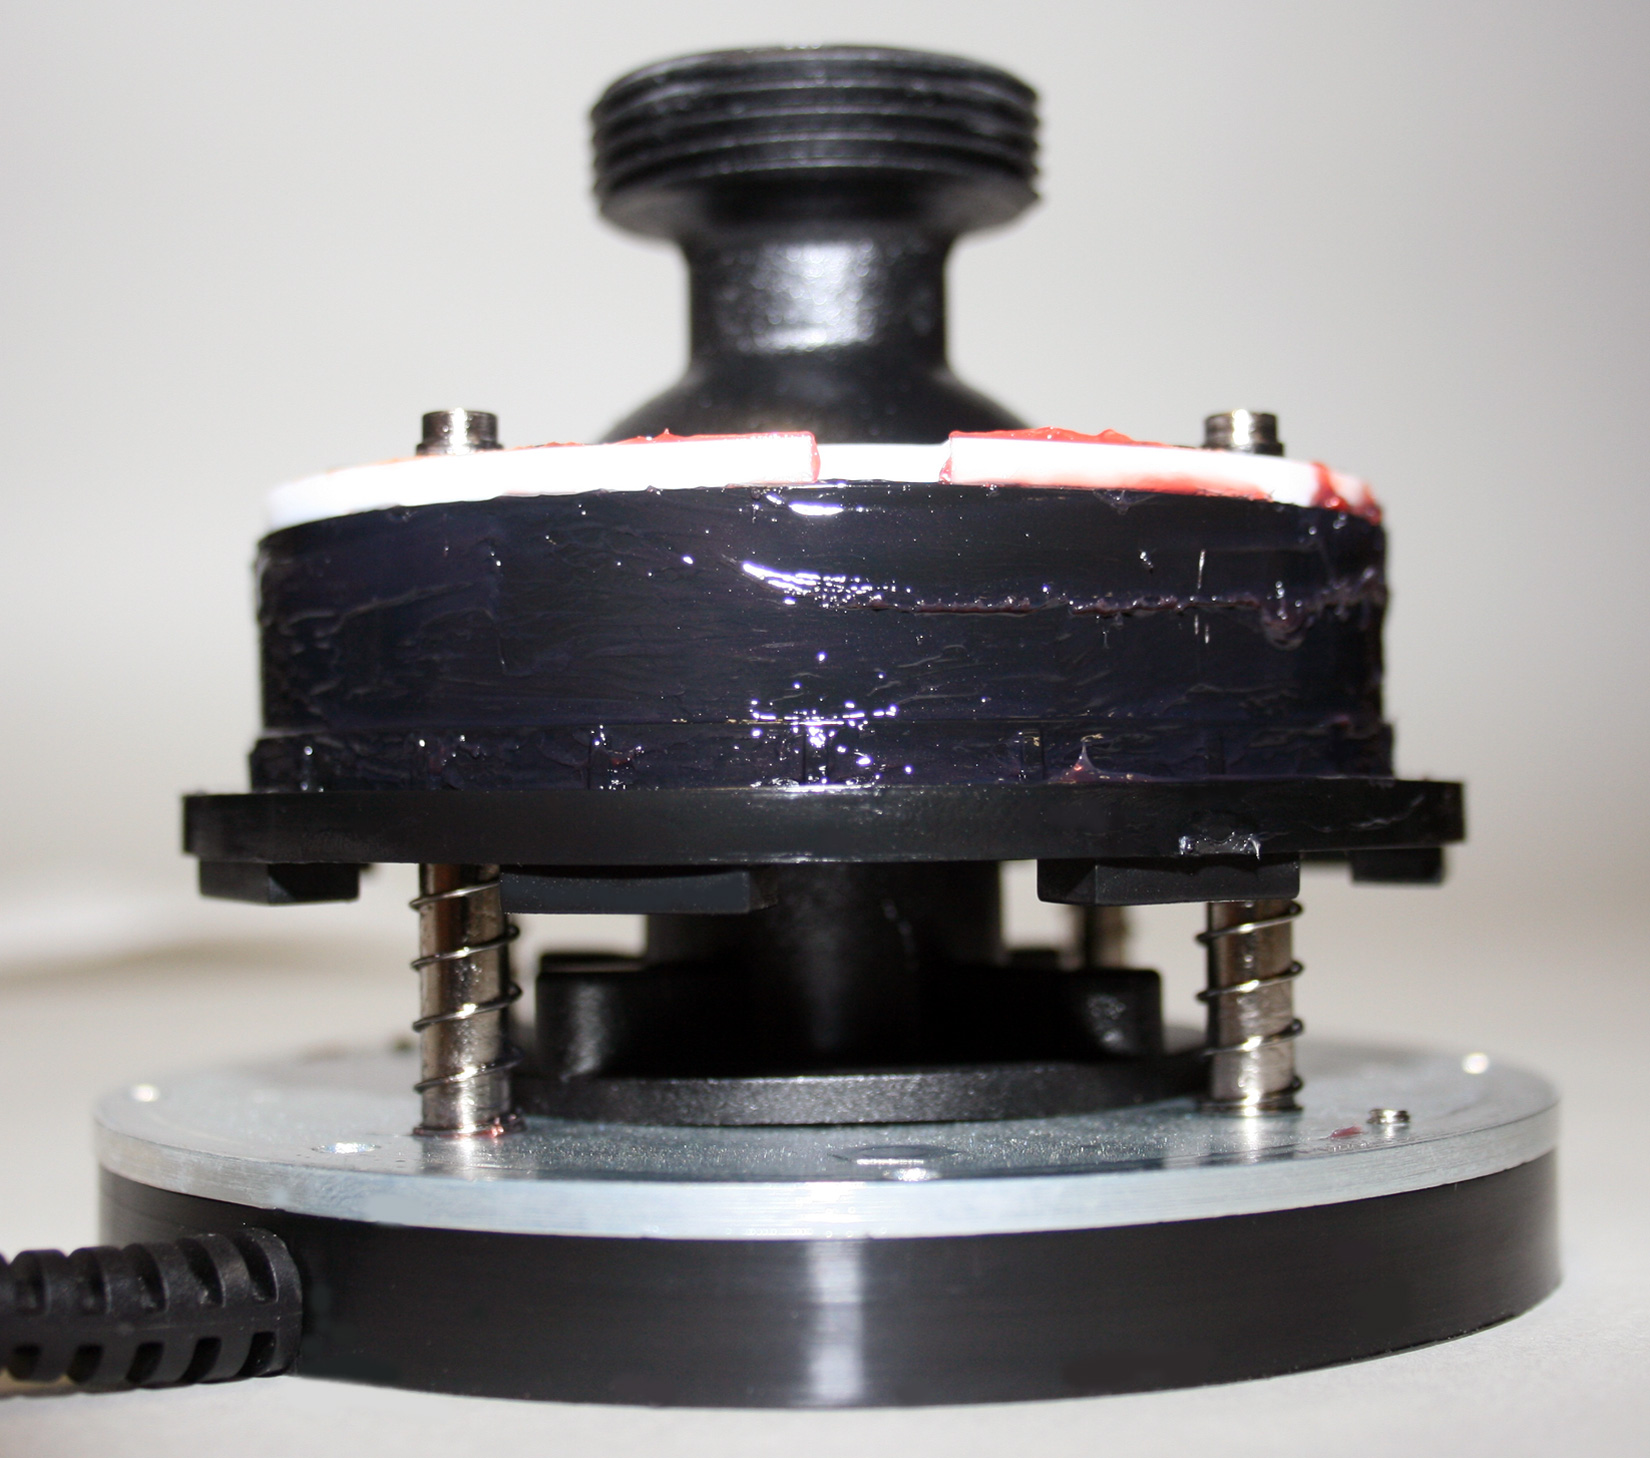
Much has been made of the HOTAS Warthog’s ball joint and coil spring mechanism since the product was announced. The inner workings of the stick and throttle were not something that was revealed at the Warthog preview event, and thus there have been no images of this mechanism published until this review.
Uncompressed, the coil spring stands about 5 inches tall. It has a diameter slightly smaller than the inside diameter of the stick base canister. The spring is held in its compressed state by the large metal circular plate at the top of the stick base, which attaches via four threaded rods to the bottom circular plate. Removing that plate allows removal of the spring mechanism.
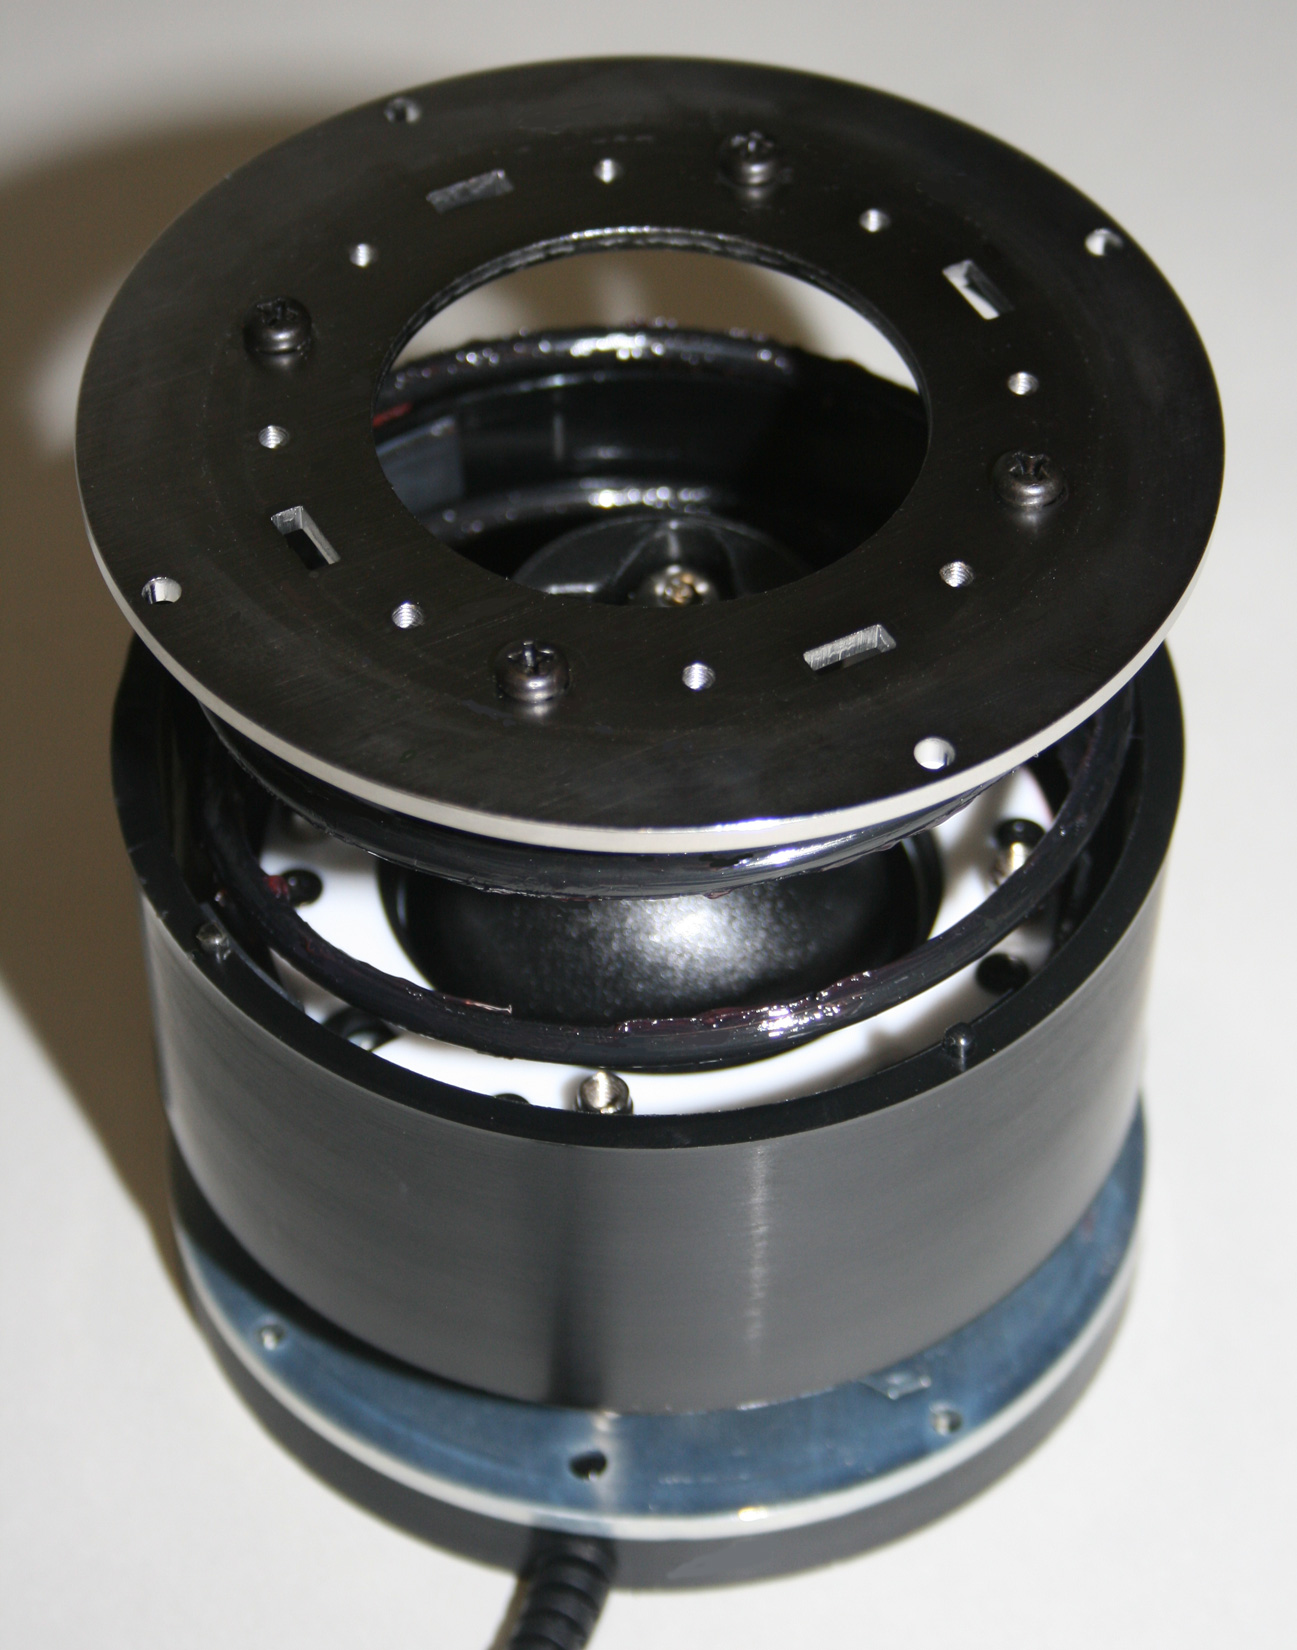 |
| Removal of the HOTAS Warthog coil spring |
The spring and the plastic piece on which it rests are covered in red lubricating material. This feels and smells similar to the lubrication used inside the Cougar. The same material is used inside the ball joint.
 |
| HOTAS Warthog coil spring support structure |
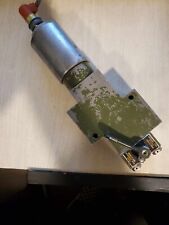
The joystick’s hall sensor magnet is mounted on the underside of the ball joint, with small circuit board mounted on a plastic insert that fits into the bottom of the ball joint structure. I was unable to separate the two parts of the ball joint.
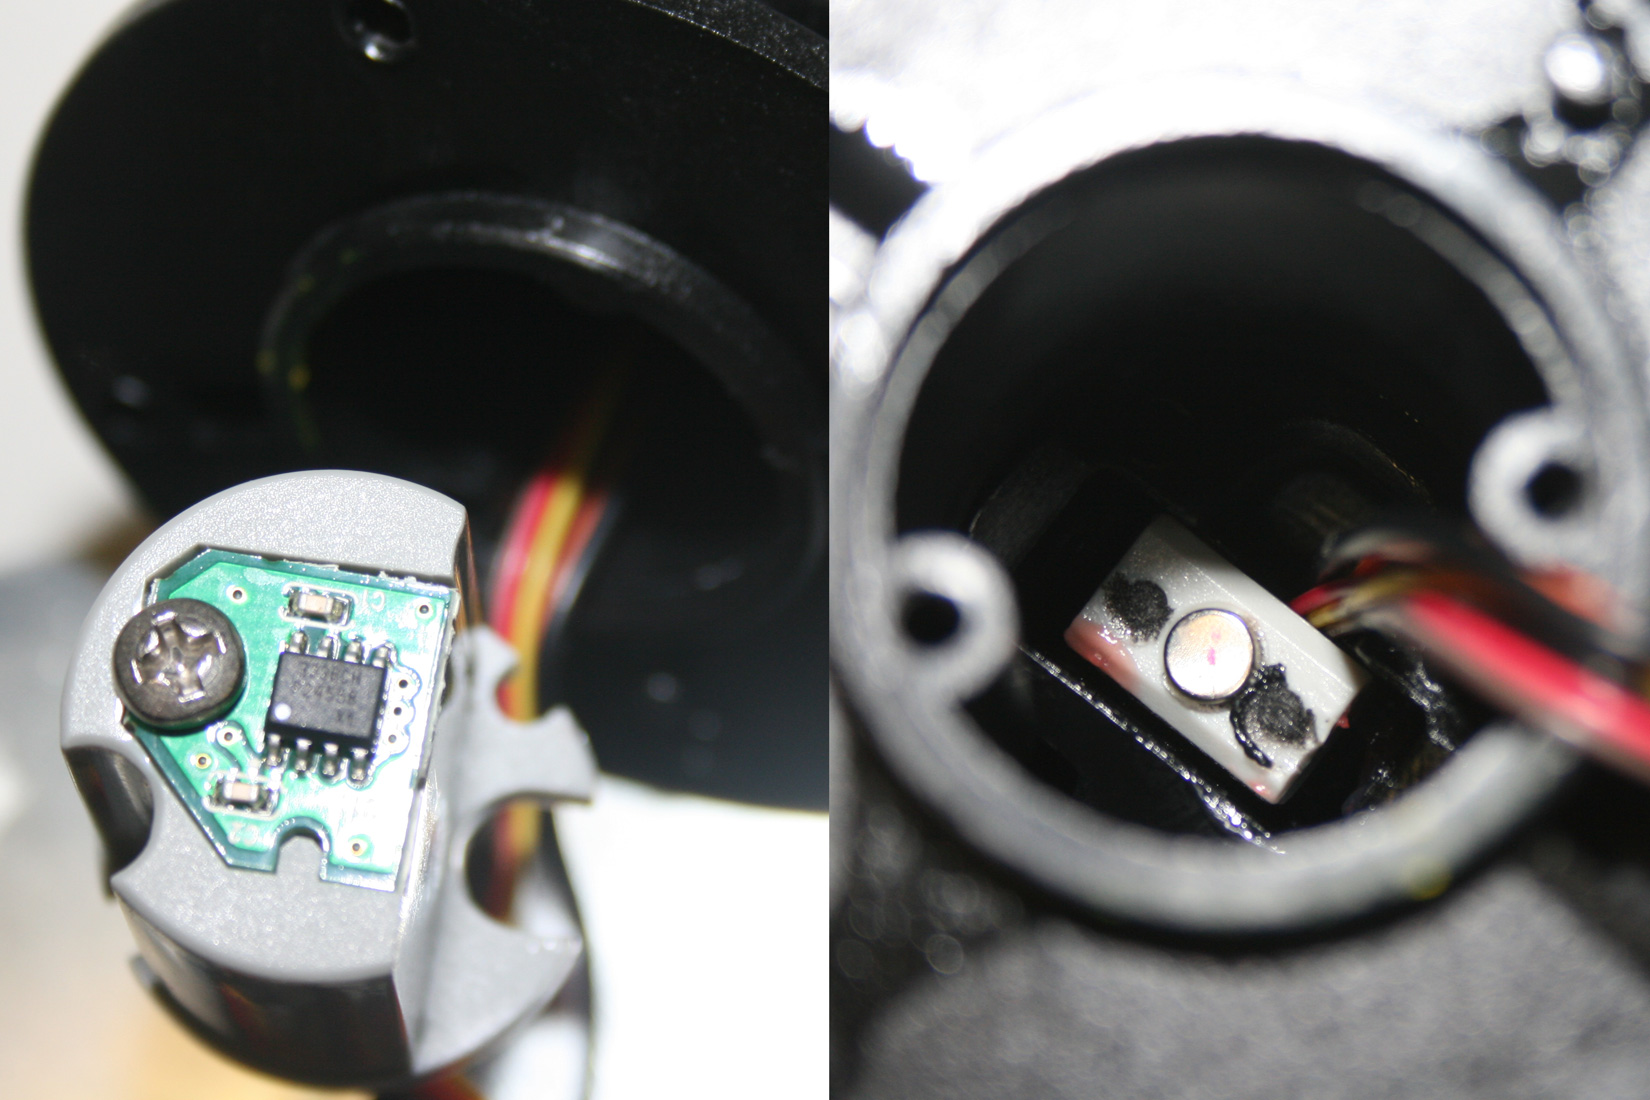 |
| HOTAS Warthog ball joint interior and hall sensor magnet |
The ball joint itself, in the absence of the black square opening at the top of the stick base, rotates in a circle. The square opening constrains the stick motion roughly to a square; this square is inscribed inside the circle that comprises the unrestrained ball joint motion. It’s not actually a square; it feels like an octagon that would result if the four corners of the square are chamfered by a small amount.
Since the stick is reporting full electrical response as it moves through the octagon, I can only assume that the electronics are designed with the fact the the stick gets less physical travel than would otherwise be available with the square opening.
The stick feels superb; it goes where you want it, when you want it. I have a Cougar with U2 NXT gimbals (considered a very good Cougar gimbal mod for accurate and light stick forces) with which to compare the HOTAS Warthog (see a description of the U2 NXT mod here). The HOTAS Warthog feels much better than the NXT Cougar and is much smoother mechanically. The HOTAS Warthog requires slightly more force to move away from center, but the required force stays constant throughout the range of the stick’s motion. The NXT Cougar, on the other hand, starts out with very light stick forces when moving away from center, and then the forces increase at the more extreme travel because the Cougar’s rubber boot stretches. The NXT Cougar tends to oscillate about the joystick center point due to its engineering design and its light springs. The HOTAS Warthog’s coil spring design prevents that from happening, as shown in the video below. The coil spring design also means that there is absolutely no transition from the X to the Y axis and vice versa. Overall the HOTAS Warthog stick feels much better than the NXT Cougar, and the NXT Cougar is already a massive leap over the stock Cougar gimbals. Thrustmaster has made a huge improvement with the HOTAS Warthog’s joystick design.
| Thrustmaster HOTAS Warthog – Stick Motion |
The first real flying I did with the HOTAS Warthog was to try a catapult shot and carrier arrested landing in Jane’s F-18. On the first try I caught the 3-wire, and the new hardware wasn’t even distracting.
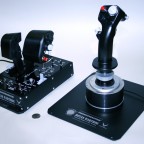
The Throttle
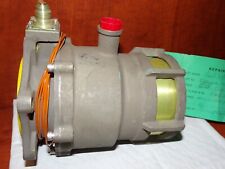
The HOTAS Warthog throttle comprises a replica A-10C dual throttle and throttle switch panel, complete with green LED backlighting. The toggle switches on the throttle base are some of the nicest I’ve ever felt, better than those on professional audio equipment. The throttle base is weighted to prevent slipping and tipping, and the throttles lock together via a magnetic post that slips into place and is locked there with a mechanical notch. The video below shows the throttle lock mechanism.
| Thrustmaster HOTAS Warthog – Throttle Lock |
 Like the joystick, the throttle buttons and switches have all been engineered so that they have realistic tension values. Each throttle axis uses a 14-bit hall sensor, and the slew control and trim wheel use 10-bit hall sensors; the HOTAS Warthog has no potentiometers.
The trim wheel is an analog axis where the real A-10C has a throttle tension adjustment; the HOTAS Warthog’s throttle tension adjustment is located in front of the throttles.
The throttle axes feature a fixed idle detent (below which there is no throttle electrical response) and an optional afterburner detent (to cater to those simulating helicopters or fixed-wing aircraft without afterburners). One must lift the throttles up and over the detents to clear them, although the throttles have been designed to move if one pushes hard enough without lifting, to prevent damage. The afterburner detent is installed by removing a small cover with the provided allen tool, reversing the detent plate, and reinstalling the cover.
The entire process takes less than a minute if you don’t stop to demonstrate the process, as shown in the video below.
| Thrustmaster HOTAS Warthog – Afterburner Detent |
The throttle has eight 3-way switches, five 2-way switches, one 8-way HAT, one 4-way HAT with push-down action, and three push buttons. The slew control also has push-down action. Altogether the HOTAS Warthog has seven analog axis and 86 programmable button/switch positions.
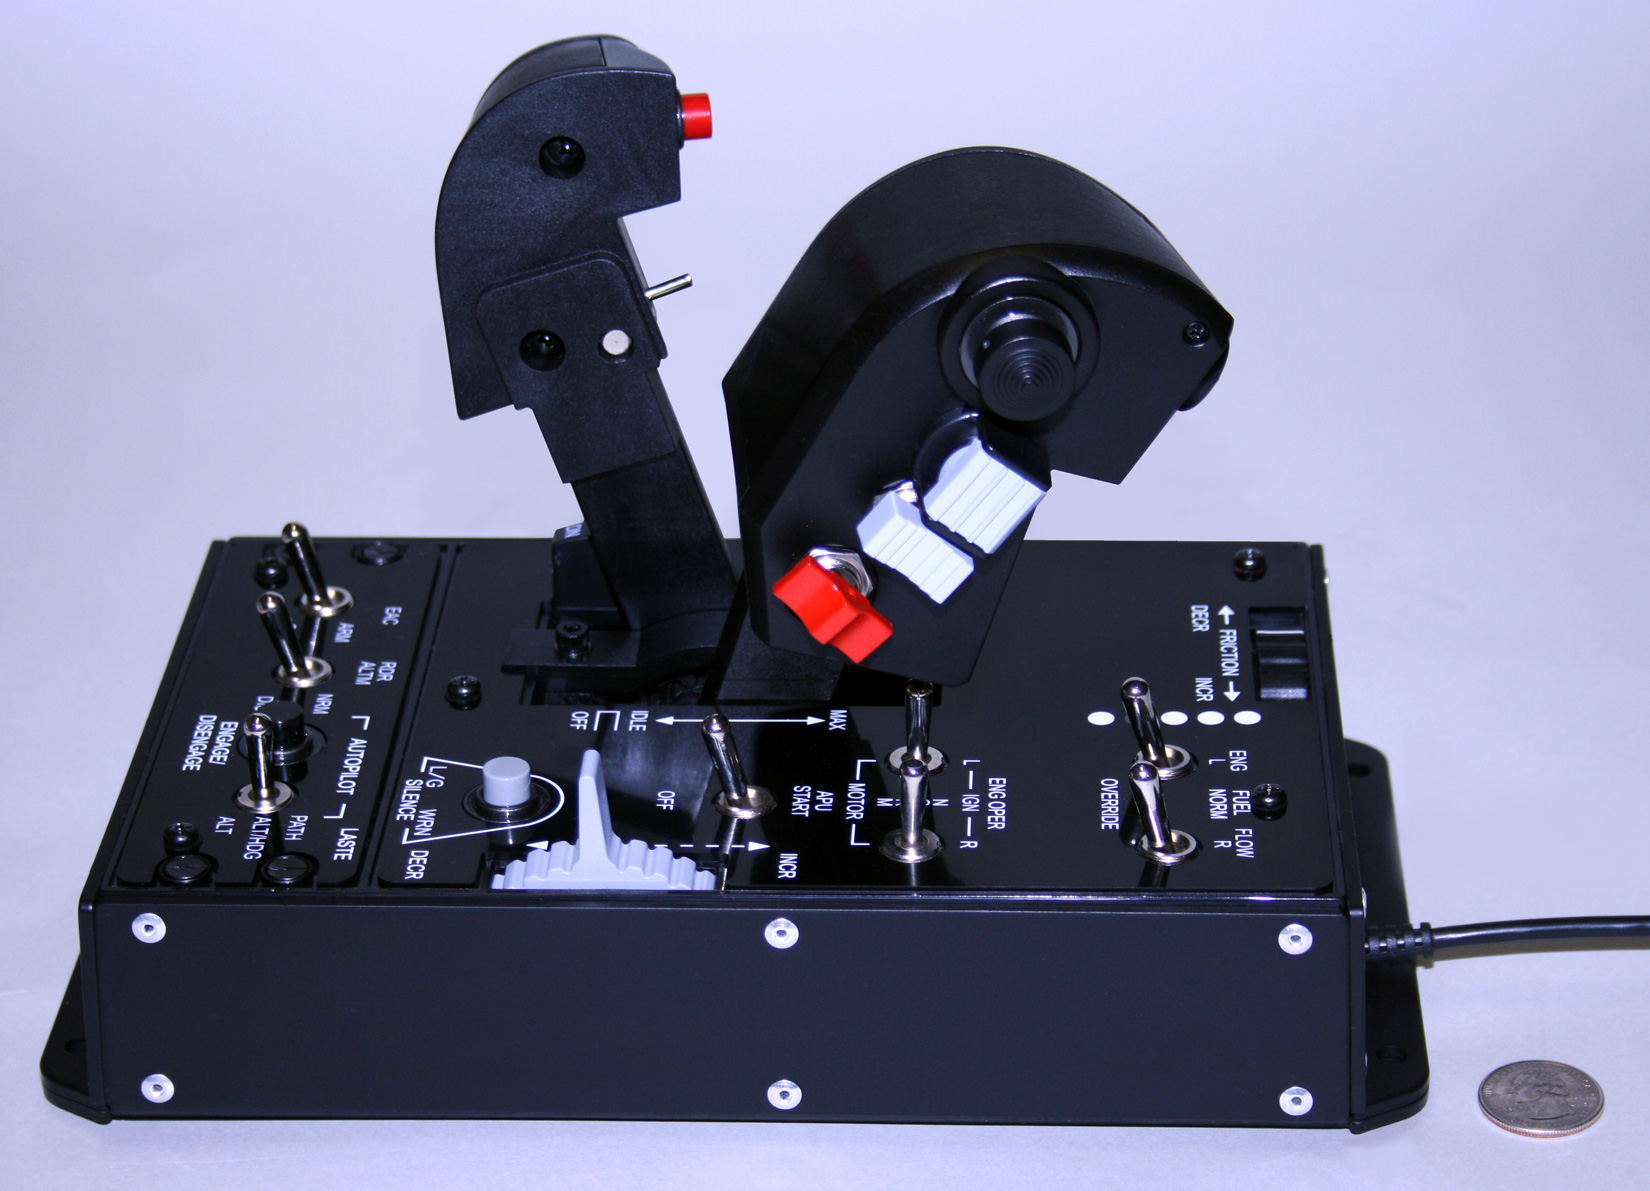 |
| Thrustmaster HOTAS Warthog throttle |
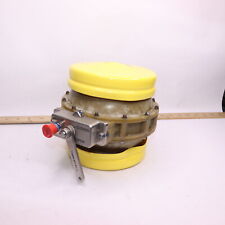
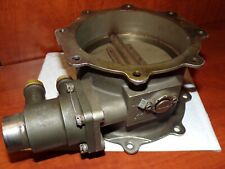
Opening up the throttle, we see that an extra metal plate with weights has been added to the throttle base. The relative spaciousness of the throttle interior allows for a less cramped electrical environment than the joystick.
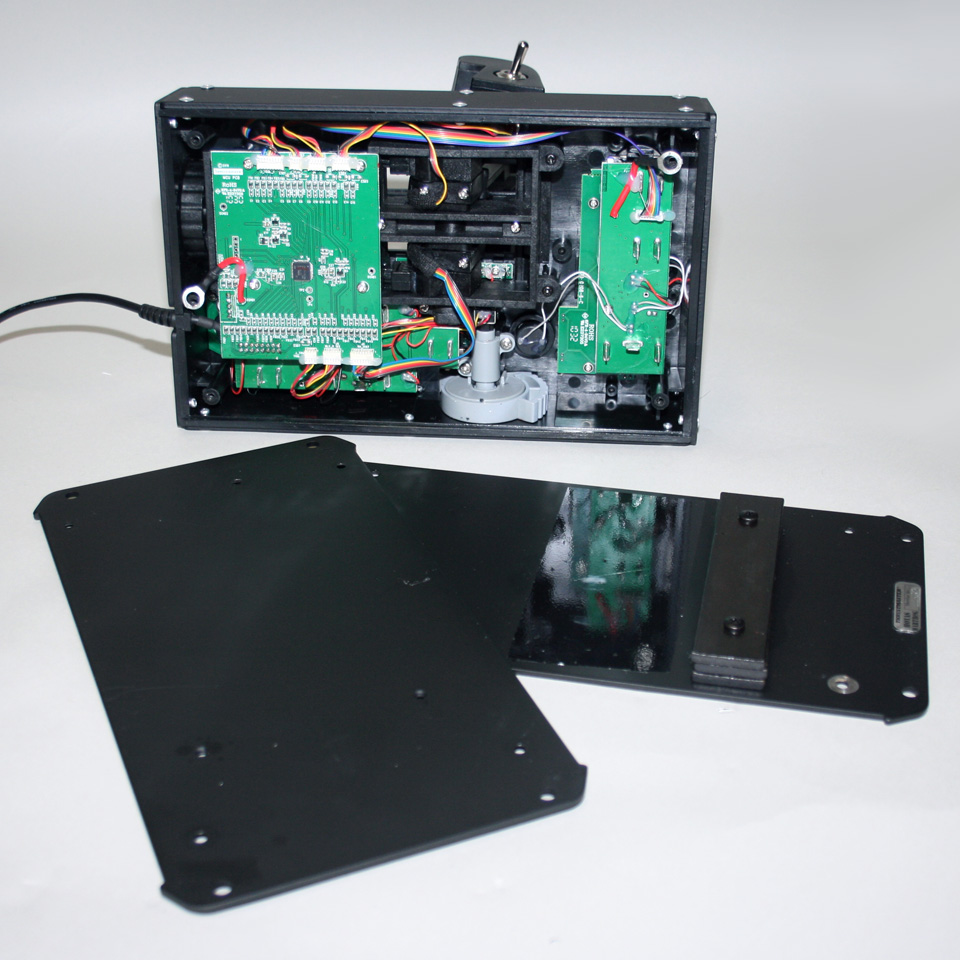 |
| HOTAS Warthog throttle with weighted base plate |
 |
| HOTAS Warthog throttle interior |
The feel of the HOTAS Warthog’s throttle is amazing. I have found myself sitting at my desk just moving it back and forth, lifting over the detents, flicking the switches, and staring at the lights. I think it’s more impressive than the stick, plus its weight is a good home defense tool (if you can manage to lift it to swing at the bad guy). There is no “sticktion” in the throttle mechanism at all (“sticktion”, an annoying tendency of the stock Cougar throttle, comes from a marked difference in the static and kinetic coefficients of friction in the throttle mechanism). Solving the “sticktion” problem in the Cougar involved aluminum foil and Scotch tape, and I don’t see these sorts of band-aids being necessary in the HOTAS Warthog’s throttle.
The only annoyance I have encountered is that the radar slew axes have such a short throw that they can be challenging to manipulate properly. It is also disappointing that there are not any rotary axes on the throttle that can be used without moving one’s hand from the throttle grips. I understand that the A-10C throttle doesn’t have these and thus they aren’t there. However, users of the Cougar, G940, X-52, and X-65F know how useful these controls can be.
| SimHQ Review / Thrustmaster HOTAS Warthog / Table of Contents | |||
|
|
|||
| Page 1 | Page 2 | Page 3 | Page 4 |
| [Re]introduction | Packaging Hardware – The Joystick Hardware – The Throttle |
Programming Software: T.A.R.G.E.T. | Programming Software: Scripts |
|
|
|||
| Page 5 | Page 6 | Page 7 | |
| Comparison: Physical Appearance – Joysticks | Comparison: Physical Appearance – Throttles | Comparison: Motion Testing and Accuracy Conclusion Reviewer’s System Specs |
|
Related Posts:
Related posts:
 E3Expo 2010 Tuesday Report – Thrustmaster Warthog HOTAS
 Flight Report – Thrustmaster HOTAS WARTHOG™ Page 2
Flight Report – Thrustmaster HOTAS WARTHOG™ Page 4
Flight Report – Thrustmaster HOTAS WARTHOG™ Page 2
Flight Report – Thrustmaster HOTAS WARTHOG™ Page 4
 Thrustmaster HOTAS Warthog
 Thrustmaster HOTAS Warthog
 Page 5
Thrustmaster HOTAS Warthog Page 6
Thrustmaster HOTAS Warthog Page 7
Thrustmaster HOTAS Warthog
Thrustmaster HOTAS Warthog Page 5
Thrustmaster HOTAS Warthog Page 6
Thrustmaster HOTAS Warthog Page 7