by Andy Bush
Introduction
Numerous articles on air combat simulation viewing systems have been written for sim pilots. All have the objective of explaining how these systems permit you, the pilot, to maneuver your aircraft with respect to another aircraft or ground object. My participation in this discussion will be to offer a different view of the subject…a new perspective on these systems. The term “perspective” will define the way I look at the subject. As a former military pilot, my “mental” picture of basic fighter maneuvers (BFM) was formed by the methods used both then and now by military instructors. I have found that the typical air combat simulation, while doing a surprisingly good job at replicating certain aspects of air combat flying, has tended to favor “in cockpit” presentation techniques in its attempt to provide the simulation pilot with flight cues and guidance to solve the three-dimensional BFM problem. As other authors have explained, these “in cockpit” presentations vary from fixed views to virtual and padlock schemes. All of these techniques are cockpit-based…they are seen from the perspective of being in the cockpit…which at first glance seems only reasonable for the obvious reason that the cockpit is where the pilot is sitting!! What I will try to explain in my discussion is that the military trained pilot takes an entirely different perspective on the situation. I’ll refer to this military perspective as an “out-of-cockpit” point of view. I’ll present several ways the typical air combat simulation views a particular BFM problem, and then I’ll present the pros and cons of these presentations with regard to their effectiveness in providing the simulation pilot with the necessary guidance to solve that problem.
But first, we need to define the scope of our discussion. Air combat maneuvering procedures and techniques cover a very large amount of material, and, as technology continues to advance into areas such as vectored thrust, stealth, and helmet-controlled all-aspect weapons, this subject only grows more complicated and expansive. Therefore, my discussion will limit the subject by placing the following boundaries on the discussion:
1. Number of aircraft limited to a one versus one situation.
2. Weapons capability limited to guns only.
3. All maneuvering must result in a six o’clock gun range position.
With these restrictions in mind, let’s now turn to a quick review of the objective of any BFM maneuver. I like to think of this as the twin objectives of controlling closure and fuselage alignment. By “controlling closure”, I mean the task of controlling your velocity relative to your opponent…controlling closure in the BFM sense does not necessarily mean controlling airspeed. Instead it means controlling the rate at which your aircraft close on or separates from the other aircraft. “Fuselage alignment” means getting your aircraft pointed in the desired direction relative to the other aircraft. Another way to think of this is to use the term “angle off”. Our discussion will center on these two BFM objectives: a closure rate of 50 knots or less and an angle off of 20 degrees or less. There is one remaining variable in the BFM solution….that variable is time. The next section will explain the critical impact time has in the effective solution to a given BFM problem.
Discussion
The Observation-Orientation-Decision-Action Loop
We all understand the concept of time in the sense of beginning a BFM maneuver either too early or too late, but that is not what I’m referring to when I talk about the importance of time in BFM. Instead, I want to take a broader view of time in BFM in the sense of one pilot making and implementing BFM decisions more rapidly than his opponent. In doing so, the pilot always has his opponent on the defensive…his opponent is always reacting to him rather than vice versa. This idea was conceived years ago by a highly regarded USAF fighter pilot and tactician in his concept of the OODA Loop. OODA stands for “observe, orient, decide, act” and the term loop in this sense means those four processes are repeated over and over again. The OODA loop is the process in which a pilot observes a BFM situation, orients himself with regard to his adversary and the horizon, decides upon a plan of action, and finally implements that plan. Having done so, the pilot then reconsiders the resulting BFM situation and starts the loop over again. But the significance of the OODA loop concept does not stop there. Instead, the author went on to explain how the victorious pilot would invariably be the one who processed his loop faster than his opponent…he referred to this as “getting inside your opponent’s loop”. By that, he meant keeping the opponent on the defensive. You, the simulation pilot, want to do the same, but how does this OODA stuff relate to you? The answer to that question is what this article is all about.
Decision Making in the Air Combat Simulation
In an actual air combat engagement, the pilot gets sight of his opponent and begins to maneuver to reduce angle off (align fuselages) and at the same time adjusts his throttle and/or nose position to control closure. He does this by looking outside the cockpit. Inside cockpit instrumentation is secondary in his decision making or is ignored completely. If the opponent begins to maneuver counter to his initial move, the pilot reassesses the situation by reference to the opponent and the horizon, in that order. Again, the new assessment is made by looking outside the cockpit. You may think of the process as if the pilot were saying to himself, “There he is, here I am, and there is where I want to go”. The pilot builds a mental three-dimensional picture of the relationship between himself and his opponent. He then projects in his mind where his opponent’s flight path is headed, and he plans a corresponding maneuver which will take him in the most efficient manner to a position of kill relative to that prediction of his opponent’s flight path.
I’ll take a word or two to discuss the term “efficient” used in the last sentence. Efficient BFM is maneuvering to take full advantage of the available turning room. Efficient BFM takes full advantage of the effect of gravity as it affects turn radius and turn rate. Efficient BFM almost always involves split-plane maneuvering. Split-plane maneuvers are those flown out of the opponent’s plane of motion…i.e. three-dimensional maneuvers. Efficient BFM is almost always lead or lag pursuit, and seldom is pure pursuit. Pure pursuit is usually the last stage of maneuver prior to the trigger squeeze. Many of you are familiar with the term “lift-vectoring”. Efficient BFM is orienting your lift vector (lift-vectoring) out of the opponent’s plane of motion to use the lead turn, lead pursuit, and the beneficial effect of gravity to align fuselages and control closure. The obvious question is “How does the pilot learn how to do this?”.
Military air combat instruction is accomplished primarily using academic texts and verbal briefings. The texts are typically illustrated with “ribbon diagrams” which attempt to show a three-dimensional picture of a maneuver. Many air combat simulations contain similar diagrams in their manuals. These diagrams are of limited value. Of more significance is the verbal briefing where the instructor takes the student through each step of the maneuver. The instructor tries to build in the student’s mind a three-dimensional picture of the maneuver. The primary training aid is the model on a stick, or in lieu of that, the instructor’s hands! Sounds primitive, I know… especially in this high tech age…but it gets the job done. It is important to understand that the student sees the models(or hands) representing both himself and his opponent together in one spatial three-dimensional relationship. I think this is sufficiently important to say again…the stick models or instructor’s hands illustrate the process of aligning fuselages and controlling closure in a three-dimensional manner and in a way which allows the student to see both aircraft together. The instructor’s objective is to create for the student an out-of-cockpit perspective of the maneuver.
I think we are now ready to move on to look at the various simulation views. As an introduction to that discussion, let’s review the main points covered so far:
1. BFM maneuvers are best visualized using an out-of-cockpit perspective.
2. BFM maneuvers are most efficiently flown out-of-plane relative to the opponent.
3. Assuming these two dictates are adhered to, time as described in the OODA loop section becomes the dominant factor in determining the victor in an aerial engagement.
An Assessment of Air Combat Simulation Views
One way to compare the effectiveness of a simulation view is to consider how the military teaches the solution to a BFM problem. The military instructor’s objective is to teach the student two things…how to perform the maneuver itself, and how to recognize and interpret the opponent’s position and projected flight path. When viewed in isolation, the BFM maneuver has the appearance of a set-piece maneuver… in other words, one flown without regard to outside factors. An example would be two fighters meeting head on…as they pass each other, one pilot decides to perform an Immelman. He pulls up into the vertical and finishes the maneuver without regard to his opponent’s position. Only when he completes the Immelman does he bring the opponent back into his scan. In BFM, however, there is no such thing as a set-piece maneuver. Flying a maneuver in this manner is not BFM, it is aerobatics. BFM must be flown with regard to the other aircraft. Therefore the military instructor will teach the student how to modify and adjust his flight path with regard to the opponent’s position, aspect, and projected flight path. Particular emphasis is placed on range estimation, closure, and fuselage alignment. From these variables, the pilot will recognize the opportunities for lead turns, the need for additional turning room, the effect of g upon his maneuvers relative to the opponent, and the balance between throttle changes and extension/acceleration maneuvers to control closure.
Let’s boil this discussion down to some simple mandates. A BFM maneuver should be flown with regard to the opponent. The maneuver should be modified as necessary to adapt to the opponent’s flight path. Visual contact must be maintained to determine range, closure, fuselage alignment, and predicted flight path.
A simulation view is only as effective as its ability to meet these mandates. These are difficult standards. It is likely that no single simulation will meet all of the mandates, but some will come closer than others. Let’s take a look at them.
Fixed Views
The forward fixed view is the foundation for all air combat simulation flying. It is the primary reference for all weapons employment as well as takeoff, landing, and navigation. The forward view is the easiest reference for the pilot to keep oriented with, but it quickly loses its value when the target aircraft flys outside the field of view. Supplemental fixed views include left, right, and up views relative to the aircraft’s nose. These are best used as a search tool while the pilot maintains level flight. Attempting to maneuver using one of these supplemental fixed views can be very disorienting due to the lack of clues as to the pilot’s nose position. The fixed view can be used to provide range, closure, fuselage alignment, and opponent flight path information, but is of little use as a maneuvering view to take advantage of that information.
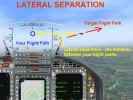
Fixed views are sometimes provided with additional symbology intended to give information on the position of the opponent when he is not in view. Typically, these take the form of “pointing x’s” or “floating windows”. The “pointing x” symbology is the most basic, and in effect only tells the pilot that the opponent went out of the field if view in a particular direction. As such, the “pointing x” provides relative bearing information only…nothing regarding closure, aspect, fuselage alignment, or flight path. To use the “pointing x”, the pilot rolls to put the “x” at the top of the monitor screen(his lift vector) and pulls for all he’s worth until, hopefully, the opponent comes back into view. All too often when the opponent does reappear, it is only for a second or so before he flys once again out of view. If the pilot has a turn rate advantage and sufficient energy, he may eventually chase his opponent down, but that is all he has done…chase the opponent down. This is not effective BFM. This is pure pursuit, in-plane tail chasing which, even if it does eventually lead to a firing solution, takes an excessive amount of time. It does, however, allow the pilot to remain oriented to his own position and because of this I consider it the starting point for new pilots. It’s like a bicycle with training wheels…a satisfactory beginning, but not something to stay with forever.
A second type of supplemental fixed view is the “floating window”. This concept is a “picture within a picture”…a small window which moves around the perimeter of the forward fixed view. The window usually includes a view of the opponent aircraft and may include additional information such as airspeed, altitude, and range. The opponent aircraft will appear in the window as it would if the pilot was looking directly at it. The window’s position on the perimeter of the monitor will correspond to the opponent’s relative bearing, and will be displayed as long as the opponent is out of the forward field of view. The “floating window” is a much more useful technique than the “pointing x” since it provides range, closure, and aspect as well as relative bearing. For the new pilot, the window may be used like a “pointing x”. As the pilot gains proficiency, he can use the window to initiate out-of-plane maneuvers. The main disadvantage of the “floating window” is its limited ability to show the “big picture” and the amount of time needed to assess the information in the window. While the “floating window” is a big improvement over the other types of fixed views, other views meet our mandates more effectively. Using the bicycle analogy, the “floating window” view is like taking off the training wheels while still needing someone’s assistance. We’ll need a better view before we can go pedaling off on our own.
Virtual Views
Virtual views or “scrollable views” allow the simulation pilot to slew his screen from the forward view to either side or up and down. The effect is as if the pilot has turned his head to look in new direction. Because of the limited information on his own nose position when his view has been slewed, the virtual view is best used as a search tool. It is difficult, if not impossible, to use the scrollable view while maneuvering. The resulting disorientation makes this view type ineffective as a maneuvering aid.
Padlock Views
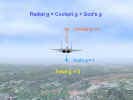
As I have previously mentioned, this is the view of the purist. Starting with Falcon 3 and continuing to the latest simulations, the padlock view has been improved upon to provide the more experienced pilot a sophisticated maneuvering tool. Regardless of the specific padlock type, the view has the common characteristic of a large primary picture with additional supplementing windows as in Falcon 3 and Su-27 or pilot cues, such as the translucent arrows in EF2000. This “collage” of information intends to provide the pilot with the present aspect, range, fuselage alignment, and flight path of his opponent as well as keeping him oriented to the horizon and the position of his own nose. The singular advantage of padlock techniques over the previously described views is that they allow the pilot to continually monitor the opponent’s flight path and position while maintaining control over his own. This allows the pilot to make changes to his BFM plan as the maneuver evolves…this is a major step forward in BFM simulation. Using padlock, our bicyclist is off to the races!!
Well…not so fast. As with most things in life, there is good news and bad news in using padlock. As good as padlock views are, there still remain some shortcomings. Two are significant…the tendency to use the view to fly in-plane with the opponent, and the amount of time needed to interpret the view. When padlock is used to orient the lift vector at the opponent, the end result is a pure pursuit course that is nothing more than a sophisticated form of using the “pointed x”. Although sufficient visual information is available to allow a very proficient pilot to use padlock to maneuver out of plane with the opponent, I suspect this is seldom the case. The padlock technique also requires the pilot to analyze specific parts of the whole view to gain the “big picture”. This reminds me instrument flying where the pilot has to cross-check a number of individual instruments to get a complete idea of what the aircraft is doing. Certainly the cross-check provides the necessary information, but it does so at the expense of time, and time is our critical factor. The time factor can be reduced only by finding a way to provide opponent data in a more “all at once” sense. Some might refer to this as an “intuitive” grasp of the BFM situation. In fact, this is an excellent way to describe this goal, and is exactly what the military instructor is trying to develop in his student…one look at the opponent that meets all the mandates which we set out earlier in the discussion. Doing this in a simulation is going to be tough, but we have one more trick in our bag…the external view.
External Views
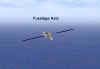
The diversity of external views is common place in air combat simulations. Unfortunately, the visual attractiveness of these views is not matched by their usefulness in flying good BFM. Too often, the typical external view is little more than “eye candy”…pretty to look at but that’s about it. One type of external view can be used, however, to meet our BFM mandates. This view is often referred to as the “player-to-target” view.
The frame of reference of this view is as if an outside observer was positioned to always have both aircraft in his field of view with the opponent aircraft in the background. Typically in this view, the player aircraft remained centered in the screen and at a fixed range. The opponent aircraft is shown in the background at an approximate correct size and fuselage orientation for the distance between the two aircraft. The overall impact of this view is to replicate, in effect, how stick models would look if placed into a similar perspective. This feature is this view’s greatest asset…it provides a “snapshot” look at the three-dimensional relationship between the two aircraft. Using this out-of-cockpit perspective, the pilot can easily see his opponent’s relative range, aspect, fuselage alignment, and direction of flight. The relative movement between the two aircraft provides a sense of closure even if no other cues are available. The pilot remains oriented because the horizon, sky, and ground detail are always in view. Here is the significance if this…
In any BFM situation, the pilot has these three considerations:
1. I’m here.
2. My opponent is there.
3. To get behind him, I need to do_______.
Of all the view types, the player-to-target view shows this most effectively. In one look the pilot recognizes both the need for a maneuver as well as how the maneuver should be flown. For the first time, out-of-plane maneuvering becomes easy to conceptualize. Decision making time is reduced to a minimum. Follow on maneuvering requirements are easily recognized, and minimum time is spent in making the necessary corrections to the pilot’s flight path. As must be obvious by now, the point of emphasis is time, and as explained earlier in the OODA Loop concept, time is the ultimate determinant of victory or defeat. Other view types may allow a pilot to fly good BFM, but none allow him to do this as quickly as the player-to-target external view. Referring back to our bicycle analogy, using this view is like competing in the Tour de France!
Recommendation
I have decided to finish this article not with a summation or a conclusion, but, instead with a recommendation. I recommend that you give serious thought to using the player-to-target external view to learn the basics of BFM. Now before you tell me that you know these basics, let me go out on a limb and respectfully suggest that, more likely than not, the opposite is true. Unless you have benefited from a formal education in BFM techniques and principles, there is little likelihood that you have a firm understanding of these basics. The academics of BFM are rooted in aerodynamics and physics, and they are not to be taken lightly. I have not attempted to cover these subjects in my discussion, and you won’t find much in your simulation manual. But let’s not get discouraged…there is a way to learn the essentials of BFM and as a result have a great time with your flight simulation. This “way” is a two step process. Step one is for you to study your simulation manual, or better still, get a copy of Robert Shaw’s book, Fighter Combat, and study the section on BFM fundamentals. In this step your objective is to know which BFM maneuver meets the needs of a given BFM situation. These are maneuvers which solve closure, angle off, and aspect problems. You must know which is which, when they are required, and, most of all, how to fly them. Please do not kid yourself…if you are really serious about BFM, put in the book time to learn the academics. If you do not, and you press on ahead anyway, the results may well be disappointing.
Step two is then to practice these maneuvers using the player-to-target external view. If your simulation does not offer this view, then get one that does. When you practice these maneuvers, do not expect for it to be easy. Initially, you will be disoriented as you attempt to “fly” from this “outside the cockpit” perspective. Stick with it – practice, practice, and more practice will pay tremendous dividends. Fly this view against the simulation AI (artificial intelligence – the program the computer uses to fly its maneuvers), or better yet, go on line with a friend and practice against each other.
If there is anyone who would like further justification for this learning approach, let me give you one. I am sure you all think of yourself as “flying” the simulation when you use padlock or some form of fixed view in a BFM engagement. Wrong! The simulation AI is doing the thinking…all you are doing is following the cues the simulation is providing. The AI is “solving” the BFM problem and is displaying symbology for you to follow. On the other hand, when you use the player-to-target view, there are no cues…no symbology to follow…no easy answers. Just as in real life, you must assess the situation, determine what type BFM you are faced with, and then fly the solution properly. Please trust me on this – learn to fly this external view and you will enjoy a level of satisfaction unlike anything you ever felt when flying padlock or anything else for that matter.
Finally, I have not overlooked or forgotten the fact that certain competitive aspects of flight simulation BFM mandate use of only padlock views. I have no problem with that. The point that I want to hammer home is that you should learn BFM fundamentals using an “outside the cockpit” perspective, Once you intuitively recognize the three-dimensional solution to a BFM problem and can properly fly that solution using the external view, then, by all means, go back to padlock if that is necessary. You then will be able to use that view to maneuver out of plane with your opponent because you already “see” the solution in your mind. Instead of following symbology to what you hope is a successful maneuver, you will instead use that symbology to “build” a mental 3D picture which you will then fly. You are doing the problem solving, not the AI…you are determining you flight path, not the AI. You are in control, not the AI.
Well, friends and fellow fighter pilots, thanks for hanging in there. I appreciate having the opportunity to talk with you on this, my favorite subject. BFM is not an easy subject, but if you put in the effort to do your part, you will succeed. Work hard, don’t get discouraged, and ask for help if needed. Good luck and good hunting.
Related posts:
 Air To Air Gunnery – Theory and Application, Part Three Page 15
 An Introduction to Simulation BFM Part One
 An Introduction to Simulation BFM, Part Two
 Boom and Zoom Tactics, Part Three
 Confessions of an Elitist Page 3
 It’s All a Matter of Perspective – Part Four
 It’s All a Matter of Perspective – Part Three
 It’s All a Matter of Perspective – Part Two