Feature by Andy Bush
Be sure to read all of the parts of this series
[ Boom and Zoom, Part One ][ Part Two ][ Part Three ][ Part Four ]
Introduction

This article is linked directly to the previous series on BnZ tactics. While those articles dealt with the BnZ attack by focusing on your techniques as a single attacker, this final article is intended to provide you with some tips and techniques on how to fly a BnZ HnC attack as a two ship.
What I’m going to propose is a set of simplified procedures that you and your sim partner can use to attack a bandit. These procedures include good piloting, effective radio communication techniques, and flight path coordination. What follows does not cover all the possibilities of a 2v1 engagement, but it is a way to get started in mutual support flying in our sims. One thing to make clear…this article is about procedures to use when flying with a human wingman…unfortunately our sim AI wingmen are not quite advanced enough to try these ideas with…not now, at least, but maybe someday!
In the A2A world, air combat maneuvers are grouped into three categories…basic fighter maneuvers (BFM), air combat maneuvers (ACM), and air combat tactics (ACT). When two aircraft maneuver together in a 2v1 engagement, these maneuvers are known as ACM (air combat maneuvers) and ACT (air combat tactics)…not BFM. It is not a minor technical distinction. BFM is a term reserved for 1v1 maneuvering, either offensive or defensive. ACM are 2v1 ‘initial move’ offensive or defensive maneuvers, usually practiced in a training A2A mission profile, that do not end with a ‘kill.’ ACT, on the other hand, is what is more commonly thought of as a full blown engagement between two or more fighters and any number of adversaries (two or more versus one or more) where the maneuvering ends with a kill or successful separation.
In our 2v1 HnC maneuver, we will not practice ACM. Instead, we will individually fly good BFM and collectively fly good ACT…hope this clarifies things a little! One other thing…before you and your sim buddy fire up your sims, let’s recognize what we are dealing with. The 2v1 is not something often addressed in our typical sim flying. There is a little more here than meets the eye. Here’s why.
The 2v1 is obviously a situation where two friendlies are attacking a single bandit. In our case, we are limiting ourselves to a HnC scenario. The 2v1 covers many other options besides the HnC, but, for now, I’ll limit myself to that situation. As a result, this article will be limited to a discussion of us and a buddy flying in concert with a specific goal in mind. Seems simple enough, but there are a couple of things that you need to know about to make this work.
Number one…you will engage with a specific tactic in mind…the HnC. Number two…this will require you to follow the procedures of aspecific type of tactical employment…for example, Double Attack or Loose Deuce, two attack types often mentioned in our forums. Number three…you need to be in a specific formation such as combat spread. And number four, all of this will involve a fair share ofcoordination and communication between you and your buddy. Not much has been said about this in our sim literature…this article hopes to plug that gap. We’ve already covered the HnC in a previous article, so this article will introduce procedures and techniques to cover the other three areas.
Lastly, we should keep in mind that it is a very real possibility that we may have limitations to our sim flying that may present problems with our ability to replicate a 2v1 attack. The two main limitations are the ability to communicate in an effective and timely manner and the ability to use the sim viewing system to keep track of everyone’s position. These two factors will be mentioned throughout this article.
Basic Concepts – The 2v1 Offense
I’ll begin by outlining the basic 2v1 game plan. This game plan has four important elements…a specific formation, a specific formation tactic, Basic Fighter Maneuvers (BFM), and Air Combat Tactics (ACT).
Here is how these four elements relate to each other. The two ship is arranged in a specific formation to be use in a specific manner (tactic). The formation members, the leader and the wingman, will individually max perform their aircraft (BFM) to achieve a mutual goal through coordination and communication (ACT). The point to keep in mind is that BFM is only a single maneuver, while ACT is a series of maneuvers flown in concert with other flight members to reach a specific goal. Let’s now look at each element in some detail.
Basic Concepts – Formation
I’ll start by discussing how we put together a formation. The following discussion only involves a two ship…if the formation is to include more than two aircraft, additional info may probably apply that will not be mentioned here. We have a number of choices, everything from a close formation such as fingertip to a widely spaced formation like spread. Most sim manuals include some info on formation types. Do you know which one to fly in this situation? Do you know why? The rationale for this decision is based on real world considerations. Do you know what they are? Here are some ideas to think about.
When the flight leader decides on a formation type for his mission, he has a number of things to consider…two of the more important areformation maneuverability and formation lookout coverage.
Formation maneuverability.
Here we are talking about two things…the procedures the leader uses to maneuver the formation and the adaptability of the formation to the conditions that the flight is operating in.
To begin with, we tend to name formations with reference to where the wingman is in relation to the leader. We’ll consider two possibilities…one, the wingman is line abreast (side by side) and, two, the wingman is placed behind the leader’s wingline at some angle. For the first, I’ll use the term “spread”, and for the second, I’ll use the term “wedge.”


OK so far. Now, do we have a viewing system that will allow us to position ourselves in these formation types? Yes. Let’s start with spread. The side snap view is good for spread formation for both the leader and wingman. Position the other flight member in the middle of the monitor screen…don’t worry about where your wing is…in a WW2 sim, you could put the other aircraft near your wingtip. But in a jet sim, your wing may or may not be in view…in that case, the middle of the screen will do fine.


What if you want to fly wedge instead? Again, no problem. The forward side view works well for positioning yourself off the other aircraft. If the view includes a canopy bow, try putting the wingman just aft of the bow. If the canopy bow is absent, just maneuver to place the other aircraft again in the center of the view. In wedge, the lead can monitor the wingman using the rear side view.


Padlock may be used for both the leader and wingman spread and wedge positioning as long as your sim allows you to padlock friendlies.
How do you determine distance? If you do not have range labels available, just estimate it. Here are a couple of screenshots to give you the idea.


You can stack high or low off the lead if you want, but I’m not convinced that this has the same effect on complicating the bandit’s ability to see you both at the same time in the sim as it does in real life. It will make using the snap views more difficult for not much advantage gained.
Finally, fly your formation with the wingman on the side opposite where you think the bandits will be. This will let him look through the leader into the direction of the threat. This works particularly well if you beam the fight…in other words, stay on the edge of the engagement area with the fight off to one side or the other while you look for the easy kill.


Formation maneuvering is not a simple matter of “follow the leader.” Instead, specific procedures and techniques have been developed that spell out both verbal and non-verbal communication procedures as well as recommended pitch, bank, and power settings to use during the maneuvering. Specific maneuvering geometry is taught to cover a variety of turning options. The end result is a far cry from what appears to be the leader going where he wants and the wingman tagging along. The next discussion touches briefly on a procedure known as the “tactical turn.”
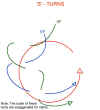
The “tactical turn” technique has the wingman changing from one side of the leader to the other as the leader turns. Rather than just following the leader, the wingman uses cutoff and “S” turns to maintain the desired position when using this technique. In our sims, you can do the same using the snap views to monitor lead’s position.

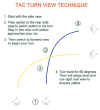

If the leader turns into you, fly straight-ahead while watching the leader. Plan to cross his flight path slightly above his altitude. This helps in providing you with some terrain clearance when you begin your turn. Just as you cross his flight path, make an aggressive turn into his direction. Switch your snap view to keep him in sight as you roll out to parallel his flight path.
If the leader turns away from you, make an immediate turn to cross his flight path to end up on his other side.
These specific procedures have a direct impact on the formation’s adaptability to the operating environment. What does that mean? It simply means that some formations are easier to fly in certain conditions than others. Level flight cruising at altitude is one thing, but high speed, low-level ingress in hilly terrain is something else.
Is there a rule of thumb? Yes. Spread formations are good for cruising conditions where constant turning is not expected. Wedge formation is well suited for low level work where frequent turns are more common. By permitting the wingman to look forward, wedge allows the wingman the freedom to maneuver while giving him the chance to monitor his altitude. In either case, the wingman uses tactical turn techniques to remain in position.

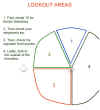
Let’s now talk for a bit about formation lookout coverage. Lookout doctrine involves both the leader and the wingman. Specific formation types have specific lookout responsibilities for each position. The next figure outlines the basic responsibilities of the formation positions.
Up until the introduction of the all-aspect missile, the primary threat to the formation came from the rear. As a result, most formations were designed to provide a six o’clock lookout capability. That sounds pretty obvious, doesn’t it? If so, why would I use the word ‘most’ in the previous sentence? For the simple reason that some formations were designed to provide maximum offensive potential, often to the detriment of defensive lookout…the best example perhaps is the WW2 RAF ‘vic’ of three fighters. In the RAF ‘vic’, the intent was to bring the wingmen into very close formation so that when the leader aimed his own airplane at a target, he was, in effect, aiming three. That’s different!! Why would he do that? The idea was to mass the concentrated fire of three fighters armed with eight machine guns apiece. The thought was that no enemy bomber would survive that amount of firepower. Unfortunately, it took so much effort on the wingman’s part to fly the close formation that he had little to no opportunity to check six. The good news for the leader was that the bomber target was in front of the formation…the bad news for the wingman was that the escorting Me-109s were behind.

Hard-learned lessons like this resulted in changes to formation doctrine that emphasized the improved lookout advantages of a line abreast formation. Let’s pause for a moment to see why this was the case.
There are two things that affect the wingman’s ability to provide effective lookout. The most obvious is that he must have the chance to take his eyes off the leader so that he can look around. This is tough to do in a close formation, so the first thing the tacticians did was spread the formation out to give the wingman a little freedom to check six.
The second was the realization that formation geometry played an important role in lookout effectiveness. Line abreast turned out to be much better than an angled back formation when it came to formation lookout, at least as far as the wingmen were concerned. Why? Because too many wingmen were getting shot down!! Wingmen were doing a great job at clearing the leader’s six, but they were not doing such a great job at clearing their own. If I were a wingman, I would have asked why the leader was not clearing me. The answer was not that the leader was paying too much attention to what was going on out front. Instead, the truth was that the leader could not easily see the wingman’s rear area. Here’s why.

The solution was to move the wingman up to line abreast. In that position, the leader could see the wingman’s six as easily as the wingman could see the leader’s. Hand in hand with this position change was the formalization of specific lookout procedures…specifically, the areas of responsibility that each flight member was responsible for. Here is the general idea.
Finally, we come to the issue of how lookout coverage varies with the expected enemy threat. In the case of a guns only environment, the lookout coverage was based on the maximum range of machine gun or cannon fire. But, when missiles such as the Sidewinder were introduced, that type of coverage was totally inadequate. It was one thing to defend against a gun attack that had a max range of about 3000’, but in a missile attack, max launch range had increased out to as much as 3nm (first generation IR missiles).
Well, that’s easy enough to understand. But what does this have to do with a formation? The answer is the heart of the lookout coverage issue. Here it is. In a spread formation, the distance between the two aircraft determines the six o’clock lookback distance.
How so? Simple math and the assumption that the typical pilot has a max lookback angle of about 60 degrees behind his wingline. Certainly, if the pilot were to really crank his head around, he might be able to increase that lookback angle, but in practice, the 60-degree limit is realistic. Here is how math figures into this situation. We assume the two aircraft are exactly line abreast. By knowing that distance, we can visualize a triangle with three points…the wingman, the leader, and the point behind the leader where the wingman’s 60-degree lookback angle crosses the leader’s extended six o’clock. This is what it looks like.

A rough rule of thumb is that your six o’clock lookback distance is about one and one half times your distance apart in spread formation. In the real world, we like to have at least 6000’ lookback at low altitude…at medium altitudes (above 10,000’), the desired lookback is at least a mile and a half or more. One negative factor in this concept is the size of your fighter. You don’t want to spread out your formation so far that your wingman is too hard to see! For that reason, spread is easier in F-15s than in Harriers!!
OK…so much for formation arrangements. You now know why spread formation is best for mutual support, and you understand how spread distance affects lookout coverage. Great! Let’s now take our spread formation and move on to the type of tactical employment we are going to use.
Basic Concepts – Formation Tactics
In the introduction, I mentioned two forms of tactical employment that are often mentioned in forum posts. These two forms of employment are Double Attack and Loose Deuce. These two concepts have been around for years now, having been formalized in the post-Korean War era. I’m not too sure that everyone understands these concepts, so let’s take a look at them. Maybe a little more academic background is in order!
We’ll start with the term “wingman.” In the normal sense, a wingman is subordinate to the leader. Usually the leader is the more experienced of the two, and their military organization has given him the command authority for the flight. Whatever he says, goes. But in Double Attack and Loose Deuce tactical doctrine, that practice is set aside for the duration of the combat portion of the flight. As a rule, the flight member that has the best opportunity to attack is the one to initiate the attack, regardless of whether he is the designated wingman or leader.
When one of the flight members begins the attack, the other becomes, in effect, the “wingman.” At this point, let’s stop using the word “wingman”, and start referring to the flight members as the “engaged fighter” and the “supporting” fighter. The terms Engaged Fighter and Supporting Fighter are defined in the Engaged Fighter/Supporting Fighter Contract, a set of responsibilities for each role during an engagement.

The responsibilities of engaged (EF) and supporting fighter (SF) are the meat of this subject…and the area that will become your bread and butter as you fly the 2v1 in your sim.
The EF has one primary responsibility…kill the bandit…but with that come some obligations. Energy management is a major one. The EF should never maneuver such that he loses his energy advantage over the bandit…excessive turning to sweeten his shot leaves him vulnerable in the event he has to pull out of the fight. On the other hand, he should not be so aggressive in his attack that he blows through on a low Pk shot while leaving the SF out of position to enter the fight. What does the EF do? He manages his energy by using the vertical to gain turning room and control closure…this is a nice way of saying that he uses maneuvers like yo-yos to keep his total energy level (kinetic and potential) high while he maneuvers for a firing position.

Does this present a challenge when we try to fly the 2v1? Not that I can see…just fly good energy conservative BFM, and things should work out just fine. As we will see in the next section, our sims offer views and a communication capability that are sufficient to allow the EF to meet his objective.
What about the SF? What are his responsibilities and how does that fit in with 2v1 flying in our sims? For our purposes, the SF needs to do two things. One, he needs to watch out for other bandits becoming a threat. Second, he needs to be in position to support the attack with one of his own. His exact positioning will depend on whether he is flying Double Attack or Loose Deuce.
Fine, but does the SF have the tools to accomplish these two objectives? No problem with the first one…our views are excellent when it comes to scanning around for new bandits. But the second objective…now that is where the work comes in. The SF must find a way to maintain an offensive position on the bandit, remain aware of the EF’s position, and communicate his intentions. Later in this article, I’ll suggest ways of doing this.
OK! So much for the background info…let’s now move on to some Double Attack and Loose Deuce specifics. For the purposes of this article, I’ll refer to these tactics in a 2v1 offensive context. This focus is intentionally narrow, and I fully realize that these two concepts have a far greater application.
These two tactics have their similarities and differences. One similarity is the formation itself…spread. In both, the distance apart varies anywhere from 1000’ to >6000’ and is determined by the anticipated threat. Another similarity is that they both use the EF/SF Contract…but they follow a different philosophy with regard to the wingman’s freedom to engage the bandit.
The primary difference between Double Attack and Loose Deuce is when the free fighter can engage the bandit. In Double Attack, the free fighter can only engage the bandit with the express permission of the engaged fighter…while in Loose Deuce, the free fighter is expected to maneuver to attack the bandit as soon as he can achieve an entry into the fight. This is a significant difference.
This allows us to think of Double Attack as a “shooter-cover” concept and Loose Deuce as “shooter-shooter.” Either one is workable in our sim flying…just decide which one you want before hand!
Is this decision that big of a deal? You bet it is! This difference in the role of the SF has a direct impact on how the EF flies his attack. InDouble Attack, the EF is free to attack as aggressively as he chooses…the only restriction is that he should not lose the offensive. While the EF is doing this, the SF flies a cover position and maneuvers to be in a position to attack if called upon.
Loose Deuce is different. The EF in Loose Deuce is really a “herder”…his job is to make the bandit predictable so that the SF can plan and execute an entry into the fight. To be a “herder”, the Loose Deuce EF will avoid ‘going for the throat’ and possibly risking a bandit role reversal. Instead, the EF will maneuver behind the bandit’s wingline to force it to turn defensively. The EF will take a shot if he has the chance, but he will never risk an overshoot or role reversal in doing so. This reminds me of a line from the old Patton movie. In Loose Deuce, the EF is going to lead the bandit around by the nose while the SF kicks him in the tail!!
Which one will it be? Is one easier to fly in our sims than the other? I don’t think so…our viewing system should offer the SF about the same chance to plan and execute an attack in either tactic. It is the role of the SF that determines the answer to those questions. I think it is a toss up. In online sims such as Aces High where a supporting bandit can show up unexpectedly, Double Attack may be more advisable due to the greater lookout emphasis in the SF role. If your sim mission is more predictable…as in the case of a ‘canned’ mission that was developed using a mission builder within the sim…then Loose Deuce may offer a greater potential for turn and burn fun flying.
Basic Concepts – BFM
The last two elements of our basic game plan, BFM and ACT, deal with how we actually fly our aircraft. The BFM element describes how we as individuals maximize our performance within the HnC maneuver. The ACT element describes how we, as a team, communicate and coordinate our flight paths to attack the bandit.
Let’s take the BFM first. The focus in this article is on the vertical HnC fight. One fighter is attacking as the other is providing mutual support. Two things are going to make or break this coordinated attack…energy conservation and positioning.
How does energy conservation fit into the picture? As the EF or the SF, there are several ideas to keep in mind. To begin with, don’t get slow! Avoid getting slow by using max power and watching your G rates…too much pulling on the pole can bleed your energy down. Next, take full advantage of your ability to trade altitude for airspeed and vice versa. As the SF, use yo-yos and cut-off to keep your energy level as high as possible.
Next…we want to be in the proper position…here the focus is again on the SF. Be aggressive with lead pursuit. Stay in close to the fight. It’s far better to be too close, than too far. If too close in, you may be able to delay your roll in by turning to a lag heading for a moment or two…but if you let yourself get too far away from the fight, then there is nothing that you can do but roll out and drive at the fight.

What does this look like from the SF cockpit? Let’s start from a wings level attitude. Now, imagine lookdown angles extending down from you at 45 and 60 degrees. These angles form a lookdown “window” that looks like this.
My suggestion is that you keep the bandit generally located within this “window.” A lookdown angle of more than 60 degrees is probably too close…and outside of 45 degrees is likely too far. Now that’s not a very big area. As a rule, I would suggest you keep the bandit closer to the 60-degree area than the 45…again the idea of aggressively crowding the fight. How do you recognize 45 degrees? It’s halfway to the horizon when you are wings level. Don’t let the bandit get further away than that! And where is 60 degrees? Take the 45-degree point and cut it in half. In many sims, the edge of the canopy rail is a reasonable approximation.

The canopy rail is not an exact reference, but it is a visual point that you can easily see from the cockpit… Another way of ‘seeing’ this window is to keep the bandit closer to your canopy than the wingtip (in those sims where there is a wingtip!). If you do anything using this technique, you tend to crowd the fight a bit. And as I am trying to say repeatedly…crowding is not all bad! So…keep the bandit somewhere between half way to the horizon and half way between that point and directly under you. Here are some screenshots to help you visualize the point.


Basic Concepts – ACT
OK. So much for the BFM…now, what about the ACT aspects of the 2v1? What is this all about? Well, it’s about the “2” in the 2v1. It’s about the coordination required to make this concept successful…it’s about the communication needed to make this happen.
Coordination…communication. One term deals with flight path control, and the other is concerned with effective timing. Here’s how it works.
The first order of business is flight path coordination…then we’ll discuss some techniques on how to communicate effectively to coordinate that flight path.
When we talk about flight path coordination, we begin by noting that this coordination varies depending on whether we use a Double Attack or Loose Deuce tactic. In Double Attack, the SF maneuvers to be in a position to initiate an attack when called upon to do so…whereas in Loose Deuce, the SF maneuvers to initiate an attack at the first opportunity. The obvious difference in these two results in different flight path options for the SF.
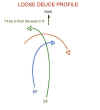
The Double Attack SF coordinates with the EF by maneuvering with two objectives in mind. He wants to maintain an energy advantage…this is usually in the form of an altitude, rather than airspeed, advantage. Secondly, the Double Attack SF wants to be in a position from which he can make a timely attack should the EF so order. By “timely”, I suggest that the SF should be in a position to immediately bring offensive pressure upon the bandit. Here is one way to visualize this using the EF flight path as a reference. I’ll refer to the SF position as the “perch.”

In the figure, the SF maneuvers to fly in a rough sector behind the EF wingline. This sector is as much as line abreast when opposite the bandit turn direction and tends to be limited to a wedge-like angle back when on the inside of the turn. The reason why you have this sector of airspace to maneuver in is to allow you to maintain an offensive position on the bandit. Use the 45-60 degree look down technique from the previous paragraph to help judge your position relative to the bandit. To maintain this position without changing airspeed, fly a series of ‘S’ turns above and behind the EF flight path. Not only will this help you maintain the perch, but it will also allow you to use a pan view to look around for other bandits.
Let me say that again! Your objective is to maintain an ability to attack the bandit quickly if called upon. Do that by maneuvering using two references…fly in the perch sector to provide cover for the EF…and maneuver in the perch to maintain the desired 45-60 degree lookdown position on the bandit. Often, this results in the SF maneuvering ‘out of sync’ with the EF. Here’s what I mean. If the EF is yo-yoing off to the outside of the bandit turn, the SF will slide to the inside of the EF to maintain the perch lookdown position. Then, as the EF rolls back into the bandit, the SF will slide across the EF’s flight path to the outside of the turn.
The perch will effectively place the SF in an advantageous attack position if called upon. By being in a good perch position, the SF has met his flight path coordination requirements.
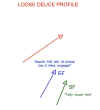
The Loose Deuce SF has got a tougher job when it comes to flight path coordination. He is looking for an entry to the fight, but, unlike the Double Attack SF that maneuvers relative to the EF, the Loose Deuce SF maneuvers relative to the bandit. The Loose Deuce SF cannot simply follow the EF as he attacks the bandit. Instead, the Loose Deuce SF must maneuver looking for the separation needed to make his own individual attack on the bandit. One of the more effective ways of accomplishing this is to use counter-flow maneuvering.

As already noted, the Loose Deuce SF should maneuver as quickly as possible to attack the bandit. But…at the same time, he must honor the fact that the EF is doing the same thing. The result is a time lag between the EF and SF attacks. During this ‘time lag’, the bandit will be maneuvering in response to the EF. The SF must anticipate the bandit’s actions by maneuvering to the bandit’s weak point…and that point is the bandit’s belly.
In a counter-flow entry, the SF maneuvers opposite the bandit turn direction to attack from outside the bandit’s turn, in other words, on the belly side. Here’s one way to do this in our sims.
The SF takes his cue from the bandit’s response to the EF. When the EF rolls in on the bandit, the SF maintains an altitude advantage. The SF uses the same 30-45 degree lookdown cues that were mentioned before as a rough estimate of lateral spacing. He is looking for the direction of the bandit turn.


As soon as the SF sees the bandit go into a defensive turn, he turns hard into the bandit while maintaining altitude. The SF continues the turn to pull the bandit across his nose and over to his 10:30/1:30 o’clock position (about 45 degrees one side or the other of his nose).
Now, the SF rolls back into the bandit while maintaining altitude. He is looking for the bandit’s nose to point in his direction as the bandit continues his defensive turn. This “nose on” position is the cue for the SF to roll in on the bandit.


In this “roll in” position, the Loose Deuce SF has met his flight path responsibilities. He is not conflicting with the EF. He has maneuvered in a timely manner, and he is in a favorable position to begin his own attack.
The second of our two basic ACT concepts is communication. The heart of the 2v1 coordination concept is the communication needed to allow the two attacking pilots to interact effectively. In the real world, fighter pilots practice extensive communication procedures used in A2A engagements. This discussion will not attempt that level of proficiency. Instead, I’ll suggest a couple of simple techniques that should allow you and your wingman to interact effectively within the limits of the typical flight sim.
You will find that the greatest challenge in communication in a 2v1 in a sim lies in the problem of keeping track of the bandit and your wingman. Those sims that offer a padlock for both target and wingman will be the easiest to practice this profile with. For sims such as Aces High that only have snap or pan views, this challenge will be more difficult. Regardless of view type, coordinated attack communication includes an initial specific radio call from the attacking fighter followed by an acknowledging call from the second pilot.
These calls are of two types…directive and descriptive. The EF is responsible for declaring his intentions (descriptive) as well as issuing commands to the SF (directive). As the SF, regardless of type of attack, you want to keep the EF informed of your position and/or intention (descriptive), and, when necessary, order the EF to pull off the attack (directive). In both the Double Attack and Loose Deuce attack, once the EF has made his initial call, most of the remaining communication falls on the shoulders of the SF.
For the Double Attack SF, he doesn’t really get into the action until called upon by the EF. His response then is a simple acknowledgement of the EF order to attack. Additional commentary may include the direction that the SF is in from and the direction the EF should pull off to.
Things are a bit more complicated for the Loose Deuce SF. His commentary is driven, not by the directives of the EF, but by his own actions. The SF is going to say three things to the EF…his initial intentions, his ‘in’ call, and, if necessary, a call to order the EF to pull out of his attack.
Let’s wrap this article up with a couple of typical communication exchanges…one for the Double Attack and the other for the Loose Deuce.
Communication – The Double Attack Profile
We begin with the flight detecting the target. The person sighting the target radios his tally using this format” ‘Bandit type, position (left or right), clock position, elevation (high, level, low), range.’ I’ll assume the person sighting the bandit is also going to be the EF.
A typical call might be “Bandit, 109, left, 10 o’clock, slightly low, 2 miles, engaged.”
The wingman replies with either “Tally” or “No Joy.” If the call was No Joy, the first fighter should provide additional descriptive info to talk his wingman’s eyes on to the bandit. Once the other pilot calls the tally, he should include the term ’free’ to tell the EF that he is accepting the SF role. Once he does this, the EF/SF Contract is established. The pilot also includes the term “visual” to indicate that he still has sight of the EF.
“Tally, visual, free.”
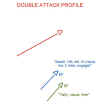
The SF should then maneuver to the side of the EF opposite of the bandit’s flight path by taking the bandit’s flight path into account. In the example above, if the flight was meeting the bandit head on, then the SF should maneuver to the right side of the EF. This allows the SF to look at the bandit through the EF.
The EF should radio his intentions to allow the SF to start planning his own subsequent maneuvering…”I’ll be in in ten’…meaning that he will begin his attack in 10 seconds.
Once the EF has declared his intent to attack, the SF should maneuver to place the bandit in the 30 – 45 degree area described earlier. In this position, the SF is essentially on the ‘perch.’
The next radio call is the “in” call from the EF. As discussed earlier, the EF will make every attempt to kill the bandit as quickly as possible. If the EF is successful, the attack is over at that point. But what if the EF is unable to kill the bandit for some reason? The answer is to call in the SF. This will require both directive and descriptive calls from both flight members to keep themselves separated and ensure that the EF/SF roles are changed safely. The EF should, if possible, make a call that he is about to discontinue his attack. That call will alert the SF to be ready to accept a command to enter the fight.
“I’ll be off in 10.”
Hearing this, the SF should clear the area one last time for other threats and then turn towards the bandit. He also keeps a visual on the EF…he needs to be ready to attack or separate, depending on the decision of the EF. We’ll assume the EF will want to keep the flight engaged, so the EF adds a directive call and ends with a descriptive call that tells the SF what the EF is doing.
“Engage the bandit, I’m coming off right.”
The SF then responds by acknowledging the directive call and adds his own descriptive info to update the other pilot on his position.
“Roger, I’m engaged…I’m in at your 7 o’clock high.”
The old EF now looks back to pick up the visual on the other pilot. Seeing him, he radios that he sees him and still has a tally.
“Visual…tally…I’m off right, free.”
With those words, the EF/SF roles are changed. The new EF dives in to attack the bandit while the new SF maneuvers back up to his own perch to await the outcome of the new EF’s attack. Should the need arise to exchange roles again, the process would be repeated just as before.
Communication – The Loose Deuce Profile
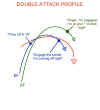
Let’s assume the engagement begins as before. But once the initial calls are completed, the SF does not remain on the ‘perch.’ Instead he will aggressively maneuver to an entry on the bandit.
As the EF attacks, the bandit breaks to the right…into the SF. The SF decides that maneuvering to the right will take too much time, so he elects to go left and set up a counterflow. The SF flys straight-ahead for a few seconds to get some turning room and then turns hard left to kick the fight across his tail. After turning about 90 degrees, he is able to pick up the EF and the bandit and then plans a slicing left roll in on the bandit.
As the SF continues his left turn, he varies his turn to set up a belly entry on the bandit. As he nears his roll in point, he makes a descriptive call to alert the EF that a second attack is imminent and includes info such as direction and time remaining.
“I’ll be in from the west in 5.”
The EF should roger that back and continue to ‘herd’ the bandit by making the bandit predictable for the SF.
The SF now turns hard to the belly of the bandit and closes for a kill. He radios that he is attacking and adds a direction to allow the EF to pick up a visual.

“I’m in at your 12.”
The EF then answers back, “Tally, visual.” It is at this point that the Loose Deuce situation gets a bit fluid. Since the objective is to kill the bandit, in combat the SF would get the kill and the engagement would be over without the need to exchange roles. The EF retains that role despite the fact that the SF is actually getting the kill.
That is not to say, however, that the Loose Deuce cannot evolve as did the previous Double Attack example. How could this happen? One way would be for the EF to force a role reversal by pulling out of the fight. For example,
“Tally, visual, I’m off to the south, free.”

The attacking SF hears this and confirms the role change.
“Roger, tally, visual, engaged.”
Now the new EF assumes the role of “herder” and the new SF maneuvers for his new entry. Once he is in position, the process begins anew.
Conclusion
This brings us to a close in our look at the BnZ and 2v1 tactics. While the situation above is a little simplistic, it does give you an idea of what you can do given the capabilities of our viewing systems and communication programs. If you are getting tired of the same old thing, you might give this a shot.
Good luck.
I had the help of several people in putting this last article together. Many thanks to Chuck “Vadr” Grimes, Kommandeur, III/JG2 for his suggestions on comm procedures. Also to John “Spoons” Sponauer and Dan “Cras”’ Crenshaw for their enthusiasm in boom and zooming me in a 2v1 in the AH training arena.
Related posts:
 Boom and Zoom Tactics, Part One
 Boom and Zoom Tactics, Part Three
 Boom and Zoom Tactics, Part Two
 Discussion Of Boom And Zoom Tactics
 Hog Basics: RAF Bentwaters Tactics Guide, 1982 Page 2
Hog Basics: RAF Bentwaters Tactics Guide, 1982 Page 7
Hog Basics: RAF Bentwaters Tactics Guide, 1982 Page 2
Hog Basics: RAF Bentwaters Tactics Guide, 1982 Page 7
 Tactics 101 – Introduction and Lag Pursuit
 Tactics 101 – Pure and Lead Pursuit