Edited by Ed “Skater” Lynch
For those of you that are “old salts” when it comes to flight sims, and for those of you that are new to flight sims, this article should be of some value to you. This is largely a reprint from the manual of one of the best combat flight sims ever released. Spectrum Holobyte’s Falcon 3.0 was indeed the father of all modern, “realistic” combat flight sims. The F3 manual was one hell of a paper weight. Weighing in at something like seven pounds, the F3 manual was jam packed with information on flying the sim, and the usage of tactics, and the deployment of weapons and the employment of the aircraft. Here is a little jewel from the tactics section. Enjoy!
Credit goes to Microprose / Hasbro Interactive, Spectrum Holobyte, and the Falcon 3.0 team.
Introduction To The BVR Fight
The chapters so far have addressed the basic building blocks of air combat. All air combat is built on 1v1 BFM maneuvering within visual range. BFM is the first subject taught to all fighter pilots. Once a fighter pilot learns how to maneuver against targets he can see, it is time to learn to maneuver against targets that are beyond visual range (BVR). The only objective in this section of the book is to peel back the cover slightly on BVR air combat and expose you to the next subject area taught to fighter pilots after basic fighter maneuvers.
Modern fighters are equipped with sensors that can be used to detect targets out beyond visual range. The most common sensor used to find the enemy is the radar. When a target is found on radar, a series of tactical reactions are set in motion. These reactions to the enemy are called tactical intercepts. Tactical intercepts consist of a specific set of procedures using the radar taken by a fighter to gain an advantage on the enemy. There are six basic steps or phases to a tactical intercept. They are:
- Detection
- Sorting
- Targeting
- Intercept
- Engage
- Separate
A fighter pilot must understand and execute each phase. Failure to successfully execute any one of these phases will cause the breakdown of your tactical game plan. Before you fly a mission with your wingman, you should address each one of these tactical intercept phases and figure out how the flight will accomplish them.
Detection
You can’t do anything until you find the enemy on your radar. At first glance, this seems straightforward. You just get pointed at the bandit, and he should appear on the scope. Not so fast. Radars have specific search volumes that are limited in elevation and azimuth. Modern fighter radars move a radar beam across 120° of azimuth, as shown in the figure below. This sweep is called a bar. The pilot can usually select the number of bars, up to the radar’s maximum capability (usually 4 to 6 bars). In the top part of the image below, the pilot has selected a 1-bar scan, while the bottom half shows a 4-bar scan.

Each bar takes a specific amount of time for the radar to search, so it is not always advisable to select the maximum bar sweep. For example, if you know the bandits altitude as you approached, you do not need a 4-bar scan. You can put more radar energy out there and increase your probability of detection if you scan with fewer bars. Along with selecting the bar scan, the pilot can also crank the entire search volume up or down. If the bandits are running in on the deck, you can select a 1-Bar scan and crank down to search the deck for the targets. In a 1-bar scan, you are searching the area of interest faster because you are not wasting radar sweeps searching empty air space.
As you go into combat with your wingman, you should have a radar search plan. Normally, you don’t want to have all the radars in the flight searching the same piece of sky. In many cases, GCI will call out targets and get you pointed at the enemy. if you know the target’s altitude, then you can select a smaller elevation scan pattern (fewer bars). Most of the time, however, you will want to search the greatest volume of airspace, selecting the maximum number of bars.
Sorting
Once you have detected the bandits, you must sort them. Sorting is the process of determining the following information about the enemy:
- How many are out there?
- What formation are they in?
- What are they doing?
As soon as each fighter in the flight completes his sort, he must pass the information to the rest of the flight. This communication serves several purposes. First, you are passing along your radar situational awareness (SA) to the other flight members, which will build their SA. Second, you are comparing radar pictures of the air battle, which helps you confirm that you are seeing what you think you are seeing. Here is an example of the radio calls during a sort.
“Falcon One has a two ship, line-abreast, high-aspect. South target is at angels 22. N orth target is at angels 20.”
“Falcon Two has a single high-aspect target at angels 22.”
From this call, you can tell that number 2 has not detected one of the bandits. He knows that there is another guy out there, and he should look for him. The call by lead that the targets are at high aspect answers the “what they are doing?” question. A high aspect means that the enemy has his nose on you.
Targeting
In the targeting phase, the flight takes a specific target of responsibility. A targeting plan must be briefed before the mission and executed after the flight has sorted the enemy.
Intercept
This is the phase where you actually close on the bandit. The intercept profile is designed to get the flight into weapons parameters. Once you have targeted the bandits, it is time to drive the flight into a position to shoot. If you have BVR missiles, such as the AIM-120 AMRAAM, then you fly an intercept profile that would place you in the weapons envelope of the missile. If you only have AIM-9M Sidewinders, you fly a profile that will put you in the best position to fire these shorter range missiles. There is one other goal of the intercept profile: in addition to driving you into weapons parameters on the bandit, your profile should keep the bandit from getting into weapons parameters on you.
Engagement
In the engagement phase, the element (your flight) enters a visual fight with the bandits. Hopefully, this will result in a brutal ambush of the enemy. Most of the time, you are not so lucky. At the same time as you find the bandits on radar, they find you. As you merge together, your element enters a maneuvering fight against the enemy formation. Element maneuvering, or ACM, is another subject, but the bottom line is fight your best 1v1 BFM. Never do anything in a two-versus-many environment that you wouldn’t do in the 1v1 environment.
Separate
Along with fighting your best BFM, you should keep in mind the position of your element in relation to your escape window. Even if you turn all the targeted bandits into scrap metal, you still need to get away from the fireball. Big bright lights in the sky have a way of attracting attention.
Putting It All Together
The best way to show you how to perform a tactical intercept is to go through an example BVR fight from start to finish. This example will be a single F-16 (since we haven’t covered two-ship tactics yet) against a two-ship of MiG-29s. The fight will start from 30 miles out at 160° of left aspect from the Fulcrums. We will assume for the sake of this discussion that no BVR missiles will be fired and the targets must be visually identified (VID).
Detection Phase
We are out there, a single ship trying to find the bad guys. Obviously the farther out we see them, the better. AWACS or GCI (ground-based radar) can help us get pointed in the right direction, but eventually we must find the bandits with our own radar in order to get a missile off the rail as soon as the bandits get within visual range. Once we get the targets on our radar, we need to analyze the intercept geometry to make sure we are running on the correct target. There is no need, for example, to try to run an intercept on a zero aspect target at 30 miles, we would never catch them. AWACS calls a target, and we get turned and point our radar in the right direction. Looking at the scope, we find targets at 160° left aspect at 30 miles.
The Sort/Targeting Phase
The next thing we have to do is sort the bandits. During the sort phase, we should try to determine how many bandits are out there and what formation they are flying. From the radar picture shown below, we determine that we have a two ship in line abreast formation.
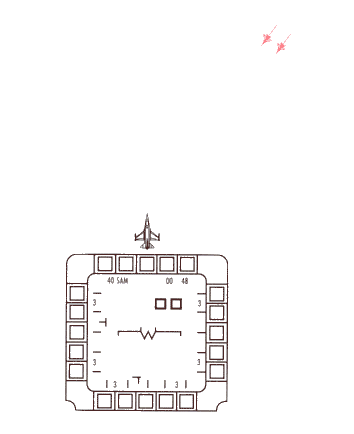
We have sorted the bandits, so now it is time to go to the targeting phase. In the targeting phase, we pick a single target and lock on to him. Since these guys are flying a visual formation, we can lock on to either guy as long as we keep in mind which one we have targeted.
The Intercept
Now we have to complete the intercept, get a VID and shoot this guy. Since we need to get a VID to shoot these bandits, the best intercept to fly is a stern conversion. By rolling out the bandit’s 6 o’clock, we will have time to pick up a tally on the bandit and get a shot. If we go in at high aspect, we may not see the bandit until we are inside Rmin for a missile shot.
What is a stern conversion, you ask? A stern conversion is shown in the next image.
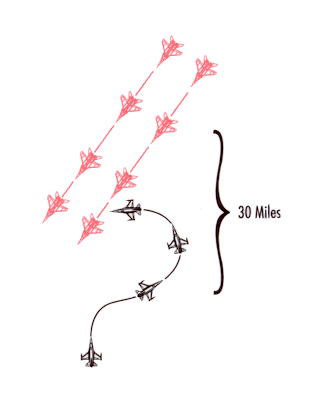
There are several steps to flying a stern conversion intercept.
- Switch to SAM (Situation Awareness Mode) or STT (Single Target Track) radar mode to get the aspect angle of the bandit formation. The next image shows a radar display with the aspect angle of the target marked.

- Turn opposite the aspect angle to get turning room on the targets. In other words, if the aspect is 160° left aspect, then you need to turn right to move the targets to the left side of the scope. Do not turn so far that you take them off the scope. Just turn far enough to put them about 40° on the scope. The below image shows how you make this turn. Notice the figure has a god’s-eye view and a radar view. All you are going to get in the jet is a radar view. It is up to you to use your gray matter to convert a radar display to a god’s-eye view of the intercept.
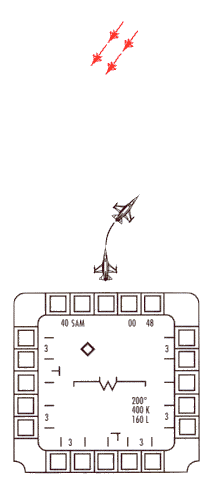
Now is a good time to show what happens if you don’t analyze the aspect properly and turn the wrong way for offset. Let’s say the aspect was 160° left and you turned left for offset. Would this work? The answer is no, and below shows why. If you turn the wrong way, you will actually be taking away your turning room rather than increasing it. This will not be obvious by just looking at the target’s position on the radar scope.

- The next step is to hold the targets at 40° on the scope and drive in. In order to hold the targets at 40°, you may have to check turn into them occasionally. The explanation for this is a little outside the scope of this book, but put simply, a target that is not on a collision course will always drift away from you. Think about this statement in driving terms. If you are driving on a two lane highway, you will notice that the oncoming traffic moves across your windshield and then suddenly flashes by. The oncoming traffic never just stays in the exact same spot on the windshield unless you are about to end up with chrome between your teeth. The same thing applies in air combat. During an intercept, you are driving the target away from a collision angle in order to get turning room. That means that the target will keep drifting farther away from you unless you turn to hold it at a particular angle.
In order to perform an intercept, all you have to do is follow the procedures. It’s just like baking a cake. You don’t have to understand the chemical process, you just have to follow the steps.
- When you get to 10 miles from the bandits, go to STT and turn to put the target you are locked to in the HUD. This is the part of the intercept where things get serious. There are two reasons that we put the target on the nose at 10 miles. The first reason is so we can get a tally on the target. In the HUD, we have a Target Designator box with a target in it. The next image shows a HUD with the TD box labeled.
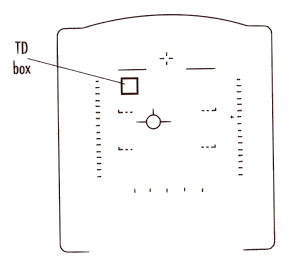
The other reason we turn to put the target on the nose at 10 miles is to get small. It is much harder to see a jet that is pointing at you because there is less surface area to look at.
When we get a tally on the target, the intercept is over and it is time to use BFM. Remember in this fight that we only have a TD box on one of the two targets. As soon as we get a tally on the bandit in the HUD, we need to look for the other guy. Don’t make the mistake of putting your eyes into the “random flail” mode. If the bandits have stayed in a visual formation (which is about 90% of the time), then the other bandit will be just outside the HUD when you get a tally on the guy in the TD box.
The Engagement Phase
Now that we have two MiG-29s in sight, we must kill the one in the TD box fast and then go 1V1 with the other Fulcrum. If you can’t smoke the bandit in the TD box fast, then you have to beat it. For this reason, be ready to shoot as soon as you can VID the target. Shoot and kill and, if you miss, do the “Jane Fonda routine” and give peace a chance. While you’re giving peace a chance, be at high speed and high angle-off from the Fulcrums. Again, you must resist the temptation to enter a turning fight.
Let’s say we do kill one of the Fulcrums at the merge-now what?
When entering a dynamic turning fight against a very maneuverable aircraft in an F-16, you need to remember one concept, lead turn. My game plan if I’m committed to stay and fight is to use a nose low slice at the pass and lead turn at every opportunity. Once you turn 180°, how-ever, your escape window is shut and unless something strange happens (like the MiG is hit by a meteor), you must kill the bandit in order to survive the fight. In a lead turning fight, you must initiate your turn on the Fulcrum prior to passing his 3/9 line. In addition, strive to be at corner airspeed on the initial turn at the merge.
While you are in this lead turning fight with the Fulcrum, think weapons. A Sidewinder can fly better BFM than you can, so put one in the air if you get a chance. Keep in mind, however, that at high aspect when you are in missile parameters on the MiG-29, he may also have you in parameters for his missile. Again, you must fight hard because it is him or you once you enter a turning fight.
And as always practice makes perfect. If you want to be the best, you must practice like the best.
Part One: The Geometry of Air Combat
Part Two: Introduction to Offensive BFM


