Maverick Switchology and Cockpit Displays
For this discussion, I’ll refer only to the default keyboard settings. I realize that many of you will modify these settings based on your particular HOTAS system. You have two cockpit Maverick displays… HUD info and a television monitor (TVM) picture. These are separate displays and are independent of each other as far as missile weapon system operation is concerned. In practice, however, you should use them both together to acquire, identify, and complete the lock on/firing process.
Normally, you begin a mission with the HUD in the navigation display. Press the number 7 key to switch to the A2G HUD. You may cycle between A2G munitions by pressing the D key. The HUD display will not tell you which station you have selected… and therefore what type missile is selected. The TVM display is the most obvious indicator since the TV display looks quite a bit different from the IR display. The LOMAC cockpit station select panel will also correctly display what stores are loaded and selected.
HUD Display
The HUD display is the same for both missile types and consists of an aiming device for the missile seeker head and slant range information from you to the target.
The aiming device is the Maverick pipper, a 25mil segmented circle consisting of four arcs and a center dot. Technically, the dot in the center is the pipper (the circle being the reticle) …but we’ll defer to common practice and call the whole thing a “pipper”!
 The pipper is displaced below the gun line about 2 ½ gun reticles or about 4 degrees. Since the gun line represents the approximate aircraft flight path at one g, then you can see that the pipper is located well below the flight path. The flight path symbol on the HUD is the Total Velocity Vector (TVV) as shown in the previous figure.
Immediately below the pipper is the slant range in nautical miles to the target. Notice that if you move the pipper up or down that this distance will change. This is because the weapons computer is using your nose position to estimate slant range to where the pipper is pointing. The weapon data box on the lower left of the HUD includes weapon type, number remaining, and slant range to the target in meters.
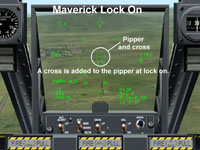 When you command a lock on (Tab key), the pipper will add a cross inside the reticle. The slant range will continue to be displayed. Once locked on, the pipper will now be free to move in the field of view of the HUD as it tracks the target. Its freedom of movement is approximately +/- 30 degrees, almost to the edge of the HUD frame. See the image at right.
AGM-65K Model TVM Display
Here is the K model TVM picture. This picture is different from any other EO Maverick display that you may have seen in the past. The K model TVM is different looking than the earlier A and B model Maverick TVM displays, but it functions in a similar manner.
 The picture at right is a 3X magnified view of where the seeker head is looking. The TVM display is made up of a large “cross-hair” that has a gap where the vertical and horizontal lines meet. This gap is where the target must be in order for the seeker to lock on. Once locked, a target will be centered in this gap. There are three small horizontal lines on the six o’clock leg of the “cross-hairs”. These are seeker head angle indicators and represent seeker head angles of 5, 10, and 15 degrees below the Maverick launcher rail. A small cross is also visible. Called the “pointing cross”, this display shows where the seeker head is pointed relative to the boresight axis of the missile. If the seeker is pointing in the lower left half of the TVM display, then the missile is looking low and left of the boresight axis. The pointing cross will be steady without a lock on and “flashing” (blinking) once the missile is locked on to its target.
 AGM-65D Model TVM Display
At right is the TVM display of the D model. The crosshairs, dive angle references, and pointing cross are the same as in the K model. The only difference is that the D model TVM has a magnification capability. The D model has two levels of magnification ..3X and 6X… sort of a close and closer view! The basic view is the 3X picture and is identified by the brackets around the mid point of the TVM. The area inside the brackets represents what you will see when changing to 6X. Use the +/- keys to cycle between magnification levels.
Related Posts:

Related posts:
 Air to Ground, Part Three – Rockets and Guns Page 7
 Mavericks, Rockets, and the Gun
 Page 3
Mavericks, Rockets, and the Gun Page 4
Mavericks, Rockets, and the Gun Page 5
Mavericks, Rockets, and the Gun Page 6
Mavericks, Rockets, and the Gun Page 7
Mavericks, Rockets, and the Gun Page 8
Mavericks, Rockets, and the Gun
Mavericks, Rockets, and the Gun Page 3
Mavericks, Rockets, and the Gun Page 4
Mavericks, Rockets, and the Gun Page 5
Mavericks, Rockets, and the Gun Page 6
Mavericks, Rockets, and the Gun Page 7
Mavericks, Rockets, and the Gun Page 8