TVM Operating Concepts
The TVM will show what the missile seeker head is looking at. As mentioned before, there are two types of displays, the K model electro-optical (EO) or “TV” display, and the D model infra-red (IR) display. The TVM picture for the EO seeker will appear to be a toned down greenish-gray looking picture. The seeker is tuned for recognizing color contrast (light/dark) and therefore if your targets are similar in color to their surrounding background, then they will be difficult to both see on the monitor and very possibly lock up as well. The EO seeker needs a fair amount of discrimination to be able to lock an object. If you are having a hard time seeing it in the HUD, the chances are very good that the EO TVM picture will be less than optimal.
Background terrain features do not show up well, as the next shot shows (below Left) but close in shots of urban detail often look much more detailed (below right).
 |
 |
It is possible that you may see your target in the HUD and not on the TVM when using the EO missile. Reducing your range is the best way to improve this situation. In real life, we wanted the sun at our backs when using the EO missile… whether this technique applies to the sim is open to debate… but as a technique, it can’t hurt!
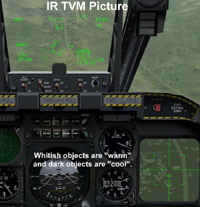
When compared to the EO TVM display, the IR TVM picture has a different overall appearance that is characterized by a smaller color range but often sharper detail. You will tend to see a mildly dark background with isolated light and darker images on that background.
In general, the IR display will contain less detail than the EO picture… however, the IR display has a much more powerful ability to discriminate targets. Remember, the IR display is not looking for color contrast… it’s looking for a difference in IR radiation levels (we simplify this by referring to this as “heat” levels). Targets are either “hot” against a “cool” background or vice versa.
Any type of pollution in the air can reduce the IR seeker’s ability to sense IR radiation… smoke, haze, and humidity play a negative role. But light levels are irrelevant, so the IR missile works great at night!
 The major advantage in using the IR missile in many cases is its extended target acquisition range capability over the EO seeker. Simply put, you can “see” much further with the IR missile. Here are some screenshots demonstrating this. I’ve pointed the Maverick pipper into a known truck target area while I am a number of miles away… 6nm in fact. This is a long way to be visually acquiring targets the size of trucks and tanks. In this example, I know where the trucks are, so I’m able to get the pipper placed in the general area. Here’s the HUD picture (below left).
Can’t make out any targets with the proverbial naked eye… so I switch to Maverick mode. First, I select the EO missile. Looking into the TVM, I try to find those trucks. I slew the pipper around a little but no joy! There just isn’t enough discrimination at this range to see those targets (below right).
 |
 |
| HUD View Of Target Area | EO TVM View Of Target Area |
Then I select the IR missile and place the pipper into the same general area. Checking the TVM, this is what I see (below right).
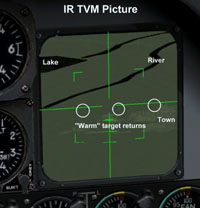 OK… that’s better! At this range I can now make out the “warm” returns from the targets (trucks). Also, notice the “cleaner” looking picture… the EO picture is far “busier” but has little usable info. Note… the screenshot quality is less than the actual game video. The IR picture has much less detail, but what is there is more valuable. In addition to the trucks, notice the buildings that are visible and were less so in the EO picture. The contrast between water (lake and rivers) is more obvious in the IR picture, making orientation to the target area easier.
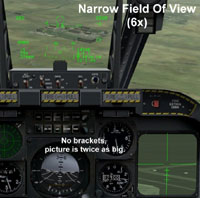
I can fine-tune this attack picture even more by using the 6x magnification feature, called the “narrow field of view”. I use the + key to switch to 6x magnification. Here is how it looks. When zooming in like this, you can clearly see target details. Use the – key to return to 3x.
 One final note. At this range (6nm), we are very close to the max range of the EO missile… but well within the range of the IR missile. Max range has two parts… the aerodynamic ability of the missile to fly a given distance… and the ability of the missile seeker head to lock on to a target. You may well find in the game that the IR missile has a much better lock on success against small targets.
Weapon Select Panel
In real life, the Hog driver will spend some time with this panel making sure everything is set up right… in the game, the need is not quite so pressing. Use this panel and your keyboard to select the number of weapons you want to drop and the interval that you want them to be released at… but this is primarily for bombs and such. Not a big player when it comes for forward firing ordnance… at least not right now. I say that because the implementation of all weapons panel functions was not finished in the build that I am using for this article. I don’t want to hold LOMAC’s feet to the fire over real world switchology when it really isn’t that important anyway.
 Here is the weapons select panel. You will have control over gun rate, Master Arm, but apparently not station select. This means when you select a weapon, rockets for example, you get all stations that have rockets loaded on them… same for Maverick. At this time there is no selective station feature that I see. Perhaps in the gold release!
As I said, not that big of a deal… we’re here to have fun… not be a switches weenie!
Related Posts:
Related posts:
 Air to Ground, Part Three – Rockets and Guns Page 2
 Mavericks, Rockets, and the Gun
 Page 2
Mavericks, Rockets, and the Gun Page 4
Mavericks, Rockets, and the Gun Page 5
Mavericks, Rockets, and the Gun Page 6
Mavericks, Rockets, and the Gun Page 7
Mavericks, Rockets, and the Gun Page 8
Mavericks, Rockets, and the Gun
Mavericks, Rockets, and the Gun Page 2
Mavericks, Rockets, and the Gun Page 4
Mavericks, Rockets, and the Gun Page 5
Mavericks, Rockets, and the Gun Page 6
Mavericks, Rockets, and the Gun Page 7
Mavericks, Rockets, and the Gun Page 8