Determining Target Plane Of Motion
Our next objective is to get our gun line into the target’s plane of motion. The gun line reference, however, is in the HUD. The target, when it is in the ‘window’ is no where near the HUD. So, how do we get into the target’s plane of motion? We use cockpit references.
Here is one technique. Go to the forward view in your sim. Fly wings level. Locate the gun line. Now, look to the sides of the HUD area for cockpit or HUD structure that are in approximate alignment with the gun line. The further away from the gun line, the better. What we want to do is to draw a line from this reference to the gun line. This line will be our target flight path reference when our wings are level with the target’s flight path.

After we have pulled our nose out in lead, we will level our wings with respect to the target’s flight path. Visualize this flight path as an extension of the target’s fuselage line. In your mind, try to see the ‘big picture’ by projecting this flight path line across your nose.
Now, with our wings level with this line, we pull our nose up to raise the gun line up (or lower our nose to move the gun line down) to superimpose our gun line with the target flight path line. Use the snap shot gun line references in Figure 29 to help get your gun line in the proper position.

Determining Sight Settling Time
Again, not applicable for fixed sight gun employment.
Determining The Open Fire Point
We used the idea of a ‘window’ to represent the lead point when pulling the nose out for a snap shot. We’ll now return to that concept and give you a ball park visual picture of the open fire point. First, one additional point regarding fixed sight technique.
The gun does not know your angle of bank relative to the target. I have suggested the idea of using cockpit references to line up the gun line with the target flight path as a matter of simplicity and convenience. There is absolutely no requirement for you to be wings level relative to the target’s flight path.

We drew the roll out window using the wings level HUD as a reference. This resulted in two ‘windows’…one on the right and one on the left of the HUD gun line. If we take our bank angle out of the picture, we can draw the lead window as a circle or ‘band around the gun line. The next figure shows this. For a good lead angle, position the target no closer to the HUD than the red circle.
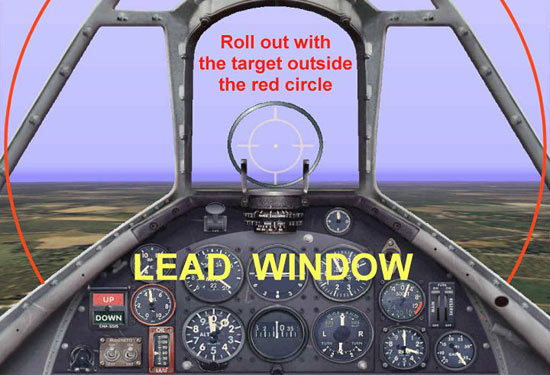
The only thing the shooter has to do is roll out with his gun line in the target’s future flight path. This same concept can be applied to the open fire point. The open fire point then becomes a circle or ‘band’ around the gun line. Regardless of his bank angle, when the target enters the open fire circle, the shooter pulls the trigger.

Related Posts:

Related posts:
 Air To Air Gunnery – Theory and Application, Part Three Page 13
Air To Air Gunnery – Theory and Application, Part Three Page 15
Air To Air Gunnery – Theory and Application, Part Three Page 17
Air To Air Gunnery – Theory and Application, Part Three Page 18
Air To Air Gunnery – Theory and Application, Part Three Page 2
Air To Air Gunnery – Theory and Application, Part Three Page 5
Air To Air Gunnery – Theory and Application, Part Three Page 6
Air To Air Gunnery – Theory and Application, Part Three Page 9
Air To Air Gunnery – Theory and Application, Part Three Page 13
Air To Air Gunnery – Theory and Application, Part Three Page 15
Air To Air Gunnery – Theory and Application, Part Three Page 17
Air To Air Gunnery – Theory and Application, Part Three Page 18
Air To Air Gunnery – Theory and Application, Part Three Page 2
Air To Air Gunnery – Theory and Application, Part Three Page 5
Air To Air Gunnery – Theory and Application, Part Three Page 6
Air To Air Gunnery – Theory and Application, Part Three Page 9