Gameplay
Let’s start with the scenarios.
You can play either as NATO or the Warsaw Pact, and the scenarios focus on four main NATO formations: the British Army of the Rhine, the US V Corps, and the West German I and III Corps. There are five scenarios for the British, six for the Americans, and three for each of the German Corps (giving a total of six German scenarios in total). Each Corps has its own map, and all that corps’ scenarios will take place within that map. For example, with the British scenarios you first have to hold the Soviets then have to start pushing them back. You can also choose to do any scenario at any time, so you don’t have to win each to progress. Although don’t be surprised if you get a good kicking because you’ve chosen a scenario that’s too hard for you at the start! My suggestion? Take the scenarios in order, and don’t play the “next” one until you’ve managed the successfully complete the previous one. It’ll frustrate you less, trust me.
Because I’m from the UK, I’m going to use one of the British Army scenarios for the purposes of the rest of this review. And I’ll be playing the NATO side.
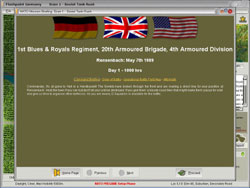
Here are the briefing screens for the first British scenario:
 |
 |
 |
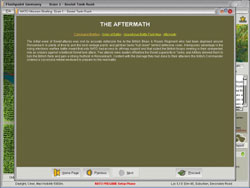 |
I like the aftermath page, as it gives you an idea of what can be expected of you — a nice touch, and something that may boost your confidence ahead of the big fight: Or not, if you’re on the side that apparently loses.
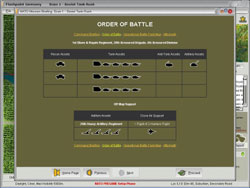
After you’ve read through this, you come to the main user interface. Let’s have a look at it.
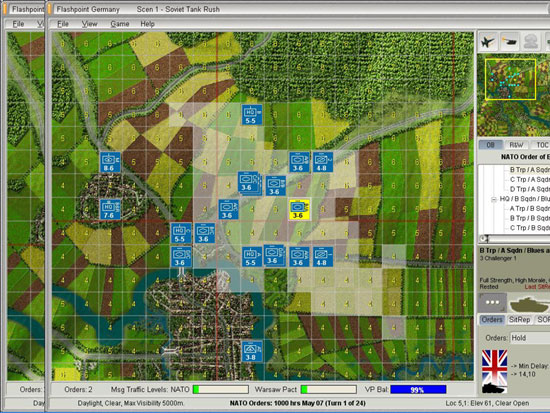
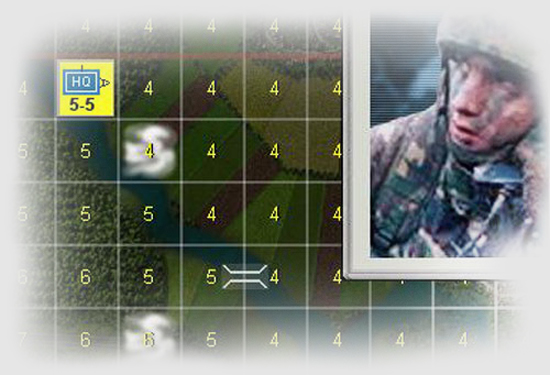
It’s fairly straight forward. The main points: you’ve got the map in the middle, the selected unit details on the bottom right, the order of battle above that. Above the order of battle there’s a smaller window showing the larger map, and you can click on this to move the main window to that area. You can also do this by moving your cursor to the edges of the main window map.
At the start of each mission, you get to place your units where you want them. Having said that, you can only place them within a certain area, so there is a bit of a limitation on this. In principle though, I like this — you’re effectively given time to organize your own forces. Since I usually play the NATO side, I like to think of it as having my men dig in the night before the bear comes to town.
Once you’ve sighted your units, the fun begins. You start giving orders. What can you do with a unit? You can:
- Tell them where to go
- Change their posture (dug in, etc.)
- Have them hold or screen in a position
- Have them rest and refit
- Or have them ready to move
For other units, such as artillery, you can do more. With artillery, for example, you can conduct various missions — barrage or counter battery. These can be in one of several forms: harassing, neutralizing, or chemical attacks, or minelet deployment or smoke screen.
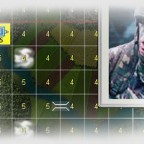
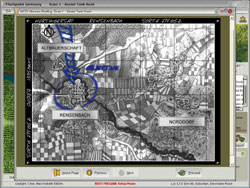
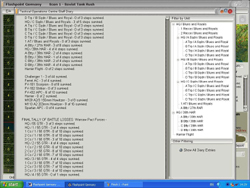
In the above screen, I’ve selected B Troop from A Squadron of the British Blues & Royal. The Troop consists of three Challenger tanks, and I’ve used “Ctrl + L” to show me the areas they can see from their current locations. I’ve also used “Ctrl + E” to show me the elevation of each square — which is how height is represented in the game. Each square with have an elevation in numbers — 1,2,3,4,etc. and the higher the number, the higher the elevation — I can see in the above that the fields to the east of the town are very flat, although higher slightly further east — so I’ll use this info to try to occupy this ground as quickly as possible.
Each turn is divided into two phases — an order phase and a resolution phase. In the order phase you have the opportunity to issue orders to your forces including calling in off map artillery or air strikes (which can be fixed or rotary wing). The method of doing this is standard and straight forward — click on unit, give order, confirm. If you’ve selected the relevant options, then you’ll find you can only issue a few orders per turn, so choose wisely! Another nice touch is that your orders take time to actually get to the unit. You may order a unit to move, and it may take 20 minutes for them to do it, especially if they’re either engaged or jamming is heavy.
Before you start the resolution phase you’re given the chance to “preview” your orders. This allows you to see how your own units would respond to the orders you’ve issued, although personally it’s not a feature I use — strikes me as being a bit unrealistic. Having said that, it’s there — so if you want to use it, then do so.
Next comes the resolution phase. A couple of points here. The first is that — unsurprisingly — you can’t actually do much during the resolution phase other than sit, watch, and make notes. Secondly, if you’ve not tailored the right settings, this can go on forever. Within the game itself you can choose to turn combat animations off (they’re not really animations as such, it’s just a bit more atmosphere mainly in the form of sound and a little puff of smoke on the square) — if you leave them on this lengthens the turn resolution phase substantially and, to be honest, makes it much more boring than it needs to be. Horses for courses though, so if you like it then leave it on.
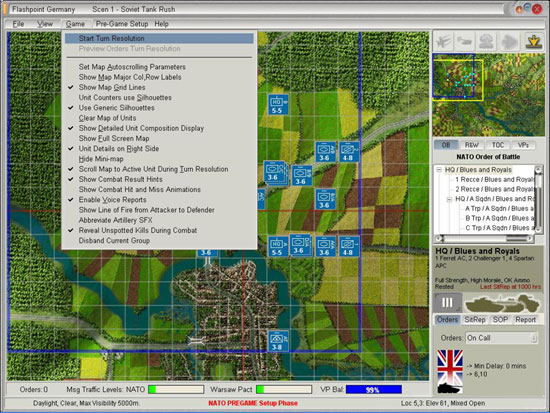
Here’s a shot of the various “in game” options you can utilize — they’re fairly self explanatory but just go to show the attention to gameplay issues that have been shown by the developers.
So your turn resolution comes along, and you watch, note what’s happened, check on your units, plan the next move, and on it goes. It’s that simple: simple to play, not so simple to win. Thankfully, NATO never had to rely on General Franny — if they did you’d all be speaking Russian now. Da? Indeed.
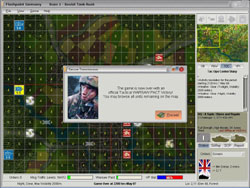
When you get to the end of the scenario, you’ll be given a breakdown of the results. This is quite interesting as it shows how many tanks etc. you’ve got left, and also whether you’ve won — decisively or marginally. There is a process by which this is worked out, but it’s in the manual and I’m not going to go into it here. Anyway, here’s a few we made earlier showing the results at the end:
 |
 |