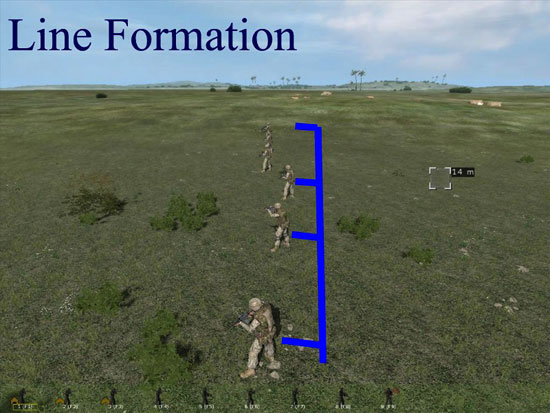
Line Formation
A line formation is when all your men come up shoulder-to-shoulder with you. You still can keep a set interval but for explanation purposes, we will say shoulder-to-shoulder. This formation is best for heavy forward firepower, like when assaulting a forward objective. But this formation leaves your flanks completely open, and if you don’t control the battlefield you can easily be outflanked and eventually destroyed. It’s always best to have other fire teams or squads on your left and right to control the flanks, or move up to your forward target’s flank while your line formation of heavy fire keeps the enemy suppressed.

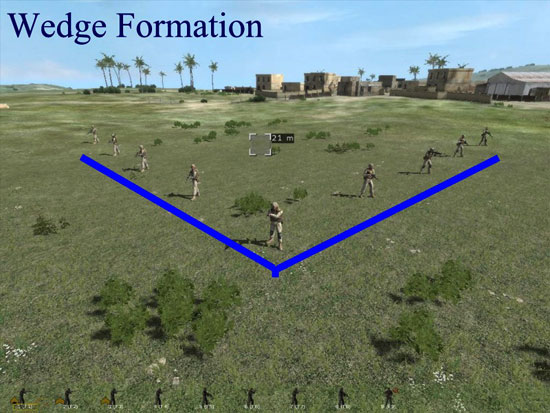
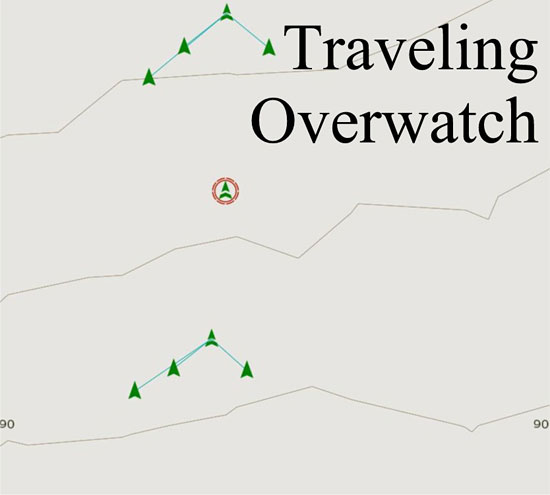
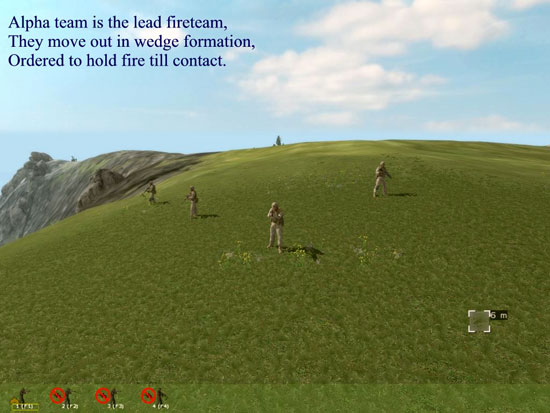
Wedge Formation
The wedge is the basic and most popular fire team and / or squad formation. The interval between team members is usually ten meters. The wedge expands and contracts, depending on the terrain. When rough terrain, poor visibility, or other factors make controlling the fire team difficult the normal interval is reduced. The sides of the wedge can collapse into a column / file formation for very difficult terrain, and then re-open as needed. The wedge formation is very flexible.
The wedge formation should be used the most, especially in an enemy controlled zone (behind enemy lines). The wedge formation provides excellent front and flank coverage, but no back coverage.
Vee Formation
The Vee formation is a reverse wedge formation. The fire team and / or squad form a V with the fire team leader or squad leader at the point. This formation gives a lot of firepower on a known enemy, almost surrounding the enemy. But it is very hard to control and adjust. It is not recommended unless you have an enemy pinned and want to move in to squeeze the enemy to death.

Echelon Formation (left or right)
The echelon formation is used to cross open areas where you know the enemy is on one side or the other of your flank. It gives you good firepower forward and to either the left or right of your direction of movement. The downside side means that your opposite flank is totally open and in danger. Moving with an enemy on one or both of your flanks is always dangerous and should be avoided.
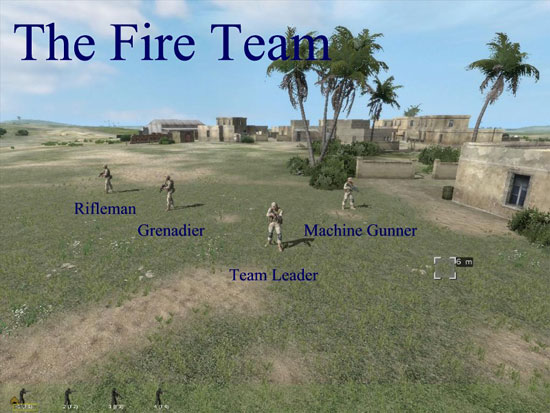
How to Use Formations Effectively in a Computer Sim
Say you’re the squad leader of a 9-man squad (including yourself), or even just a 4-man fire team leader (including yourself). Your objective is to leave your forward base of operations on foot, cross over enemy lines, infiltrate an enemy forward supply point and destroy it. (All other things, like crossing danger zones and proper movements aside, let’s talk about the formations you use only).
You leave your base in a column formation because you want to get from point A to point B pretty quickly, and the friendlies have a pretty good hold on this side of the enemy line. You approach the enemy lines; you then order your squad / team into a wedge formation for the best overall protection. You go through some rough woodland area, the wedge constricts in size in order to maintain visibility. At some point it gets so thick you order your men into a staggered column. Once you exit through the thick woodland, the wedge expands back to proper size. You continue on and right before you crest the hill that you already “map recon’ed”, you order your men into a line formation. This will give maximum firepower to the front where the enemy is expected. Your squad / team goes prone and you crest the hill and on your command, engage the enemy. Okay, the enemies are about gone, but you want to sweep in and clear it. You order a vee formation, so you can put the squeeze on the enemy position and close in for the final kills.
You can download this video I put together in Armed Assault showing the different formations (zipped, wmv format, 26.47MB).
Conclusion
That covers a few of the formations and how they might be used. Realize that we didn’t discuss cover fire and bounding overwatch maneuvers, or any of the other things you have to consider and take into account. The purpose at this time is to explain the formations. More advanced lessons will come later in other tactical briefs.
If you missed any of the other articles in the series, you’ll find them here:
- Tactical Briefing 01: Meet the Squad
- Tactical Briefing 03: Squad and Fire Team Movements
- Tactical Briefing 04: Movement to Contact
- Tactical Briefing 05: How to Plan and Execute a Squad Sized Assault
Resources
- Wikipedia (what a wonderful tool)
- Armed Assault (the computer game)
- FM 7-8 Infantry Rifle Platoon
- FM 22-102 Soldier Team Development
We want your Feedback. Please let us know what you thought of this article here.
Check out our Land Combat Library! A percentage of the sales helps to keep the SimHQ doors open.
Related Posts:

Related posts:
 Tactical Briefing 01: Meet the Squad Page 2
 Tactical Briefing 02: Formations
 Tactical Briefing 03: Squad and Fire Team Movements
 Page 2
Tactical Briefing 03: Squad and Fire Team Movements
Tactical Briefing 03: Squad and Fire Team Movements Page 2
 Tactical Briefing 04: Movement to Contact Page 2
Tactical Briefing 04: Movement to Contact Page 5
Tactical Briefing 04: Movement to Contact Page 2
Tactical Briefing 04: Movement to Contact Page 5
 Tactical Briefing 05: How to Plan and Execute a Squad Sized Assault Page 4
Tactical Briefing 05: How to Plan and Execute a Squad Sized Assault Page 6
Tactical Briefing 05: How to Plan and Execute a Squad Sized Assault Page 4
Tactical Briefing 05: How to Plan and Execute a Squad Sized Assault Page 6