Countering Crosswinds On Takeoff and Landing
Crosswind is something that we control directly when we configure our gameplay. It’s an option. If we don’t want it, we don’t have to include it. But for advanced gameplay, we can spice things up a bit by tossing in crosswind. So, if we check the crosswinds selection box, what do we get?
We get a force that is going to try and blow us sideways off the runway centerline. If the wind is coming at an angle that is not directly at 3 or 9 o’clock, then we’ll also have to contend with a headwind or tailwind component. This headwind or tailwind component will be most evident in the landing.
The Takeoff
We correct for crosswinds on takeoff with a combination of rudder and aileron. The rudder is used to keep the nose pointed down the runway. Aileron is used to keep the crosswind from raising the upwind wing. These are real world concepts so be aware that they may or may not apply to your sim. For example, aileron input may result in a turn as if you were turning a steering wheel. If so, the “aileron into the wind” technique will be inappropriate!

Here’s the crosswind takeoff technique. Smoothly add power as you bring your heading control crosscheck items into your scan…keep the “ball’ centered with rudder and look for any visual indication that you are not going straight. If appropriate, add aileron into the direction that the wind is coming from. If uncorrected, you can expect the crosswind to drift you to the downwind side of the runway, cause your plane to “weathervane” into the wind (you will see this as yaw), and possibly cause the upwind wing to rise.
As you gain speed, you may anticipate having to lessen the amount of rudder and aileron correction that you initially put in. This is because your flight controls will gain effectiveness as speed increases. Do not take all of the control input out, however until you are airborne. Once in the air, you can smoothly return the aileron to neutral. You may have to maintain your rudder input after takeoff or trim it out. Check the ball for this.
The Landing
The crosswind landing is more difficult than the crosswind takeoff. This is because of the differences in maintaining a desired ground track while in the air versus while rolling down the runway. The role that the rudder plays in this is important.
The first thing to remember is that the plane does not “know” there is a crosswind. And the pilot only does when he notices that he is not maintaining the track across the ground that is desired…in this case a track that is centered on the runway. The wind is attempting to blow the plane off to the side. This is called drift. The pilot has to make a control correction to offset this drift.
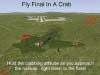
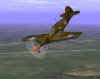
There are two ways of doing this. One is called the “wing low” method, and the other is called the “crab”. Only the wing low method involves the rudder. A brief mention of the crabbing technique is in order. In a crab, the pilot turns into the wind until he establishes a wings level heading that produces the desired ground track…in this case, a ground track that is aligned with the runway centerline. Of course, the nose will not be pointed down the runway in a crab as the next figure shows:


The other method of maintaining a ground track in a crosswind is the “wing low” method. The wing low technique is a slip…a maneuver where the rudder and aileron are applied opposite each other. The concept of the wing low method is this: the pilot rolls into a shallow bank into the wind. This will produce a turn into the wind and a corresponding change of heading. The pilot does not want a change in heading, so he applies opposite rudder to yaw the nose back away from the wind. This yawing when done correctly stops the turning tendency and allows the aircraft to fly straight. Sounds simple enough in concept, but the maneuver is more complicated in execution.
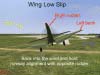
The wing low technique is an example of “cross-controlling”, a situation where the normal application of controls are reversed for a specific reason. Cross-controlling is a juggling act where the pilot has to determine how much bank will be needed based upon the crosswind velocity and offset that with the right amount of rudder that will be needed to keep his nose straight.
The usual application of these two techniques is to use them in a “step one – step two” combination. The crab is used to line up with the runway and to “kill the drift” (offset the crosswind). The pilot slows to approach speed and configures for landing. Plan to fly slightly faster than normal…5-10 knots/mph is usually sufficient. Descend until on the proper glide path and then bank into the wind to stop any sideways drift. Now hold this heading and fly down the glide path. Maintain this crab until you are ready to enter the “flare” or roundout for landing.
Now things get dicey! You should be aligned with the runway centerline with your nose pointed upwind. While some aircraft can land in a crab, most do not, and usually this is because of the extra impact sideloads on the landing gear at touchdown (many gear designs are not meant to absorb such off-center loads). So how do you correct for this?
The answer is that you must transition to a wing low attitude prior to touching down. This means aligning the aircraft heading with the runway centerline. But wait! If you do, won’t the crosswind blow you sideways? Not if you quickly get into your wing low attitude…and position your controls properly! The trick is to go from the first to the second without losing your centerline orientation.
One way to get a leg up on this is to fly your crab to the upwind side of the runway, not the centerline. This technique gives you a little cushion for your transition to the wing low attitude. Now, fly your crab right down to the runway. Don’t be in a rush to get into the wing low attitude too soon!
As you approach the touchdown, smoothly rudder the nose away from the wind to align your nose with the runway centerline. Simultaneously roll into a shallow bank into the wind. The bank will kill the sideways drift while the rudder will maintain your ground track down the runway. If you are drifting downwind, increase the bank and add a little rudder to offset the bank increase. Conversely, if the bank is taking you towards the wind, shallow out the bank slightly and take out a little rudder at the same time.

Plan to touchdown in this attitude. At touchdown, let the aircraft settle onto its gear by releasing backpressure on your flightstick, but do not takeout the rudder or aileron!! Maintain your cross-control input and track down the runway. You may neutralize the rudder and aileron only when slowed to a taxi speed.
Here are the steps to a crosswind landing using a combination of crab and wing low techniques:
- Configure early and slow to final approach airspeed plus 5-10 knots/mph.
- Climb or descend until you are on the correct glide slope angle. Do this early as well.
- Continue on the glide slope and bank gently into the wind, then return to wings level. Check your runway ground track. Continue banking and returning to wings level until you have attained a crab angle that will hold the runway centerline.
- Fly in the crab down the glide slope until you reach the flare altitude.
- Then, smoothly add opposite rudder to align your nose with the runway centerline and bank into the wind. Vary your bank and rudder input to hold your centerline track.
- Touchdown in the wing low attitude. Allow the plane to settle onto the gear as you maintain your cross controls. Hold this until reaching taxi speed.
The point of emphasis here is the use of rudder to hold your runway alignment in both the takeoff and landing. Crosswind landings are a challenge but are also great fun! If your sim allows, crank the winds up and let ‘er rip!
Maintaining Directional Stability.
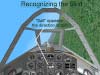
Finally, we need to touch upon directional stability, or to put it a different way, making sure the pointy end stays pointing forward! This is an issue that will apply to the newer sims, particularly the prop sims. What we are interested in is making sure we are flying in coordinated flight and not in a skid or slip. How do we know this? Check the “skid or slip-meter”…better known as the “ball”! If the ball is not centered, you have two options. Either use a little rudder pressure to move ball into the middle…or trim the ball until it is centered. We’ll leave the trim until Part Three of this series, so what do we do with the rudder? “Step on the ball” is the time-tested technique. If the ball is right of center, “step on the ball” by using a little right rudder to move it back left. If the sim is modeled realistically, you may find yourself checking the ball frequently and making corrections as needed.


Why is directional stability important? Two reasons….drag and weapons delivery. When you fly in a skid (rudder not centered when in wings level flight or pro-rudder applied during a turn) or in a slip (opposite rudder applied during a turn), you create extra drag…drag that can bleed speed and burn extra gas. Not good technique! Also, when the ball is not centered, your weapons aiming symbol on your gunsight is lying to you. You think you are pointed in one direction, while your actual weapons impact point is elsewhere. This is true both A2A and A2G. As a rule, your weapons will impact opposite your rudder error, so if you are yawed right and don’t notice it, your bomb or bullets will hit left of where you aimed. Always! Keep the ball centered!
One last point. Why did I underline the word “during” in the paragraph above? Because the rudder is used to roll into and out of a turn. Not during a turn! Do not use rudder in a turn. In general, rudder will not improve turn performance…it will not make you turn faster or tighter! Rudder is used to coordinate a turn, not make a turn! Jeepers! Did I say that strongly enough!
Countering Adverse Yaw
If your memory is as short as mine, adverse yaw is the effect caused by aileron drag when rolling into or out of a turn. The pilot sees adverse yaw as a swing of the nose opposite the direction of roll. Adverse yaw is often accentuated by slow speeds, and is similarly less pronounced at high speed.
Pilot correction for adverse yaw is simple in concept but difficult in execution. A rudder input in the direction of the roll that is made simultaneously with the aileron input is usually all that is needed to eliminate adverse yaw. The difficulty lies in determining the magnitude of the input. As a rule, more rudder is needed at slow speed than at high speed.
Is the rudder correction for adverse yaw necessary? Yes and no. Let’s take the “no” first. In our sims, adverse yaw effect is rarely modeled, and when it is, the effect is minor. In fact, you are just as likely to over control by adding too much rudder as you are likely to get it right…and the result of over correction is a slight skid…something which you will probably be blissfully unaware of! Why? Because we lack any “seat of the pants” feel when flying our sims. In the real world, particularly in WW2 era aircraft, misuse of rudder produced lateral G loads that the pilot could readily feel.
OK. When, then should we consider using rudder to coordinate turns? Two instances come to mind…and again are only applicable if the sim’s flight model is programmed to duplicate a correct flight envelope. One applies to turning at high angles of attack in modern, high performance, swept wing fighters. Adverse yaw in the F-4 in real life, for example, required the pilot to use the rudder as the primary roll control when at high angles of attack. These times not only included the obvious A2A situations, but also included normal landing pattern maneuvers as well. BFM maneuvers such as high G rolls are either performed using rudder alone or are flown with a combination of aileron and heavy rudder to achieve high rates of roll. The rudder aerodynamic effect actually accelerates the roll and allows a faster roll rate. One exception applies to modern fighters, and that is the instance where the aircraft has a “fly by wire” (FBW) flight control system such as the F-16. In these aircraft, the rudder input is handled by the computer, and the pilot does not have to make an input under typical situations.

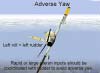
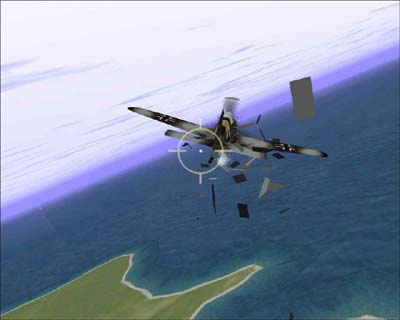
In the next figure, you will see an accurate portrayal of a Barrel Roll maneuver being flown under G. The F-4 had significant adverse yaw problems when using ailerons at high AOA. As a result, the rudder was used to roll the aircraft when at these AOA . Note the right rudder being used to roll opposite the bandit flight path as the F-4 pilot maneuvers into a missile firing position. Few, if any, of our sims model this type of rudder response…yet it is typical of modern fighters.
The second instance in which you may expect to need rudder in countering adverse yaw is when rolling at slow speeds. This may occur in slow speed BFM, or it may occur in the traffic pattern. In either case, be prepared to add rudder if it appears that your aircraft is initially slow to respond to the turn. In any sim, when rolling into or out of a bank, check the ball! If the ball remains centered, the sim is ignoring or correcting for adverse yaw. Don’t worry about it! But, if the ball is not centered, then “step on the ball”…apply rudder in the direction of bank until the ball is centered.
Remember…rudder is only used to coordinate the turn, not to turn! This means use rudder when changing your bank angle. Once your bank angle is set for the turn, you may return the rudder to neutral in most cases. Engine effect may be a player in some sims. Check the ball and step on it to fly coordinated!
Related Posts:
Related posts:
 Secondary Flight Controls – Part Three: Trim Page 4
Secondary Flight Controls – Part Three: Trim Page 6
Secondary Flight Controls – Part Three: Trim Page 4
Secondary Flight Controls – Part Three: Trim Page 6
 Secondary Flight Controls – Rudder, Flaps, and Trim
 Page 2
Secondary Flight Controls – Rudder, Flaps, and Trim Page 3
Secondary Flight Controls – Rudder, Flaps, and Trim Page 4
Secondary Flight Controls – Rudder, Flaps, and Trim Page 6
Secondary Flight Controls – Rudder, Flaps, and Trim Page 7
Secondary Flight Controls – Rudder, Flaps, and Trim
Secondary Flight Controls – Rudder, Flaps, and Trim Page 2
Secondary Flight Controls – Rudder, Flaps, and Trim Page 3
Secondary Flight Controls – Rudder, Flaps, and Trim Page 4
Secondary Flight Controls – Rudder, Flaps, and Trim Page 6
Secondary Flight Controls – Rudder, Flaps, and Trim Page 7