Section Two – View Objectives Based On 3/9 Line Position
Now we move on to what we are trying to do when using these views. The basic maneuver in a scissors is the reversal, and it comes two forms. I call these the “initial” reversal objective and the “follow-on” reversal objective. In the initial reversal, what are we trying to do first? Gain control of the bandit’s 3/9 line. Once we are “in” the scissors, what are we trying to do? Win the minimum forward velocity contest. Now, I realize these two distinctions can get pretty narrow, but, as far as view use goes, let’s think of view objectives in this manner.
The Initial Reversal – Control the 3/9 Line. “Controlling the 3/9 line” means reversing so that we end up behind the bandit’s wingline. To do this, we have to win the turn radius contest as both we and the bandit turn hard into each other. Your decision is what kind of reversal to make…an unloaded or loaded reversal. To answer this question, we first consider the objective. Then we look at how we get there.
Where We Want To End Up. This is the objective. Getting our flight path behind the bandit’s wingline. To do this, we must know what that looks like. In simple language, it looks like lag pursuit. It means your gunsight pipper is pointed behind the bandit. When your reversal ends, this is what you want to see:
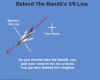
How Do We Get There? We start with the bandit’s overshoot…his angle and rate will determine how we reverse. You must know where you expect the bandit to end up…in this case, outside your original turn and approximately level with your turning plane. It is of supreme importance that we keep in mind where we want to end up…pointing in lag.
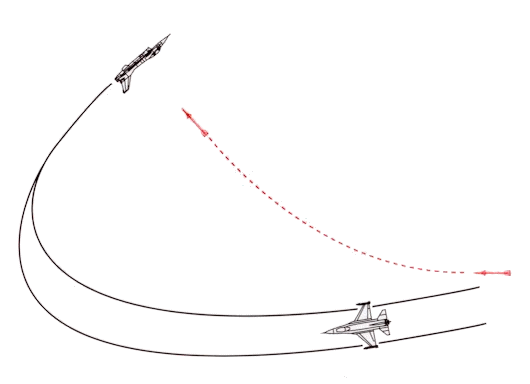
Here’s an external view of the situation:

For unloaded reversals, begin with a quick view change to the forward view. This allows you to use the view as a basis for rolling your lift vector to the anticipated position of the bandit. Unload your g, then roll hard to the right, using the horizon line and expected bandit position to orient your initial roll out point.
For a loaded reversal, you will do the same mental projection of the roll out point. But now, since your roll is going to be a loaded, high AOA roll, your roll axis is not going to be straight ahead…so there is no need to cycle through the forward view. Instead, you bypass the forward view and switch immediately to the opposite side beam/rear side view as you blend in your backstick and rudder to roll your plane around to the roll out point. In this roll out, try to roll out with your lift vector above the bandit’s flight path. This will accentuate your control of your forward velocity vector.
These last two examples assumed a snap view use…if you are using the padlock, the end result is the same…you just don’t have to cycle the views…the padlock does that for you!
How About A Lead Turn? Could you improve your initial reversal by using a lead turn as the bandit approaches your extended six? Possibly…it all depends on crossing angle and speed. My advice is to be really, really, really careful about attempting a lead turn on the initial reversal. If you misjudge this, you will be committing hara-kiri! You’ll fly right into his guns! If in any doubt, wait until the bandit actually overshoots and then perform your reversal.
Follow-On Reversals – Minimize Forward Velocity.Once you are established in the scissors, your reversals will occur with the bandit tending to be in your front quarter…ahead of your 3/9 line. You and the bandit will be “scissoring” with each other. You will both have the same objective…you want to “flush” the bandit out front.
This is where the scissors becomes a “who can fly the slowest?” contest. Our point now is to show that “slowest” in this context is not only a measure of airspeed. It is also a measure of flight path velocity. Your airspeed is what you read on your airspeed indicator…your flight path velocity is your forward vector relative to the bandit’s flight path.
Where We Want To End Up. We want to end up with our gun pointed at the bandit! In-plane, in range, and fuselages aligned. The problem is that we and the bandit are weaving back and forth…not exactly a picture of fuselage alignment. Being in-plane and in range are not significant problems to solve…but how do we deal with this fuselage alignment thing?
We do it by timing our reversals so that we reduce our angle off as we keep ourselves behind the bandit’s wingline. Sounds good…but how is this done?
How Do We Get There? The problem is two-fold. One, staying behind the bandit’s wingline. This is where the scissors becomes a “slow speed contest”. Two, we have to find a way to solve the angle off problem.
Winning the wingline contest is going to require you to do two things. Get your lift vector behind the bandit’s six and fly at minimum maneuvering speed. Let’s put ourselves into our cockpit and visualize the situation. The bandit is in our front quarter…we are pulling towards each other. We want to fly to his six. Here is how. Slow to minimum maneuvering speed. Lower flaps if appropriate. Then roll to point your lift vector at the bandit’s high six…behind and “above” his extended six. Then pull your nose to this point.

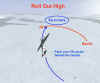
How About a Lead Turn? Now you have half of the problem solved. Next, you want to minimize angle off. Do this by looking for a lead turn opportunity prior to passing the bandit’s 3/9 line.
How do you know when to begin the lead turn? As a rule, the point to begin the lead turn is when you are in the “lead point window”. This is an area that is defined as the space in the bandit’s front quarter from 45 degrees off his nose to 60 degrees off his nose. It looks like this:

When do you use the 45 degree lead point versus the 60-degree point? Treat this as function of lateral separation from the bandit. If you are going to pass close to the bandit, then wait until you reach the 60-degree point. If you distance is wider, then consider turning sooner, at the 45-degree point. This is really a turn radius issue…that’s why the use of the lateral spacing technique. Here are two more views of the lead turn window, one an external view over your nose, and the other an internal forward quarter view.


Section Three – Specific Techniques
In this section, we’ll talk about flight control inputs and weapons employment. By now, you should have a good idea of how to use your views…now let’s discuss the mechanics of the scissors. We’ll continue to use the Flat Scissors as our focus.
Throttle Technique. Here’s a general rule to follow: when pulling g, use power. When not pulling g, throttle back. Why this generalization?
Because of the “slow speed contest” nature of the scissors. You want to minimize anything that tends to increase your forward velocity relative to the bandit. When turning, you want just enough speed to fly a small radius turn…and no more. When unloading, you do not want to accelerate.
Remember the concept of lift vector to bandit flight path. In the scissors, we want our lift vector to point away from the bandit’s flight path. This will minimize our velocity relative to the bandit. As long as you keep your lift vector oriented to the bandit’s high six, you may add power without unduly increasing your forward vector.
Practice flying your aircraft at slow speeds. Develop a feel for the sim’s modeling of buffet and other stall warnings. Armed with this knowledge, let’s run through a typical scissors.
You are in a hard break. Your throttle is at full power. The bandit overshoots. You decide to reverse into a scissors. What you do with the throttle depends on two things…your speed at the beginning of your reversal, and the type of reversal you are going to make.
Entry Speed. At what speed do you get your maximum turn rate? Corner velocity! At what speed do you get your minimum turn radius? Mmm…depends on aircraft type! More often than not, your minimum turn radius speed will be a little slower than corner velocity. Let’s simplify things and just go with corner velocity! It’ll be “close enough”. Find out what your corner velocity is for your aircraft. For WW2 fighters, it will vary between about 180mph to nearly 300mph, depending on aircraft type, weight, and altitude. For jets, use about 300KIAS to 400KIAS.
Entry Speed Versus Reversal Type. As the bandit overshoots, decide what kind of reversal you are going to fly…unloaded or loaded (high g). For an unloaded reversal, if your speed is above corner, immediately throttle back as you unload and roll. Then, as you point your lift vector behind the bandit and begin pulling towards him, check your speed again. Add power to stabilize it at corner. If your speed was below corner to begin with, consider unloading and rolling with the throttle left at full power. This will accelerate you towards corner speed. Then, vary the throttle to hold that speed as you pull towards the bandit.
For a loaded reversal, you will most likely need all the power you can get. Unless you are well above corner velocity, consider leaving the throttle at full power as you initiate the loaded roll. Because of the high energy bleed of this maneuver, you will need full power by the time you are half way through it. Roll towards the bandit and keep both your g and throttle on as you point behind him. Once you have your nose where you want it, you may reduce the throttle to keep from accelerating.
In subsequent reversals, use the technique of throttling back when unloaded and throttling up when adding g. Think of the throttle and stick as moving opposite to each other! Stick back…throttle forward…and vice versa!
Flap Technique. Here is where the real world and our sim world sometimes go their separate ways! Not all sims model flap effect. If your sim does not change its flight model when you lower flaps, then there is not much point in using them!
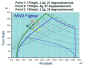
Flaps are used to lower stall speed. If flaps are modeled correctly, then you can expect to see a slight decrease in turn radius along with this lowering of stall speed. You will also have to consider the maximum flap employment speeds of your sim. Do not lower flaps above corner velocity…you gain nothing but drag in doing so. If below corner, you may lower the first “notch” of flaps as the max flap lowering speed is typically above corner. In the next diagram, we begin at Point 1…a 3 g turn with no flaps. If we extend flaps, the stall line (the green curve) moves left showing how flaps decrease stall speed. Points 2 and 3 show the performance gain if airspeed is held constant (point 2) or g is held constant (point 3). This diagram is strictly an academic example and may not represent actual real world or sim flight performance.
If your sim models flap effect on stall speed, then consider putting flaps out as you enter the first reversal, speed permitting. Then, as the scissors develops, you may lower additional flaps to control your stall speed. As a rule, do not use full (landing) flaps…typically full flaps do not significantly lower stall speed and only add a bunch of drag. You may not have enough power to maneuver with if you use full flaps.
Gun Employment. Let’s not forget why we are in the scissors! We want to shoot the bandit, not put on an airshow for him! That raises the question of snapshooting in the reversal. If you get a chance at a snapshot while scissoring, should you pass it up to continue to maneuver for a lower angle off shot?
First of all, when would you get a chance at this? As you and the bandit approach each other in the front quarter. Pardon my lousy artwork, but the picture is attempting to show the forward view of a gunsight!

You will find yourself in one of three positions. You will either be inside the bandit’s turn…outside his turn…or matching his turn.
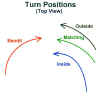
Only one of these is good. The one where you are on the inside. Only here will the bandit fly through your gun line. If you are on the outside, it’s you that is likely going to get fired at. In the case of matching turns, neither you or the bandit will get a shot, because if you try for one, you’ll probably end up mid-airing the other guy!
So, let’s look at the good case. You are turning inside the bandit. Should you take a shot? The answer is a conditional yes. If you are flying in or close to the bandit’s plane of motion, then taking a snapshot is advisable. If you are not close to the bandit’s plane of motion, you probably won’t have the time to make the needed correction to get in-plane, so my advice is to concentrate on making a good lead turn and forego the snapshot.

One last word about what to do if you are on the outside of this situation. Now the bandit has a snapshot opportunity on you if you let him. DO NOT fly in-plane with the bandit when he has the inside position. You will get shot! If you come out of your reversal and see the bandit to the inside, make an immediate bank change as you pull towards him to move out of his plane of motion.
Related Posts:
Related posts:
 Air Combat Basics: The Scissors Maneuver
 Page 2
Air Combat Basics: The Scissors Maneuver Page 4
Air Combat Basics: The Scissors Maneuver
Air Combat Basics: The Scissors Maneuver Page 2
Air Combat Basics: The Scissors Maneuver Page 4
 Air To Ground Basics – Bombing Page 7
 Air To Ground Basics – Bombing, Part Two Page 7
 Secondary Flight Controls – Flaps Page 3
 The Falcon 3.0 Manual Tactics Section – Introduction to Defensive BFM
 The Falcon 3.0 Manual Tactics Section – Introduction to the Geometry of Air Combat