Loss Of Sight Techniques
The first thing to do is “fess up”! Don’t continue to fly around hoping that luck will come you way eventually. Make the call, “Red Flight, Two’s blind”. Unless the leader has the flight member in sight, he should immediately get everyone on the same heading and speed, “Red Flight, turn 360, 200 knots”. This keeps everyone in the same general piece of sky. Then each pilot can use his snap or pan views to search for the wingman.
Let’s now have the leader get the wingman in sight. How does he get him back into formation? If the lost wingman is close enough so that the leader can recognize aircraft features, he can tell the wingman which view to use to regain sight…such as, “Red Two, check your left 7, two miles, level”. The wingman would then know to use his left rear quarter view to look for the leader.
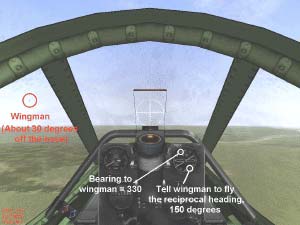
If the wingman is too far off to make out aircraft details (all the lead sees is a dot), then the lead needs to provide steering directions to bring the wingman back into sight. The leader should use his heading indicator to compute the heading for the wingman to fly. The leader estimates the wingman’s bearing (let’s say 330 degrees) and then tells the wingman to fly the reciprocal of that bearing …”Red Two, fly 150″. That should bring the errant wingman back into the fold in short order!
So far, we’ve talked about getting into position and staying in position. Now, let’s move on to what we are going to do once in position! We begin with lookout techniques.
Lookout Techniques
A good lookout is a function of three things…knowing where to look, knowing when to look, and knowing how to look. We can call this “lookout doctrine”. As before, please go to the BnZ article for info…but here are the basics.
Where To Look
We begin by saying that the leader’s primary responsibility is to navigate and plan the attack. The wingman/element’s responsibility is to clear the formation of threats. We assume that we are in Line formation. The following is a simplified version of the BnZ article.
The leader’s first responsibility is to clear the flight’s 12 o’clock…then he must clear the wingman/element’s six…lastly, he looks to the outside of the formation.
The wingman/element’s first responsibility is to clear the leader’s six…then clear the 12 o’clock area…and last, clear the outside of the formation.

When To Look
What I’m talking about here is the manner in which the flight member implements the “where to look” concept. There will be times when the flight can be comfortable with knowing the approximate location of the enemy. This translates into prioritizing the amount of time that the flight member takes in checking his three areas of lookout. Enemy position will dictate how much time the flight member will devote to a specific area. For example, if the flight suspects that the enemy is in their six, then both flight members will accentuate their six o’clock cross-coverage.
How To Look
There are a variety of ways a sim can let us look around. This article will not attempt to say which way is best. Those ways include snap views, pan views, padlock views, and external views.
Snap or pan views are probably most common. The flight member should use the three step technique above to orient his view into the applicable area. Each of the three areas should be considered to have three sub-areas…level, high, and low. Search in that order…level, high, and then low. When looking into an area, look for relative movement of the target against the background. Of course, if icons are used, then the process is much easier!!

Padlock could be used for searching for a target if the sim includes such a feature. Some may find this feature lacking in realism.
Lastly, the external view can be used to good advantage, particularly if it can be panned using the keyboard or mouse. As with the snap/pan views, look for relative movement.

When we fly, we can use three parts of our body…hands, eyes, and mouth! We’ve used our hands to get into position and our eyes to provide good lookout. Now it’s time to add a little spice to the brew…that spice is communication!
Communication Techniques
Let’s begin by reading the “Brevity Code” article in the Air Combat Corner. This article contains the types of radio calls, their format, and a glossary of terms to use. Real world pilots use these techniques to minimize transmissions and reduce confusion. You can do the same with your sim. Flight leaders! Have all of your pilots read and understand this article. There is a lot of info and terminology in the article and glossary. Feel free to use only the info that you think is appropriate.
One technique that pays big rewards is to remember to use the “right/left” direction words in your bogey call. This helps cue your flight member’s eyes immediately to the correct area of sky, as in “Red Flight, bogey, left, 10 o’clock, level”. Include range info if available.
Next, go to the end of the Part Four to the BnZ article and read about how radio calls are used in typical formation tactics. You will find that these calls do several things…communicate intent, assign flight path deconfliction responsibilities, and provide a means of changing attack roles.
These two articles may well be somewhat challenging. You might find yourself asking if all this is necessary. Well…it is, unfortunately…unless you just want to go out and thrash around willy-nilly! These techniques have been tested in combat over the years…there is simply no other way to implement multi-plane operations without effective communications. You may abbreviate this material if you want, but you will not be able to eliminate it.
A read of these articles also makes one thing pretty obvious…the keyboard is a lousy way to communicate! Use one of the communication programs such as Roger Wilco whenever possible to take advantage of real time directive and descriptive calls.
At this point, we have nearly everything that we need to sally forth into the arena… formation tips and techniques, a communication doctrine, a technique for lookout…the only thing missing is how do we fly the dang thing??!!
Basic Offensive and Defensive Concepts
We begin with the idea that the two-ship is the formation around which everything else is built…a four-ship, for example, is really nothing but two two-ships acting in concert. Every now and then, someone will propose a three-ship option. I suggest the three-ship should be left as a fall back option in the event that one flight member in a four ship should fall out. We have already described the line and wedge positions for a two-ship. You can use a similar arrangement when putting together a four-ship. Line is good for a mission such as fighter sweep where the enemy is known to be in a given area. Wedge is a good choice when you expect to need to maneuver…such as in a road reconnaissance mission. In wedge, the element leader is free to maneuver within a + or – 60 degree cone of the leader’s tail. Box is a trail formation useful for ground attack missions. In any of these four-ship formations, please note that the #2 and #4 wingmen are on opposite sides of the formation…this allows them maximum cross coverage of the four-ship’s six o’clock.
What about four-ship spacing? Try this. Have your element fly at double the distance between you and your wingman. With that separation, the element leader will have a little maneuvering room to play with without having to be concerned about conflicting with the first element. Again, for ease of view operation, I’ll have the four-ship all at the same altitude. With experience, you can experiment with altitude splits.

There are various theories regarding tactical employment…among them are concepts such as Double Attack, Loose Deuce, and Fluid Two. These tend to be somewhat similar, the major difference being in the amount of autonomous control the wingman/element has over its role in the engagement. Loose Deuce is the least structured of these formations with Double Attack possibly being the most restrictive on the wingman. In any case, the overall objective is for the two flight members to fly their own best offensive or defensive BFM to counter the bandit(s). This is not a small distinction. In any of these formations, the idea of the wingman/element being “welded” to the leader is considered null and void. He wingman/element MUST maneuver to gain an offensive position or deny the bandit the opportunity to gain an advantage. Past formations such as Finger Four tend to restrict autonomous wingman/element activity and are considered outdated today.
When you read the BnZ article, pay particular attention to the concept of the Engaged/Supporting Fighter Contract. While it at first appears somewhat academic, it, in fact, is the foundation for all tactical maneuvering. The flight leader and the wingman/element must clearly understand what their mutual responsibilities are in the context of the type of tactical formation they have chosen to fly. Remember, Double Attack is not the same as Loose Deuce when it comes to flight member responsibilities.
Offensive Concepts
See the BnZ article for diagrams, screenshots, and text that describe in detail typical offensive moves and the attendant radio calls that go along with these moves. As a sim pilot, your major problem is this. You must use your views in a manner that allows you to maneuver relative to the bandit while maintaining an awareness of the other flight member’s position. This will not be easy, and there is no best answer. Remember, you have three types of views…fixed views such as the snap or pan views, padlock views, and external views. These will have to be used in combination to maintain the needed SA on the engagement as it unfolds.
There is one other factor that needs to be stressed and re-stressed…and that is the concept of split-plane maneuvering. Both the Engaged Fighter and the Supporting Fighter must fly their own best BFM to counter the bandit(s)…this invariably will require maneuvering out of the plane of motion of the bandit)s). Pure pursuit maneuvering is no way to fly tactical formations. Flight leaders…ensure your flight members understand this cold. Concepts such as turning room, counterflow, belly entries, and the radio calls to set up such maneuvers are the bread and butter of air combat tactics.
Defensive Concepts
Again, we begin in Line formation. The most basic defensive response to an attack from the rear quarter is the in-plane break with a follow-up sandwich. Unlike offensive tactical concepts where split-plane maneuvering is emphasized, defensive concepts often tend to consist of in-plane, pure pursuit maneuvering. Why? Because pure pursuit…putting the lift vector on the attacker and pulling hard…is the quickest way to gain a firing position. The Supporting Fighter has but one job when on defense…kill the bandit in the shortest possible time. In most situations, the best way to do that is to maneuver in the attacker’s plane of motion assuming that sufficient turning room exists.
Maneuvering against an attacker in the rear quarter involves three types of turns…kick turns, hard turns, and break turns. Use a kick turn to maintain a tally on a distant bandit while you attempt a separation. A typical check turn radio call might be something like, “Red Flight, check 30 right, bandit, five o’clock, three miles.” Perform a kick turn by rolling into a steep bank. Then apply full power and use 3-5 Gs to turn the desired amount…usually 30 degrees is sufficient to maintain a tally on the attacker. Do not use the heading indicator for this turn…instead, prior to banking your plane, look to your 1 o’clock or 11 o’clock (30 degrees off your nose) for a visual reference, and then use it to pull your nose to in the turn. Once the kick turn is complete, the wingman/Supporting Fighter is responsible for getting back into formation since the leader or Engaged Fighter will most likely be padlocked on the bandit.

Use a hard turn on a long range bandit when attempting to take away his turning room or when attempting to increase aspect angle as much as possible…a good example of a hard turn is the Cross Turn. In the hard turn, use full power and 3-5 Gs to turn rapidly without losing excessive energy. Gs will vary with weight, altitude, and aircraft type.

In the Cross Turn, both fighters execute a 180 degree hard turn into each other. The leader commands this with a directive/then descriptive call such as, “Red Flight, cross turn now. Bandit, six o’clock, level, two miles”. After rolling out and with the bandit now in their front quarter, the flight leader can assess what the next move should be. The cross turn is flown similar to the hard turn.
Sometimes, despite your best lookout, the wily bandit will sneak into your chili. At times like these, all bets are off. The fighter under attack (or perceived to be under attack) must break or be ordered to break to prevent its possible loss. The Engaged Fighter in this situation has only one responsibility…survive. The Supporting Fighter’s job is to kill the bandit. Either fighter initiates the break by making a directive call followed immediately by a descriptive call, “Red Flight, break right. Bandit, five o’clock, 3000’, low.” A break turn is a maximum performance turn flown at max G without concern for airspeed loss. Whenever possible, break out of the plane of the attacker…preferably “down” to use gravity to help maintain energy. The supporting wingman will attempt to sandwich the attacker.
What if there are multiple bandits? While it is not practical to try and script such a situation, here is one approach. Use a defensive split to force the bandits to commit one way or the other. A cross turn is one maneuver that may produce results. Other options include any combination of hard turns and short extensions that provide initial flight path separation between the two friendly fighters. Once the separation is obtained, the two fighters should turn hard towards each other. At this point, the two fighters should attempt to force one or more of the attackers to reposition.

How would you handle this situation with our viewing system? By using a combination of snap views to monitor bandit and wingman position. Another technique might be to padlock your bandit and then use snap views to keep track of the other flight member. But remember, your primary responsibility is to defend yourself. Maneuvering in concert with your wingman is going to be a luxury…if you can do it while keeping your bandit at arm’s length, then fine…but never sacrifice your own best defensive move in an attempt to pull off a “Gee Whiz” sandwich!
Well, folks…that pretty much covers the basics. I hope this has been of some help to you. Good luck out there!
Related Posts:
Related posts:
 Hog Basics: RAF Bentwaters Tactics Guide, 1982 Page 3
Hog Basics: RAF Bentwaters Tactics Guide, 1982 Page 7
Hog Basics: RAF Bentwaters Tactics Guide, 1982 Page 3
Hog Basics: RAF Bentwaters Tactics Guide, 1982 Page 7
 One Day In The War – Wolf 20, Part Three Page 3
 Tactical Briefing 03: Squad and Fire Team Movements Page 2
 Tactical Briefing 05: How to Plan and Execute a Squad Sized Assault Page 4
 Tactics 101 – Introduction and Lag Pursuit
 Tactics 101 – Pure and Lead Pursuit
 Tips for online Tactical Formation Flying