Feature by Andy Bush
Introduction
This article is intended to amplify the material in the fourth article in the “Boom and Zoom (BnZ)” series as well as the article “Brevity Code” in SimHQ’s Air Combat Corner. Please read these articles before you begin this one. Much of the material in these articles bear directly on this new article, and I do not want to duplicate the material.
The purpose of this article is to provide additional info that can help online simmers effectively fight in a multi-plane environment. A recent SimHQ forum question revealed that more tips and techniques were needed in this area…so here goes!!
Overview
Here’s the problem. You and your buddy are hooking up for some online action…but you are not too sure how to effectively fly and communicate. You do OK in a 1v1, but when it comes to maneuvering as a two-ship or more, you feel at a loss. A number of questions come to mind as you get ready for your next mission…here they are:
First of all, what formation do we fly in? Is there a “one size fits all” answer…or should we tailor the formation to meet specific needs?
Choosing a formation is nice…but how do we fly the sim in order to remain in position? What are the simulation limitations that we have to deal with?
NOTE: this article was written with WW2 era sims in mind. The suggested formation spacing numbers are for this era. If you want to apply these techniques to jet age sims, I suggest you multiply the recommended numbers by a factor of six…for example, if the suggested WW2 line abreast spacing is 1000 feet, use 6000 feet when flying a jet sim.
Staying in position is obviously important…but so is looking out for the enemy. What tips and techniques are there to help us improve our situational awareness (SA)?
Once we learn how to determine our formation position, how do we maneuver? What techniques can the leader use to help keep the wingman in the proper position?
Staying in position is only half the battle. We must also be able to communicate between ourselves. What communication aids and techniques are available to help out?
Lastly, what are some of the basic offensive and defensive maneuvers that we can use to successfully meet the enemy?
OK…let’s get to the meat of this subject…we’ll begin with what kind of formation you might want to choose. But before I go any further, let me throw in a disclaimer. I’m going to talk in general terms for our sim audience. Not everything I suggest may meet the “real world” rules of today’s air combat environment…not to worry. We’re not flying for real. We’re flying for fun. That’s what I want to address…your fun.
Formation Types
We’ll begin by saying that there are two basic formation types…one where the wingman/element is line abreast…and one where the wingman/element is angled back. Lets define that. Line abreast means that the wingman/element is on the leader’s 3/9 line. Let’s call this “Line“. Is the “3/9 line” absolute? No…the wingman/element might be forward of the 3/9 line slightly (about 15 degrees max), and be allowed to fall behind the 3/9 line to about 20 degrees…but the wingman/element should strive for the 3/9 line as much as possible. Note: in this article. I use the term “wingman” to mean the #2 position…and the term “element” to mean the #3 and #4 positions when applicable.
The other option is having the wingman/element angled back from the leader by some number of degrees. We’ll call this “Wedge“. How far back? 30-60 degrees, with 45 degrees as being the typical position.
We can make some generalizations about these two formations. Line is best suited for minimum maneuvering situations, and, in Line, defensive lookout is maximized. Wedge is a more maneuverable formation but sacrifices lookout for this maneuverability. Think of Line as a “patrol” type of formation with good offensive and defensive lookout…and Wedge as essentially an “ingress” formation that is optimized for maneuverability when lookout is a secondary consideration.
Wedge is more of a “follow me” type of formation from the leader’s perspective…the lead is free to maneuver…the wingman’s contract is to maneuver behind the leader without the leader having to signal his turns. In Line formation, the leader has more of a responsibility to signal his intent to turn to the wingman/element…we’ll discuss this in more detail later.
Wedge formation is also thought of as a formation best suited for low altitude flying while Line is better suited for higher altitudes. I’ll make the assumption that online flying is oriented towards the higher altitudes…therefore I’ll make Line as the formation of choice for this article…we’ll sacrifice a little maneuverability for better offensive and defensive lookout.
Formation Spacing
All right…we’ve settled on Line as being the formation of choice. The obvious next question is how far do we separate the flight members. What ever feels right? Not hardly! The spacing in Line is actually an important consideration. There are two primary factors in determining this spacing…turn radius at the given altitude and cruise airspeed…and maximum range of the enemy’s weapon, in this case, the gun. Let’s take them one at a time.
Turn Radius. Turn radius is important because it affects how quickly a flight member can bring his nose to bear on an enemy that is attacking the other flight member. For the purpose of this discussion, I’ll assume that the defender is going to turn away from his supporting flight member, and I’ll assume that the attacker is going to follow the defender.
The supporting flight member will want to turn into the attacker and attempt to “sandwich” him. For this sandwich to work, two things must occur. The supporting flight member must remain close enough to the attacker to be able to shoot him, and the supporting flight member must be able to bring his gun to bear in minimum time…any time spent in excess maneuvering on the part of the supporting flight member may result in the defender getting killed!
The supporting flight member will have to turn at least 90 degrees before he can hope to get a shot at the attacker. Assuming relatively equal turn performance, when the supporting flight member completes this 90 degree turn, his distance behind the defender will be approximately equal to his initial Line spacing.
The expectation is that the attacker is somewhere in between the defender and the supporting flight member…but where? This is the key point. If the initial line spacing is too close, then the supporting flight member may roll out too close to the attacker to get a stabilized shot,…and if the spacing was too great, then the supporting flight member will roll out too far back from the attacker to be an immediate threat.

Just for the heck of it, let’s say that the typical turn radius is about 500’. This then defines our minimum Line spacing…500’. But that will be a no-kidding minimum…it might be better to open the spacing up a little to accommodate the sandwich. In this case, we could widen the spacing to about 2000’ max. In this manner, the supporting flight member would end up with a sandwich range of 1000’ +/- 500’.
Maximum Gun Range
What effect does gun range have on formation spacing? Well, for one thing, we are talking about the enemy gun range, not yours. The real issue is not gun range though…it’s really lookout. Specifically lookback angle. In real life, most pilots could comfortably look back to about 30 degrees off their tail. In our sims, the typical rear quarter snap view does the same.
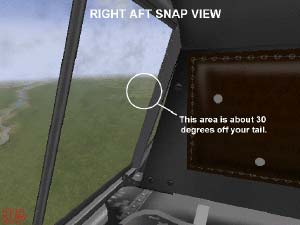
I cover this concept in detail in the BnZ article, so let me abbreviate this discussion and just state that lookback angle and Line spacing determine how far back an attacker can be seen. You want that distance to be greater than the attacker’s maximum weapon range. If we assume that max gun range is about 2000’, then the spacing has to be about 1150’ to allow the attacker to be seen before closing inside the 2000’ max range. If the Line spacing was less than 1000’, then the attacker could nominally get into gun range before being seen…so 1000’ seems a good, average number.

If we now go back to our turn radius example and use 1000’ as the spacing, we end up with the supporting flight member having a decent chance of sandwiching the attacker.
All of which is a long way of saying make your Line spacing a minimum of 500’ and a maximum of about 2000’!!
Vertical Spacing
One last item…should the line formation be “stacked” in the vertical…in other words, should the wingman/element fly at a different altitude than the leader? In the real world…yes. In the sim environment, particularly with relatively new sim pilots, I think not. Why? Because I want to simplify the use of snap views to keep everyone in sight. Having all flight members at the same altitude minimizes the number of snap views needed. More experienced simmers might want to experiment with altitude splits.
OK so far? Good! Now let’s leave the theoretical for a minute and get back to flying! Let’s take our nominal Line position of 1000’ spacing and talk for a while on how we can maintain that position in our sims.
Maintaining Formation Position
For starters, I’ll tell you right up front that tactical formation flying is one heck of a lot tougher in a sim that it is in real life. We need to accept that as a fact…
I know, I know! You want proof!! Why is it a fact? Two reasons…restricted monitor field of view and poor monitor resolution that negatively impacts the sense of closure and the ability to determine exact spacing.
The lack of the “big picture” and the difficulty in recognizing changes in closure and/or spacing make holding your position tough. The need to cycle views to maintain SA means that we are not looking at our wingman for a considerable period of time. The limited resolution offered by our monitors means that changes in closure and spacing will occur before we are aware of them…and these changes will likely go on for longer than is desired before we finally pick up the visual cues on our screen. The typical result is that the deviation gets appreciable before we see it…and then requires a relatively large flight control or power correction. This correction has to be monitored carefully lest we over-correct…the result being too much time spent on position maintenance and not enough time on maintaining a good lookout.
Given these limitations that we can’t do much about…how can we make formation flying a little easier? Here are a couple of ideas.
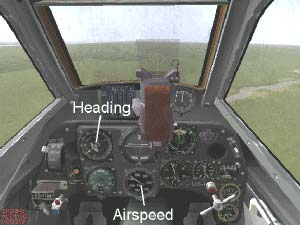
First, let’s look at maintaining position in Line with about 1000’ spacing. The problems are two-fold…maintaining that 1000’ spacing and remaining line abreast. The 1000’ spacing is an aircraft heading issue, and the 3/9 line position is an airspeed issue. Flight leaders! You can help out here by telling your wingman/element your heading and airspeed…as in, “Red Flight, fly 360 and 200 knots”. Sounds corny, but now the wingman/element can easily check their heading and speed to stay even with the leader.
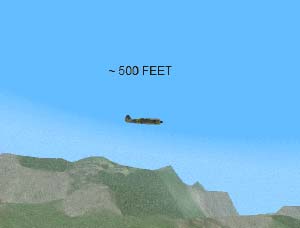
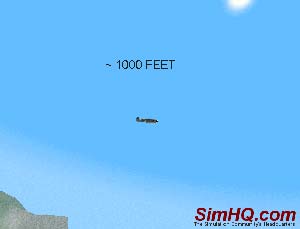
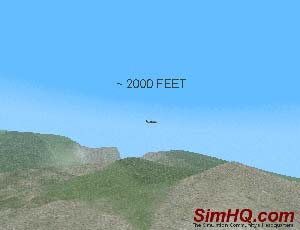
Some folks may have a problem with recognizing what 1000’ spacing looks like. Flight leaders…take a screenshot and have your guys study it beforehand. Understand that the spacing does not have to be exactly 1000’…but the guys should be able to recognize the difference between 1000’ and 500’ or 2000’, for example.
As I mentioned earlier, have everyone fly at the same altitude…it makes using the snap views easier.
Lastly, what if the leader wants to bank a bit to navigate? No problem…as long as the leader does not change his heading when he does this. Here’s a tip. Roll into the bank and then apply opposite rudder to yaw the nose opposite the bank…avoid any back pressure. Once back to wings level, double check the heading and correct if necessary. This cross-controlling may bleed a knot or two, so crosscheck airspeed also.
OK…so much for recognizing and maintaining the proper position…now, what do we do if we get out of position?
Correcting Formation Position
Getting back into position is both the leader’s and the wingman/element’s responsibility. Sometimes, it’s as easy as the wingman adding power to move back into position. Other times, it takes a little more effort.
We begin by stressing that correct formation spacing is mandatory…give it your maximum attention and do not accept sloppy flying on anyone’s part. Getting out of position is no big deal…staying out of position is! Don’t be the Tail End Charlie that gets bagged!
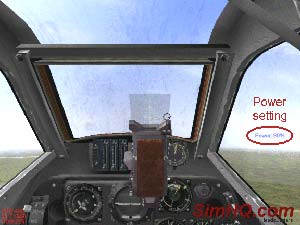
Proper airspeed control is critical to maintaining that 3/9 line. Sometimes the wingmen find that they just can’t seem to stay up with the leader….and this may be because the leader is flying at max power. Solution…leaders, don’t fly at full power! Instead, set your throttle to something less…say 90%…this will give the wingmen/element something to play with.
Now, there will be times when the leader just has to use full power…if the wingman/element drops back, what do we do now? No problem. Instead of using the throttle to adjust spacing, we now use geometry. We use things called check turns, weaves, and shackles.
Check Turns
A check turn is a quick turn made either into or away from the wingman/element. The magnitude of the turn is directly relative to the amount that the formation is out of position in degrees. Let’s say the wingman/element is 15 degrees behind the 3/9 line.
If the leader will make a quick turn into the wingman/element of 15 degrees, this will move them up to the leader’s 3/9 line. The wingman/element must make the check turn at the same time and for the same amount. The leader accomplishes this with a radio command, “Red Flight, check right 15”. Everyone makes a simultaneous quick turn of 15 degrees and then rolls out, checks heading and airspeed as well as new position. Check turns are easy and work well for small (0-30 degrees) errors in position.
But what if the leader does not want to change his heading…or the error is larger than 30 degrees? We then use a weave or a shackle.
Weaves and Shackles
A weave is used by the flight member that is ahead of the 3/9 line…it could be either the leader or the wingman/element. The weave is initiated by the leader’s command, “Red Flight, weave”. The weaver is obviously the person in front. The trailing flight member maintains the original heading and airspeed. The weaver then executes an “S” type of maneuver to get back into position. The weave works well when the 3/9 line error is between 30 and 45 degrees. The weave also corrects spacing errors as well.
The shackle is a little more aggressive and is used when the positional error exceeds 45 degrees or the spacing error is large. The maneuver begins with the leader’s call…”Red Flight, shackle”. The two flight members turn hard into each other and vary their bank angle and back pressure to cross flight paths. The idea is for both flight members to change sides while adjusting both spacing and 3/9 line. Use the shackle as a last resort. It requires a lot of attention and time and may not be suitable with threats close by. Weaves and shackles are moderately aggressive maneuvers flown using steep banks and about 3 Gs to minimize energy loss. Depending on the amount of turning needed, full power may be necessary.

Every now and then, the unthinkable happens! You lose sight of your buddy. Now what??!! Here are some ideas.
Related Posts:
Related posts:
 Hog Basics: RAF Bentwaters Tactics Guide, 1982 Page 3
Hog Basics: RAF Bentwaters Tactics Guide, 1982 Page 7
Hog Basics: RAF Bentwaters Tactics Guide, 1982 Page 3
Hog Basics: RAF Bentwaters Tactics Guide, 1982 Page 7
 IL-2 Series: Fundamentals of Teamwork Page 3
 One Day In The War – Wolf 20, Part Three Page 3
 Tactical Briefing 02: Formations
 Tactical Briefing 03: Squad and Fire Team Movements Page 2
 Tactical Briefing 05: How to Plan and Execute a Squad Sized Assault Page 4
 Tips for online Tactical Formation Flying Page 2