Many features will not show up on the planning map unless you select them to be visible. Right click anywhere on the map and a menu will come up allowing you to select which features you wish to have placed on the map. If you were to place all of the available information on the map at once it would be much too cluttered to be useful. Right clicking on enemy units and selecting RECON will allow you to see specific information about the unit that is useful for planning purposes.
 |
 |
 |
 |
Also take advantage of the RECON imagery to visualize your approach, attack and egress from the target area. Getting a mental picture or even sketching the site on a dry erase board is invaluable for making the most out of your attack and directing your wingmen to strike the appropriate targets.
The horizontal planning is important, but so too is the vertical planning. Coming in low has advantages since SAM sites will be less likely to detect and fire upon you from long distances. Flying low has distinct hazards however such as small arms fire, man-portable SAMs and of course, running into the ground. Fuel consumption is also drastically higher at low altitudes so plan accordingly. You can adjust the altitudes at your waypoints by manually editing the waypoint information boxes or by simply dragging the waypoints on the vertical profile up or down to the desired altitude.
Once your planning is done you can proceed to the aircraft load-out screen to check which weapons you are taking on your mission. You can use the recommended load-out which is already placed on your aircraft, or you can change settings to suit your preferences. I often dump the extra fuel tanks in favor of more ordnance, but care must be taken not to leave fuel behind that you might need later. Leaving external tanks behind is a decision that also means I will not be using much afterburner on this mission. Another thing to consider is that very often missions in F4 are “one pass, haul ass” missions where second strikes are not possible or desirable unless total air supremacy has been established. You can mix and match ordnance for you wingmen also, giving them a load-out different from yours if they are striking a different type of target.
 |
 |
Once you are sure everything is complete, hit the FLY button and the clock starts racing toward your takeoff time. During this process you can select one of three starting options: RAMP, TAXI or TAKEOFF. Depending on which option you select, you will be placed in the cockpit earlier or later so that you have time to accomplish the ramp start or taxi.
As noted in Part I of the review, F4:AF has much denser city scenery in some areas. Following the orders from the tower controller our flight makes its way to the active runway.
 |
 |
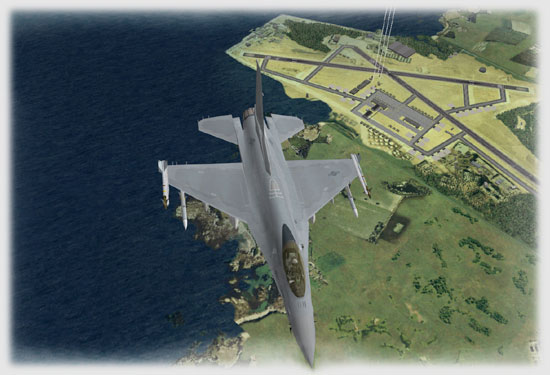
If you don’t have your airport taxiway diagram handy, a good alternative is to use the “Satellite View” (ALT ~) to give you a zoomed out view of the airport. Be careful taxiing across active runways since there may be many more flights other than yours arriving and departing!
Related Posts:
Related posts:
 A New Pilots First Look at Falcon 4.0: Allied Force Page 3
 Falcon 4.0: Allied Force – Part 2 Page 5
 Falcon 4.0: Allied Force Page 7
 Falcon 4.0: Allied Force Part 5 Page 2
 Lead Pursuit’s Falcon 4: Allied Force Page 5
 Tom’s HiTiles for Falcon 4: Allied Force Page 2
Tom’s HiTiles for Falcon 4: Allied Force Page 3
Tom’s HiTiles for Falcon 4: Allied Force Page 4
Tom’s HiTiles for Falcon 4: Allied Force Page 2
Tom’s HiTiles for Falcon 4: Allied Force Page 3
Tom’s HiTiles for Falcon 4: Allied Force Page 4